Microsoft released Windows 11, which includes extensive renovations and a host of new features. With the new rounded corners of the Start menu and widgets, Windows 11 has a whole new look, but it also brings a host of productivity improvements, including Snap Layouts that let you run multiple apps at the same time and Dynamic Refresh Rate to help save battery life extend .
Microsoft has released Windows 11. They guarantee regular functions and security updates through automatic Windows updates. But if you don’t want it, check out this guide 5 different methods to stop or disable automatic Windows updates in Windows 11 and why in some cases you should and why not disable it.
What is Windows automatic update and why disable it?
Microsoft has released Windows 11. They guarantee regular function and security updates through automatic Windows updates. Additionally, you need to use the latest security patches and features to keep your Windows 11 updated. Any changes to Windows Update could cause Windows to stop updating the driver and cause other problems such as: B. the inability to use the Microsoft Store.
At the same time, you know the risks if you want to stop Windows 11 updates again. Well, there could be many reasons, for example, once you know how to stop Windows updates according to your preferences, you can solve the following problems.
- Prevent Windows 11 from installing new features
- Prevent a specific driver from being installed
- Save your internet bandwidth
- Turn off automatic updates on older computers
- Stop unnecessary Windows 11 version upgrades
Remember, Windows 11 updates will happen automatically unless you don’t have a metered connection. Windows updates are set so that all updates are downloaded automatically.
5 easy ways to turn off automatic Windows updates in Windows 11
You cannot stop or disable Windows Update directly from Settings. Here I will show you 5 easy ways to stop Windows updates in Windows 11:
- Using Windows Update
- Via Regedit (Windows Registry)
- Using component services; Manage Windows Updates
- Temporarily hide certain updates
- Set the measured connection
Note: Some of the The tips in this article were originally written for Windows 10. However, you can use them on Windows 11 as well. Please note that we are regularly looking for something better. So if we find something better, we’ll update this article with more specific information.
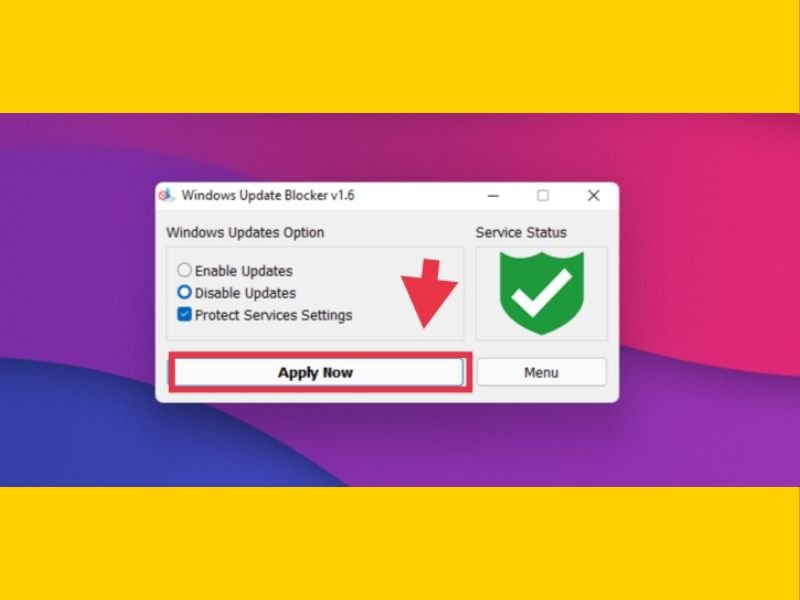
Method 1. Use the Windows Update Blocker Tool
Windows Update Blocker is a tool published by Sordum.org. These are portable tools that you can use to stop Windows updates on Windows 11. It is an advanced tool that you can use to configure additional services. After opening the tool, all automatic update services are blocked with one click. You have two options: first, it does what it needs to do, and second, it restores Windows Update to a normal state.
This tool will allow you to permanently disable or disable the Windows 11 automatic updates without wasting your time. Open the tool from the original site, run it and follow the instructions.
- Get the tool from the official website.
- Extract the tool and run Windows Update.
Note: You can pause Windows 11 updates for up to five weeks. You don’t need any tools for this. Just go to Windows Settings, then Windows Update and select Pause Updates, then you can pause up to five weeks from the drop-down menu.
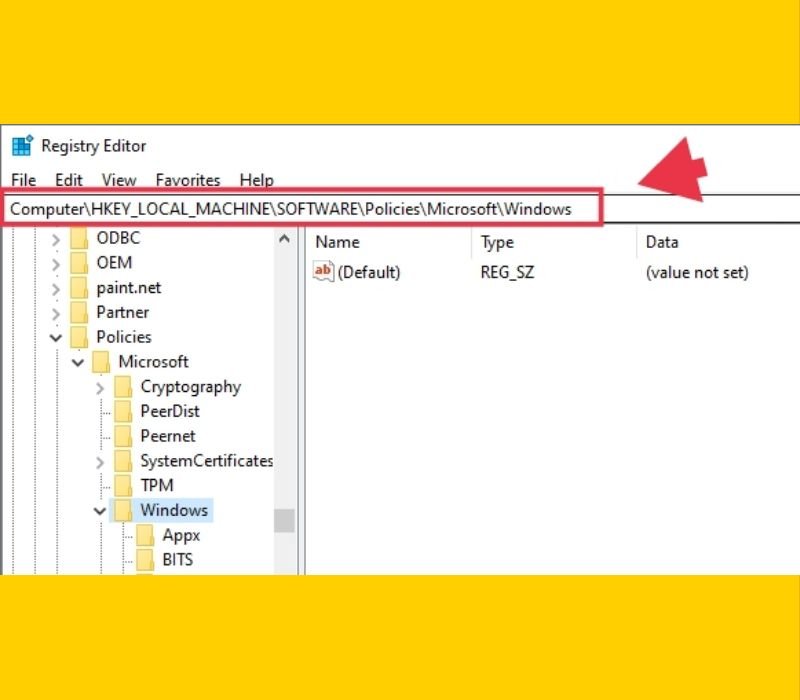
Method 2. Stop Windows Updates with Regedit
The Windows registry acts as a storage database for Windows and programs that choose to use the registry.
- To stop Windows updates in Windows 11, open Registration editor by entering regedit and open it from the start menu, you can use too Win + R to open the Run dialog box and type the same in.
- Now go to the following key (you can copy and paste it)
- HKEY_LOCAL_MACHINE SOFTWARE POLICIES MICROSOFT WINDOWS
- Next, create a new key under window and name it Windows Update.
- Then create another new key under Windows Update and name it AT THE (Automatic updates).
- Remember that the location should look like this: WindowsUpdate AU
- Finally select the AT THE Button and create a new DWORD name in the right area No AutoUpdate and 1 as value. And that’s it!
Method 3. Turn off Windows Updates using Component Services
Here’s how to permanently disable Windows 11 automatic updates by disabling the service. Follow the steps below:
- To open”administrative tools“On your Windows computer. Press Windows + S and enter “administrative tools“To find it very quickly.
- Now you will see Component services, Double tap on it.
- Under the console tree you will see three tabs. Tap that Services (local) Tab.
- Next, navigate to Windows Update Service, Go to its properties by double tapping on it. There’s a drop-down list with ‘Start type‘, choose Deactivated and save it.
- That’s it. Now check if this stops the update. Click the Start button, type “Windows Update” and see if your computer is only using internet updates. So yes, Windows doesn’t automatically download updates and leave you this message.
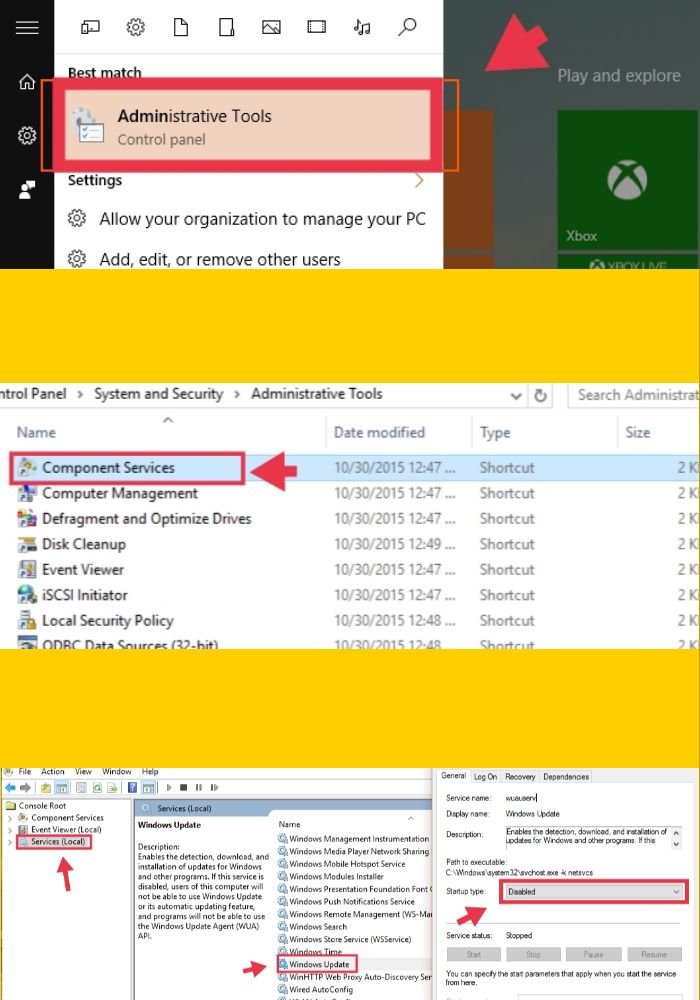
That’s it. If you need to activate Windows Update in the future, go back to the Windows Update properties (component service) and set the start type to “Automatic start or delayed start”. You may need to restart your computer for this to take effect.
Method 4. Temporarily hide certain updates by using a Windows tool
Microsoft provides an official tool that can be used to hide Windows updates if necessary. With this tool you can hide and show updates. You can download it here.
- To stop Windows updates using this tool, open it.
- You now have two options for either hiding updates or showing updates again.
- Tap on “Hide updates“To suppress updates.
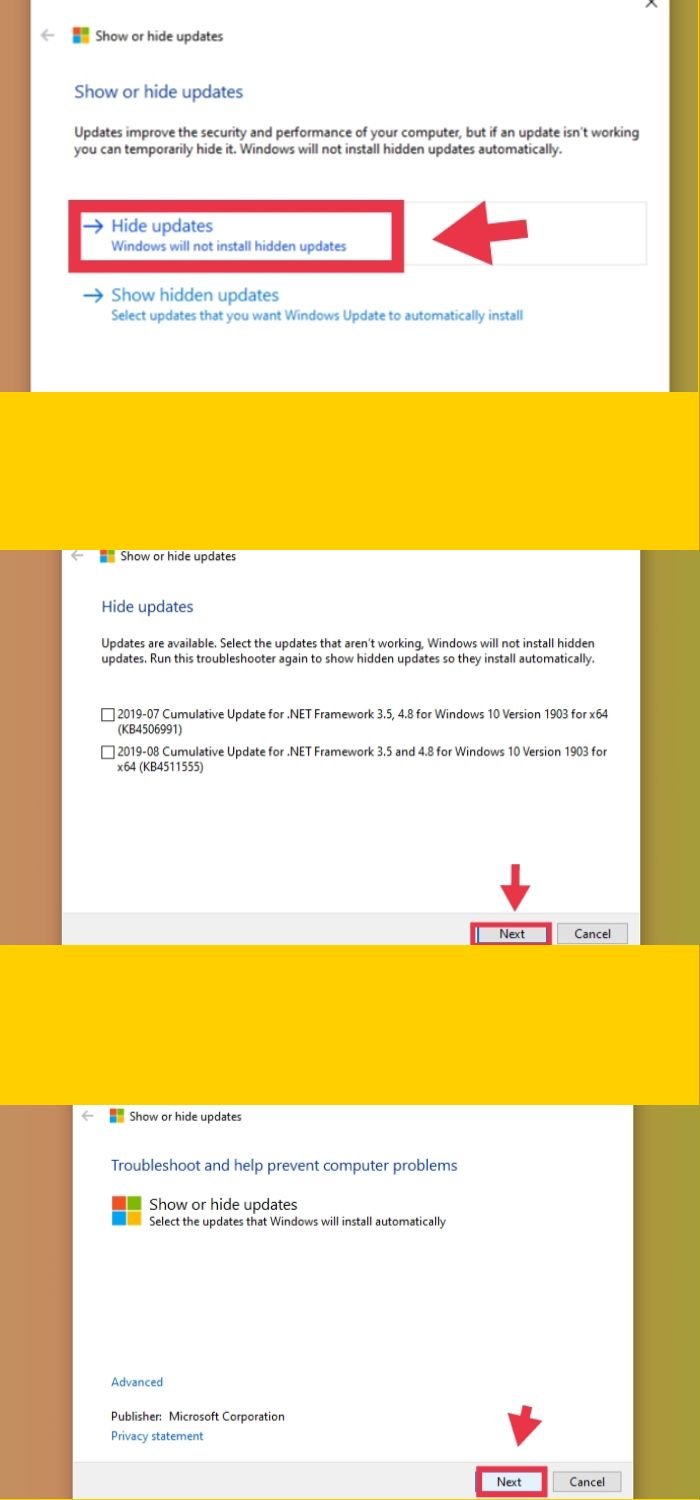
The tool is useful when you want to stop unwanted driver and defender updates.
Method 5. Stop updates by setting up a metered connection
While this does not completely prevent the update, it does give you the option to download and install the update. There’s an option in Windows settings to set your internet connection as metered and then Windows will ask you to go manually Settings> Windows Update to install the update.
- To stop Windows updates in Windows 11 by setting the metered connection, tap the Network symbol in the system tray
- Next, navigate to “Network and internet settings“And choose Wireless Internet access from the sidebar.
- Now tap on “Manage known networks“And tap on the network you are currently connected to.
- Finally switch the “Set the measured connection” Possibility.
Note: Many users are still receiving updates with Metered Connection enabled. I can say that this is not a reliable option.
last words
I want to keep all of my devices up to date with Automatic Windows Update. However, if you don’t want or need it, you can use any of the methods above to turn off Windows Automatic Updates in Windows 11.
Finally, remember to pay close attention to what you download and install from the internet. You don’t need antivirus software (or even Defender) so be sure to check everything you do online. Rely on internet tools heavily, for example don’t try to download decrypted Office, use Google Docs or Microsoft Office to process all documents online, use Canva instead of bulky Photoshop.
Also read:
- How to rename your file or folder in Windows 11
- How to reset your Windows 11 PC