It’s been a long time since we’ve been using Windows 10 and it’s getting so boring. This year, Windows 11 hits the market with its big changes and a host of new features. It has a whole new look with the new start menu rounded corners and widgets. Windows 11 also brought a host of productivity improvements, including snap layouts that let you run multiple apps at the same time.
Additionally, Windows 11 changed the way we used Windows, it made things easier. For example, how to enable WiFi, how to rename a file or folder, and even how to rename your computer. Here in this article, I’ll show you four different methods to change the name of your PC or laptop in Windows 11.
4 Easy Ways to Change Your PC or Laptop Name in Windows 11 Change
Changing the computer name was pretty straightforward and easy in other Windows, but Windows 11 made it even easier and simpler. The option to rename your computer is now on the main computer screen.the settings‘ by doing ‘system‘Tab.
In addition to the ‘Settings’, you can also change the computer name via the ‘System Properties’, ‘PowerShell’ or the ‘Command Prompt’. Below are the step-by-step instructions for each method:
Method 1: Change your Windows 11 PC name through system properties
You can change the computer name in the properties. One of the advantages of this method is that when you enter the characters that are now allowed, a dialog box appears with a list of allowed and disallowed characters. This makes it easy to delete characters and get a name that conforms to standards.
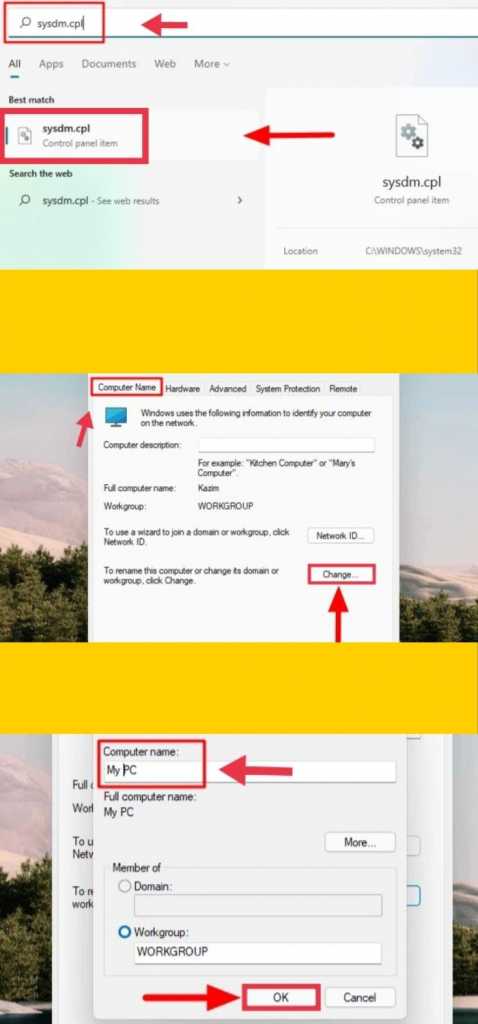
- To change the PC or laptop name, press window Button to start the ‘Start menu‘, Kind’sysdm.cpl“And select the relevant search result.
- Next, the ‘Computer Name’ tab of the ‘System Properties’ will open by default. Choose ‘change‘ Possibility.
- Now choose a new name for your computer based on the guidelines discussed above and tap on ‘OK‘ at the bottom.
- Finally, you need to restart your computer now, click on ‘Restart now’ to restart it right away.
Note: If you see one or more characters you are typing are not working. Try something else ”because the characters you entered cannot be used in the computer name. Check for spaces, apostrophes (‘), colons (:), underscores (_), periods (.), Or other similar characters, and delete them. You can use alphabetic characters, numeric characters, and hyphens () for the computer name.
Method 2. Change your Windows 11 PC name through Windows Settings
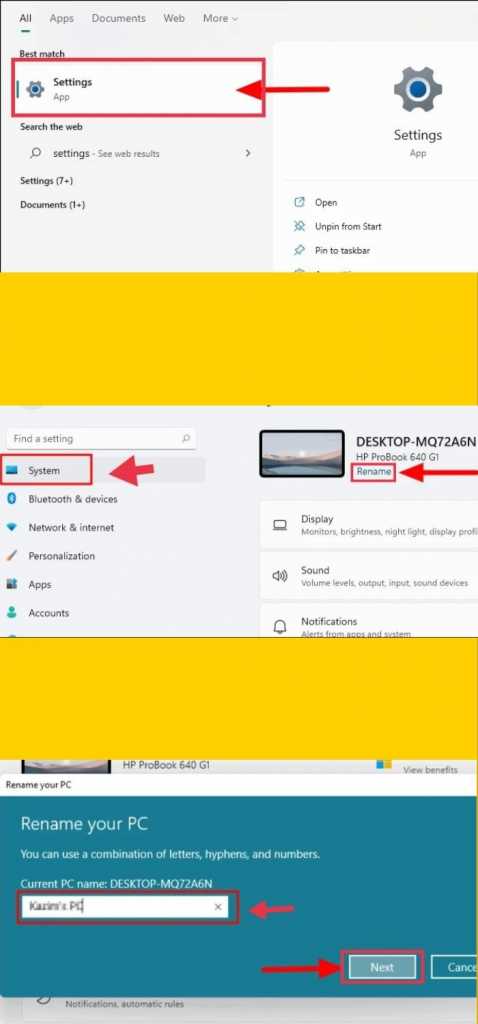
- To change the name of your PC or laptop, open the the settings App with the window Button to start the ‘Start menu“And look for it.
- Next is the ‘system“Settings will open and you will need to find your computer name in the top right corner. Tap the ‘Rename‘under the computer name.
- Now choose a new name for your computer in the text field and tap on ‘Next‘.
- Eventually, you will need to restart your computer for the new computer name to take effect. Restart the computer and you will find the new computer name in the settings.
Note: You need to make sure that you save all files before restarting your computer to avoid data loss.
Method 3. Change your Windows 11 PC name using the command prompt
The command will now run, look for ‘0’ next to ‘ReturnValue’. If “5” is displayed, you did not start the command prompt with administrator rights. Once you have ‘ReturnValue’ as ‘0’, close the ‘Terminal’ window and restart the computer for the changes to take effect.
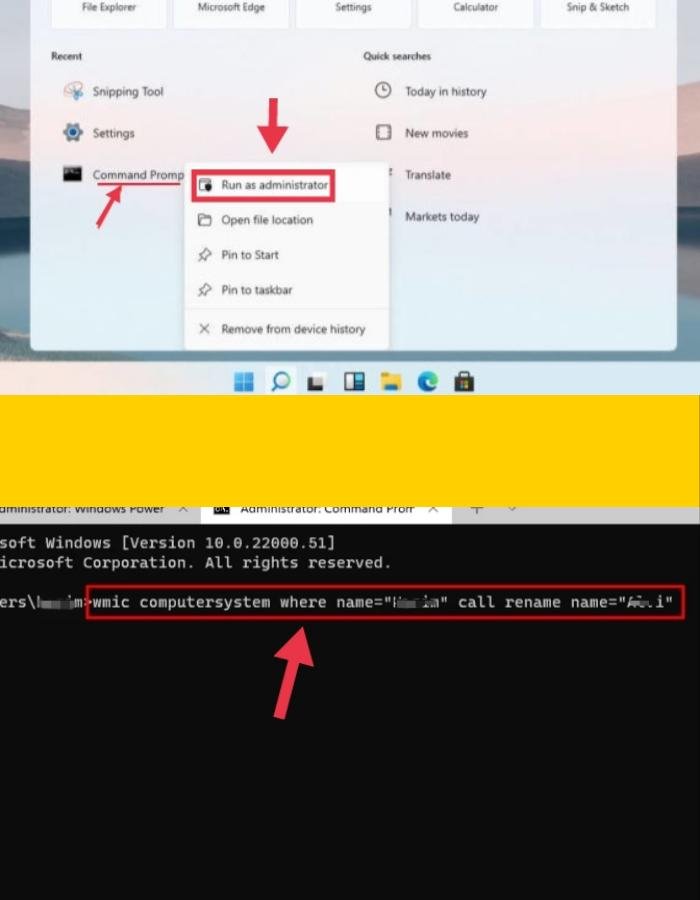
- To change the name of your computer, open ‘command prompt‘by searching in the start menu and running as administrator.
- Next, the ‘Command Prompt’ window opens. Use the following command in the command prompt.
wmic computersystem where name="Present Name" call rename name="New Name" - To choose a name for the computer, replace the ‘Present name‘with the current computer name and’New name“With a new name.
- When finished, press Enter to run it and restart your computer.
After restarting the computer, the new name will appear everywhere.
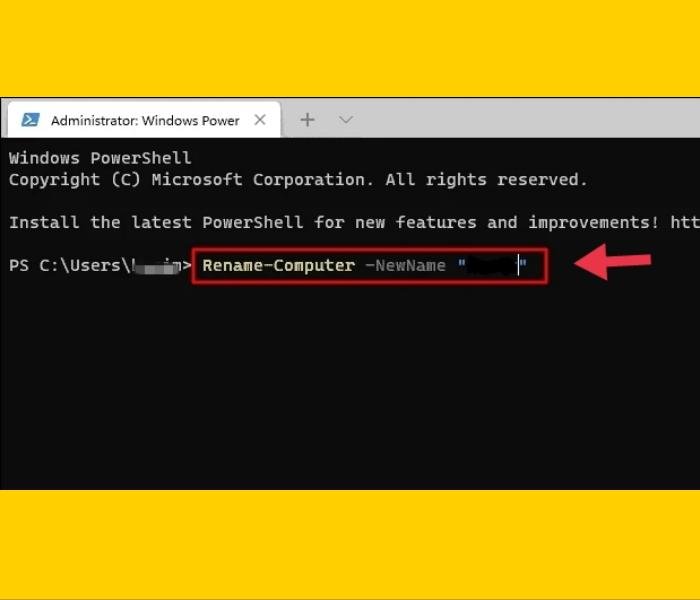
Method 4. Change your Windows 11 PC name through PowerShell
Here’s how to change your PC or laptop name using the Shell command in Windows PowerShell.
- To change your computer name, open the Windows Terminal with administrator rights and open Powershell.
- Next, use the following command in the PowerShell window.
Rename-Computer -NewName "New Name" - Replace in the above command ‘New name’ with a new name and press the Enter Button to execute the command.
- Eventually, you will need to restart your computer for the changes to take effect. Exit the terminal window and restart the computer.
last words
That’s it! These are 4 different ways to change your PC or laptop name in Windows 11. You can use any of the four methods to change the name of the computer as the result will stay the same. However, we recommend using the first two in case you are unfamiliar with Command Prompt or PowerShell. Enjoy Windows 11!
Also read:
How to hide recommended files in Windows 11 Start menu