Windows 10 is the most popular operating system of the present times, given its amazing features and tools, especially for general-purpose PCs. The operating systems from Windows have been ruling the market right since 1995, and rightly so. Windows 10 can be seen on most desktops and laptops these days. However, the one thing that has been bugging a lot of people for a while now is the updates that come for their OS now and then!
To ensure the best services to its users, Windows automatically downloads and installs all updates. This is usually a good thing since you regularly get security patches and feature updates through Windows Updates. However, people complain about their PCs getting updated while they are in the middle of an important job. That can get pretty troublesome for many.
Some people take time to adapt to new features. Others just like the older feature better. Some want to get rid of the untimely updates that pop up out of nowhere. Some even witness random issues with their PCs after an update. If you fall into this category of people who are annoyed by the updates and wish to stop them, this guide is for you temporarily.
Follow the steps below to get rid of unwanted Windows updates!
Check for the recent updates and drivers.
Sometimes, the recent updates might cause trouble to your PC in general or some application on your PC. This might occur due to compatibility issues or different versions of the applications. Hence, you might want to check what were the latest updates and device drivers.
Checking for this is very easy since all you have to do is go to the “Update History” of your PC. To reach there,
- Open Settings on your PC.
- Go to Update and Security.
- Next, head over to Windows Update.
- Click on “Update History”.
You can see all the updates and device drivers that got installed when your OS got updated on this window.
Uninstall the driver or update
Once you are in the “Update History” window, you would see an option that says “Uninstall Updates”. Click on that. You would be taken to the “Uninstall an update” dialog box, where you can see the various updates and device drivers installed. From here, you can uninstall the specific update or driver that has been causing trouble to your PC. However, this dialog box contains the list of installed updates since the previous major update or build only.
Sometimes it is seen that a version of the driver works perfectly for the user. But after that version gets updated, the user faces issues with the new one. If you get stuck in such a case, you might want to roll back to a previous build. You can easily do this on Windows 10 to get back to the previous version of the driver support on your system.
How to roll back to a build or driver on Windows 10?
To roll back a build
This method will only work if you installed the new build less than ten days ago. Additionally, you must not have removed its files using the Disk Cleanup. If both of these conditions are fulfilled, you’d be able to roll back to the previous build.
First of all, you will have to reach the Recovery section of Windows Update. For reaching there.
- Go to Settings.
- Head over to Update and Security.
- Go to Recovery.
Once you reach Recovery, you will see the option to “Go back to an earlier build”. Now click on “Get started,” and It’d take you to the previous build of Windows 10.
To roll back a driver.
Instead of rolling back an entire build, you might want to roll back a previous driver that suited your system. You can do so by using the Device Manager on your system. For opening the Device Manager:
- Click on the Start button and go to the Control Panel.
- Head over to the Device Manager option.
Alternatively, you can press Windows+X on your keyboard. From the menu that comes up, you can click on Device Manager.
After you are in the Device Manager window, follow these steps to roll back to a previous update of a driver:
- From the list of drivers, locate the one that you want to roll back.
- Right-click on the driver and select “Properties”.
- Click on the “Driver” tab.
- Click on the “Roll Back Driver” option.
And you are all set!
Rolling back a device driver is also sufficiently easy, except Windows would keep installing the latest version during its next update. To avoid the automatic installation of the update, you can opt to stop the automatic updates using a tool from Microsoft.
Stop automatic updates of a specific driver or update.
Just because you uninstall an update or device driver from your system once doesn’t mean that Windows won’t install it again during the next update! Hence, you might want to stop the automatic download and installation of these updates and device drivers that might not be working on your system.
There is no in-built option for this in Windows 10. However, the parent company of Windows, Microsoft, provides a tool that you can download to freeze the automatic updates of a specific device driver or update.
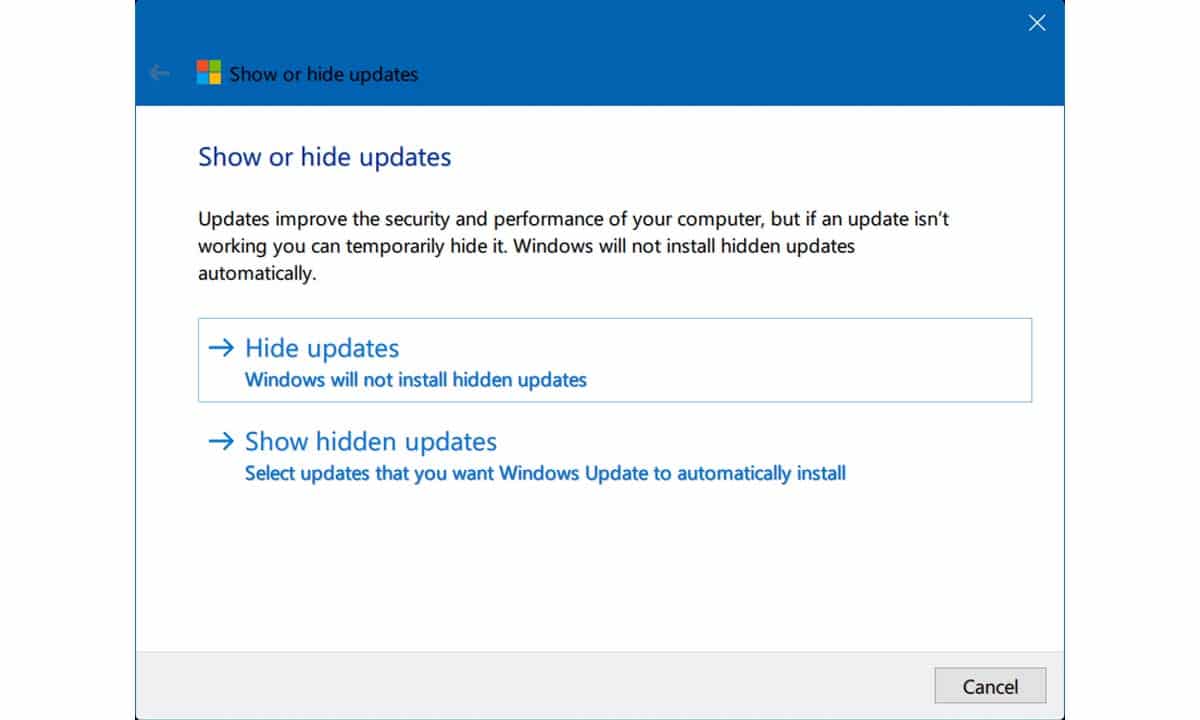
You can directly download this tool by Microsoft from the Microsoft Download Center itself. The tool is the “Show or Hide Updates” troubleshooter. The device drivers and updates blacklisted on this tool shall not be installed by the Windows Update during the next update session.
If you want those blacklisted drivers and updates to get installed in your system at some point in time, you can head over to the tool again and unhide the updates.
Final verdict
We understand the trouble so many people face due to the windows updates. The notorious updates are known best for arriving at the worst of times! Especially when you are on an important task and cannot spare any time at all, your system would start updating, pretty much mocking at you.
Hence you can simply stop the updates and device drivers that don’t work for your system. We hope you find this publication helpful, and you never have to worry about updates that won’t work for you.