When installing Windows 11 on your computer, Microsoft insists on linking your PC to your Microsoft account. Also, to install Windows 11, you’ll need to sign in with a Microsoft account to complete the setup. Most Windows users don’t want to sign in to their PC with a Microsoft account and delete it from their computer after Windows 11 is set up.
In this guide you will learn how to disconnect or remove a Microsoft account from Windows 11. If you follow the steps below, you can go back to a local account or remove the Microsoft account from your PC or laptop.
What is a Microsoft Account?
With a Microsoft account, you have access to a wide variety of services and tools. These include:
- Productivity Tools: You can use them to create, save, and edit documents, videos, pictures, and other files.
- Social tools: They allow you to communicate via email and chat, as well as to share files stored online and work on them together.
As a Windows operating system, a Microsoft account will help you perform most common computing tasks. The difference between these packages and the more traditional productivity suites is that all of the files and resources you use are stored online rather than on your computer. This type of online storage is often referred to as cloud storage.
You need a Microsoft account to use these services. All the information you create with Microsoft tools – from Outlook and Skype contact lists to Office documents stored in the cloud – is linked to your Microsoft account. No matter how many of these programs you use, you only need to use one account. How to unlink Microsoft account from Windows 11.
2 ways to delete a Microsoft account from a Windows 11 PC
To remove or delete a Microsoft account, you need to add a local account on your computer and then sign in to your PC with that account. You can then easily remove the Microsoft account from your computer. Otherwise, the option to unlink or remove your Microsoft account will be greyed out. Because your computer needs at least one administrator account to log into your PC. Click the link below to learn how to create a local account.
️ https://techschumz.com/how-to-create-a-local-user-account-on-windows-11/
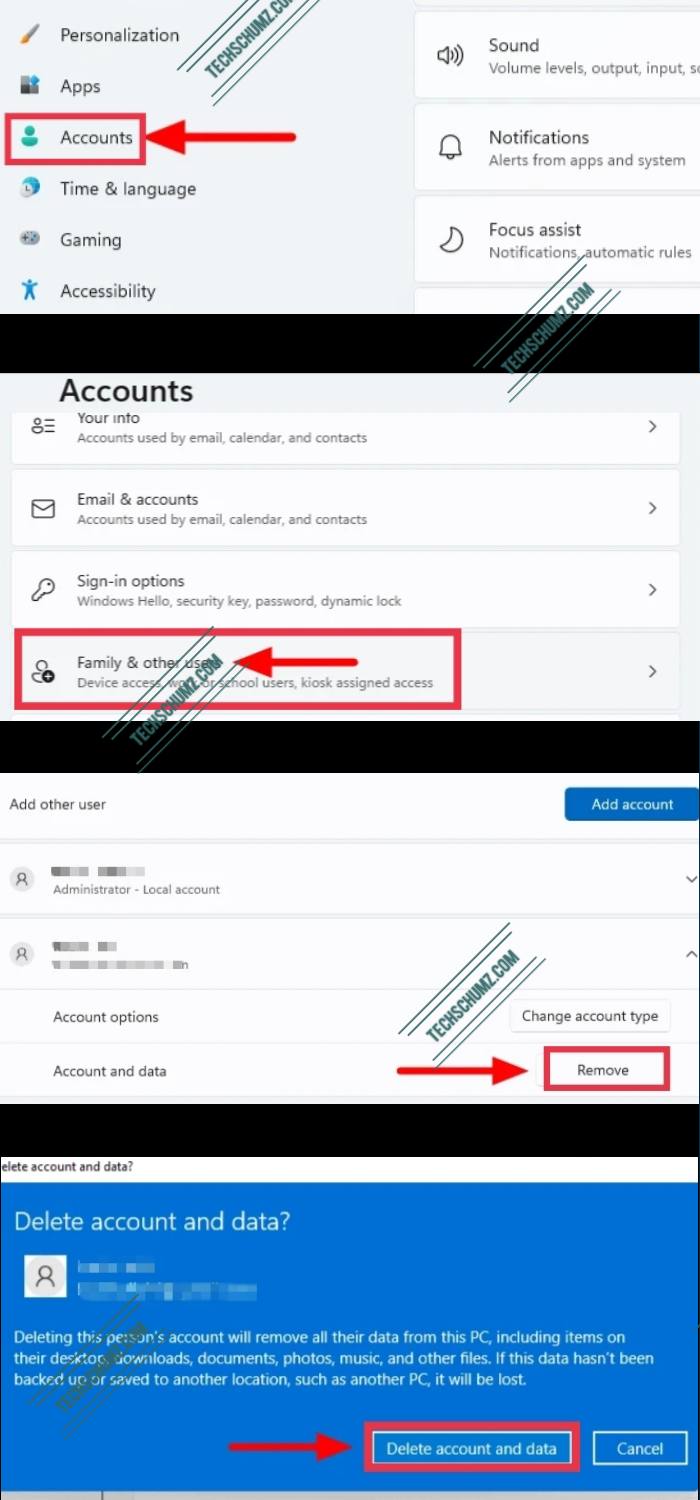
1. Remove a Microsoft account from Windows 11 through Settings
- To remove the Microsoft account through Settings, find it in the ‘Start Menu’ and launch the app.
- Next, select the Account tab on the left.
- Now under “Other Users” find the Microsoft account that you want to remove and click on it.
- Then click on “Remove” next to “Account and data”.
- Finally, click on “Delete account and data” in the confirmation field to continue.
- The selected Microsoft account will now be removed.
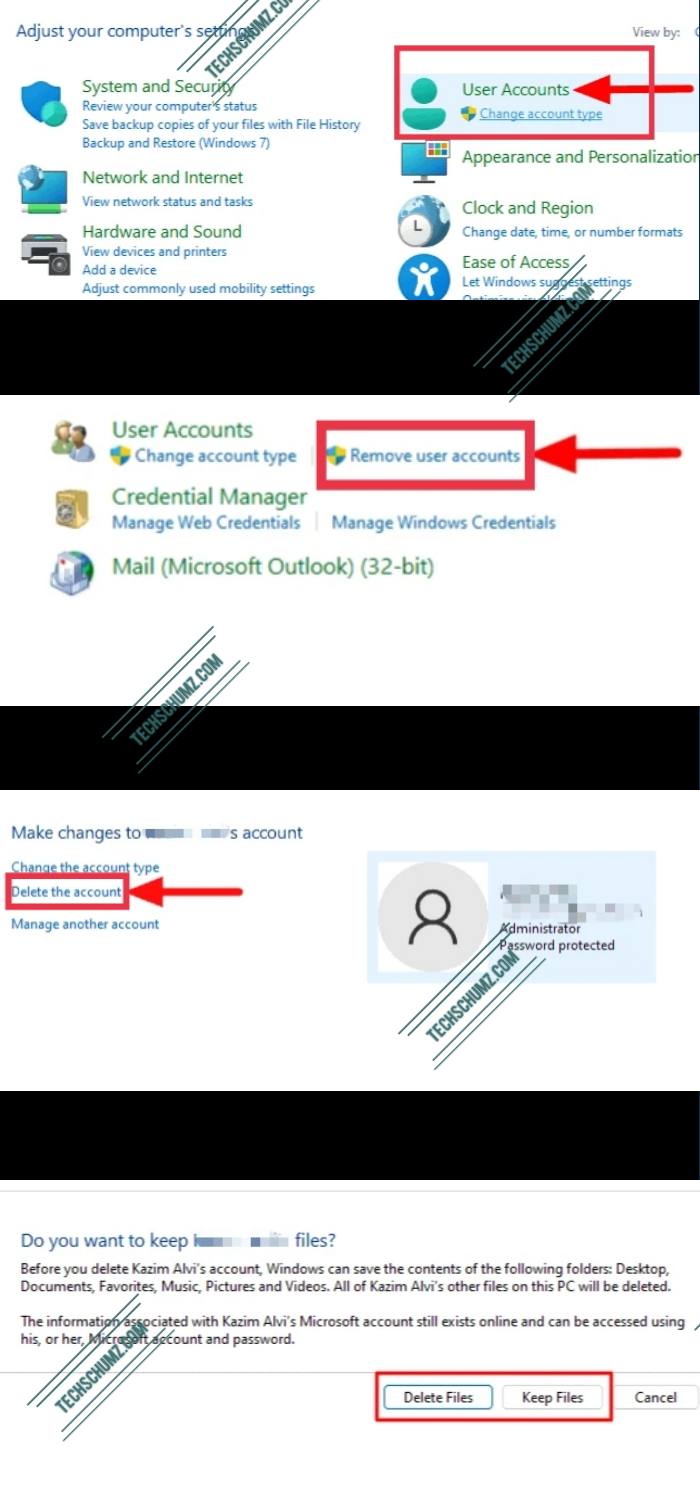
2. Unlink a Microsoft account from a Windows 11 computer using the Control Panel
- To remove a Microsoft account using the Control Panel, search for “Control Panel” in the Start menu and click the relevant search result to start the app.
- In the Control Panel you will find many options, click on ‘User Accounts’.
- Then click on “Remove user accounts” under “User accounts”.
- Select the account you want to delete and click Delete Account.
- You will now get a pop-up asking if you want to keep this user’s file or delete it. Choose the option you want and respond accordingly.
- That’s it, you’ve successfully removed your account from your Windows 11 PC using the Control Panel.
Wrap up
That’s it. Here’s how to delete or remove a Microsoft account from a Windows 11 PC or laptop. By following the steps above, you can easily create a local account and remove a Microsoft account at the same time. If you have any questions about the steps above, let us know in the comments section below. Good luck!
Also read:
- How to make a user an administrator on Windows 11
- How to change your PC or laptop name in Windows 11