How do I optimize USB storage for better performance on Windows 11/10? As of the Windows update of October 10, 2018, Microsoft no longer optimizes external storage devices for “Better performance“Windows 11/10. Instead, it optimizes them for “Fast removal. ”
Better performance and quick removal in Windows 11/10
Microsoft has two different guidelines for external storage devices connected via USB, whether it’s a USB stick or an external hard drive. Each storage device has its own specific policy setting, so you can choose different policies for different devices. For example, you can apply the better performance policy to USB-A and the quick removal policy for USB-B.
As mentioned above, when starting the Windows 10 October 2018 update, Windows 10 and Windows 11 use the “Fast removalPolicy. If you plug your USB drive into a PC and write to the drive, Windows will write the data to the drive as soon as possible if the quick removal policy is selected. This policy ensures that you are using the USB You can remove a drive without using the “Safely Remove Hardware” option. A program can write to your USB drive in the background anyway. However, this feature drastically reduces the risk of data corruption if you are in the habit of safely removing storage devices first You disconnect them from the mains.
However, this quick removal feature can slow down other programs you are using. For example, if you save a file to an external drive, the program you are using may stop and wait for the save process to complete before you can continue working.
On the other hand, the “Better Performance” policy does not slow down your program. Windows caches writes to the drive and lets applications continue as if they had already written the data. Windows then performs the writing process in the background. There is a disadvantage to this policy. It can lead to data loss in some situations. You will think the data is saved and you will remove the drive, but the data was not saved to your hard drive and the files on the drive will be corrupted. For this reason, Microsoft has also provided the option “Safely Remove Hardware”. So make sure to use this “Safely Remove Hardware” feature before disconnecting a drive from Windows 11/10. Windows will not allow the external drive to be removed until all of the cached data has been written to the hard drive to ensure that all of your data is safe before removing the external drive.
However, it is unclear how much performance will improve your Windows 11/10 PC if you choose the Better Performance option. This should depend on the speed of your external storage device. Microsoft believes that the default Quick Removal setting is good enough for most people looking to avoid data loss; Therefore, this policy applies to a USB flash drive by default. Finally, you have the option to switch between Better Performance and Quick Removal; You can choose both options wisely.
How to optimize USB storage for better performance on Windows 11/10?
As mentioned above, if you have more than one, you need to apply the policy to each external drive separately for better performance. However, once the policy has been applied, Windows will remember for the next time you plug the same USB drive back into your PC. So changing this option for one USB flash drive will not apply it to any other flash drive. However, if you connect the same USB flash drive to a different PC, you will need to configure this policy again.
Step 1. Connect your USB flash drive to the Windows 11/10 PC.
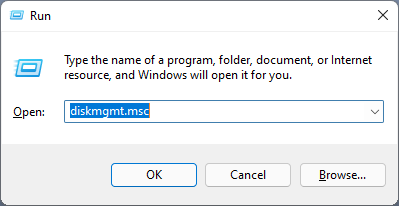
Step 2. Bring up Run Dialog box by pressing window + R. Keys entirely from the keyboard.
Step 3. Now enter diskmgmt.msc by doing Run Box and press Enter Key from the keyboard to start the Disk management Tool.
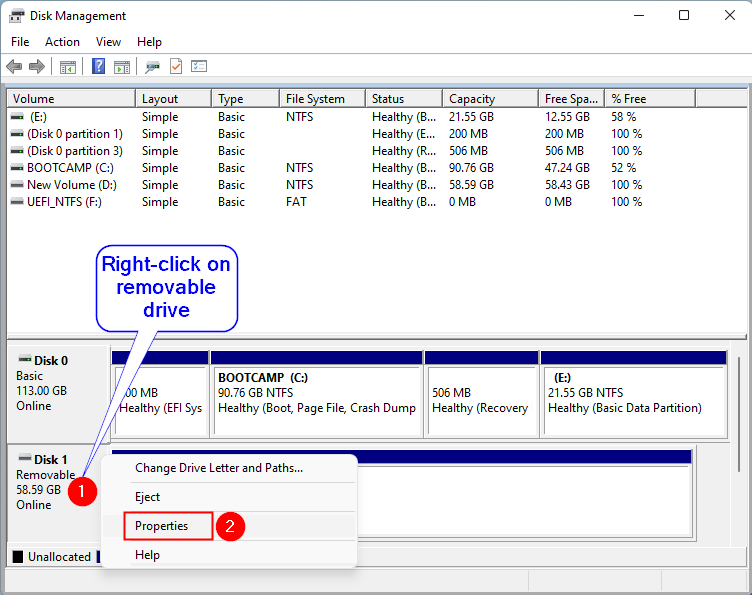
Step 4. At the bottom of the Disk Management window, find the USB Flash Drive entry and then right click on it. To choose properties from the options available.
Step 5. Im Properties of USB devices Dialog box, navigate to the Guidelines Tab and select the Better performance Opportunity.
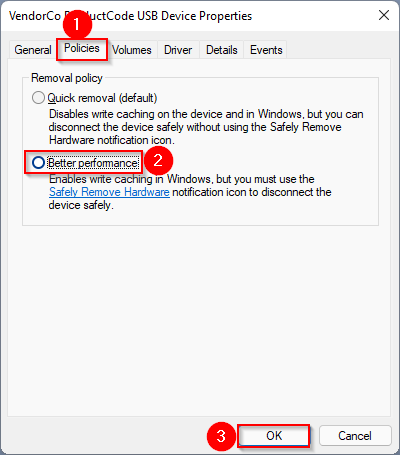
Step 6. Finally, click the OK Button.
If you change your mind and want to apply the default policy Fast removal, repeat the above steps and select the same in step 5.