Have you heard of the new operating system known as macOS Monterey or macOS 12 for Mac? Would you like to try it out on your Windows 10 computer? If you want, this is the place for you. In this article, I’ll show you How to Install macOS Monterey on VMware on Windows 10 PC & Laptop Step by Step. I want you to read this post through to the end and share your thoughts on our guide.
Connected: How to Install macOS Monterey on VirtualBox on Windows 10 PC and Laptop
Will macOS Monterey work on your PC?
At WWDC 2024, Apple released iOS 15, iPadOS 15, WatchOS 8 and finally macOS Monterey. Compared to macOS Big Sur, macOS Monterey (macOS 12) impresses in appearance and style. I’ve seen universal controls, shortcuts, emojis, and other great new features, but you can’t ignore the look and feel. The M1 chip works fine with macOS Monterey (macOS 12), but some features will not be available on some Intel Macs.
The same goes for virtual machines, some features may not be available, but if you are a developer you can still use them. You can use XCode in VMWare and it will solve your problem, although I am 100% sure as it is currently in beta.
You may also be wondering what macOS feels like and what is the difference between Windows and macOS 12. How do I create a bootable USB stick, how do I install software on a Mac, or even uninstall apps on macOS? These simple and curious questions will guide you into the macOS environment and find the answers yourself.
Steps to Install macOS Monterey on VMware on Windows 10 PC & Laptop
Below, I’ll show you how to install macOS Monterey on your Windows 10 computer in five easy steps. The steps are as follows:
- Download and install the prerequisites.
- Unlock VMware to install macOS. Monterey on Windows.
- Create a new virtual machine for macOS 12 Monterey on Windows 10.
- Edit the macOS Monterey VMX file.
- Install macOS Monterey on VMware on a Windows 10 PC and finally do some basic settings.
1. Download and install the prerequisites
In order to install macOS Monterey on your Windows 10 computer, you should download and install a few files and applications. You will need them later in this tutorial. But remember to skip it if you’ve already done any of the following. Here is the list of things you need to download:
- Download VMware Workplace Per 16.1.x or VMware Player 16.1.x
- VMware Workstation 16 Pro
- VMware Player 16
- Download the. down macOS Unlocker V3 for VMware
- Download – GitHub (latest version)
- Direct Download – MediaFire (3.0.3)
- Create or download macOS Monterey ISO
Now install the VMware Workstation Pro or VMware Player 16.1.x Applications, if you already have them, you can skip them. However, make sure that it is compatible with your system.
After downloading VMware Workstation Pro / Player, you can run the installer and follow the instructions default Options.
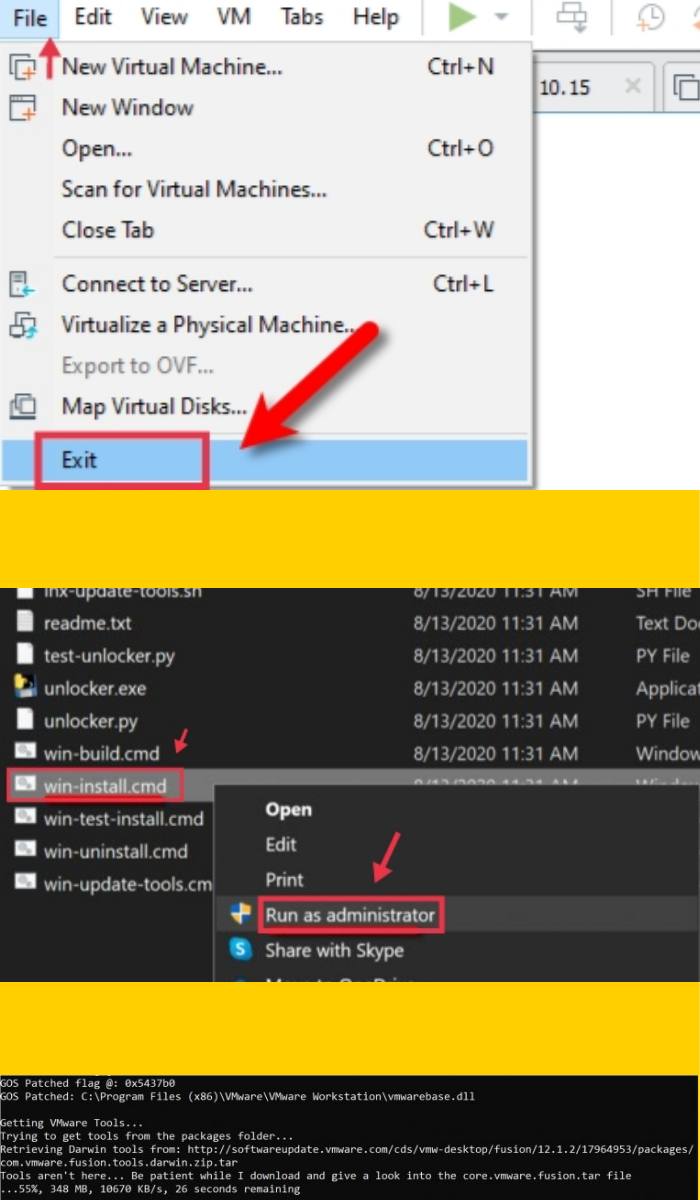
2. Unlock VMware to install macOS Monterey on your Windows PC
First, make sure that the VMware Workstation application is completely closed. Otherwise, the VMware unlocker will not work. To do this, you have to tap on that File tab > Exit.
The reason we installed win-install.cmd is because macOS does not appear in the list of guest operating systems by default. So we’re running this script to enable macOS in the guest operating system list.
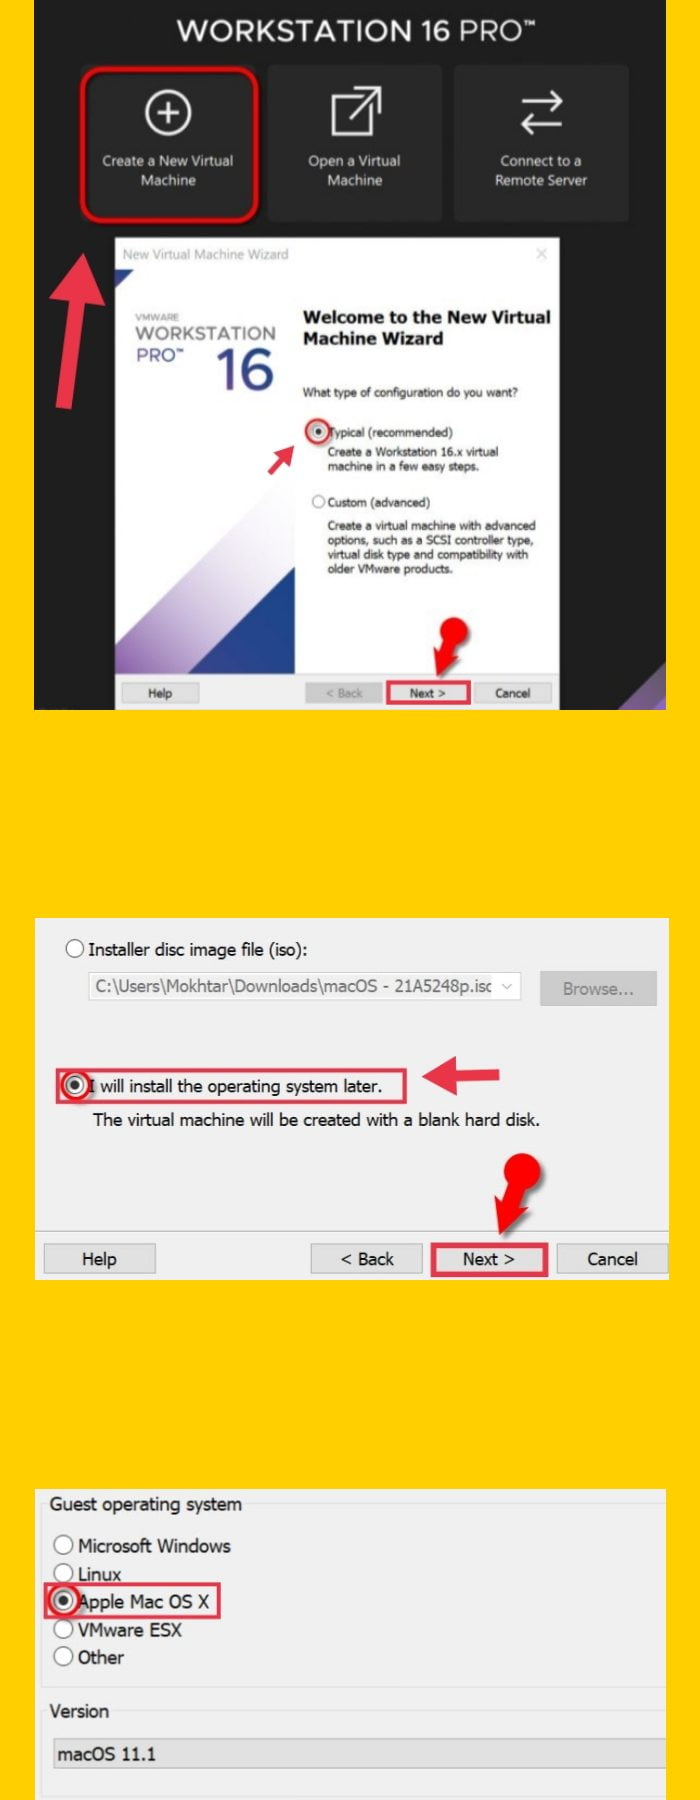
3. Create a new virtual machine for macOS 12 Monterey on Windows 10
To run macOS Monterey on a Windows 10 PC, you need to create a new virtual machine. You can do this by following the steps below:
- First go to VMware and tap Create a new virtual machine (Ctrl + N) then click on Typical (recommended) and tap Next.
- Next you check I will install the operating system later and tap Next. Choose Apple Mac OS X from the operating system list, and then tap macOS 11.1 from the Version drop-down list and tap Next.
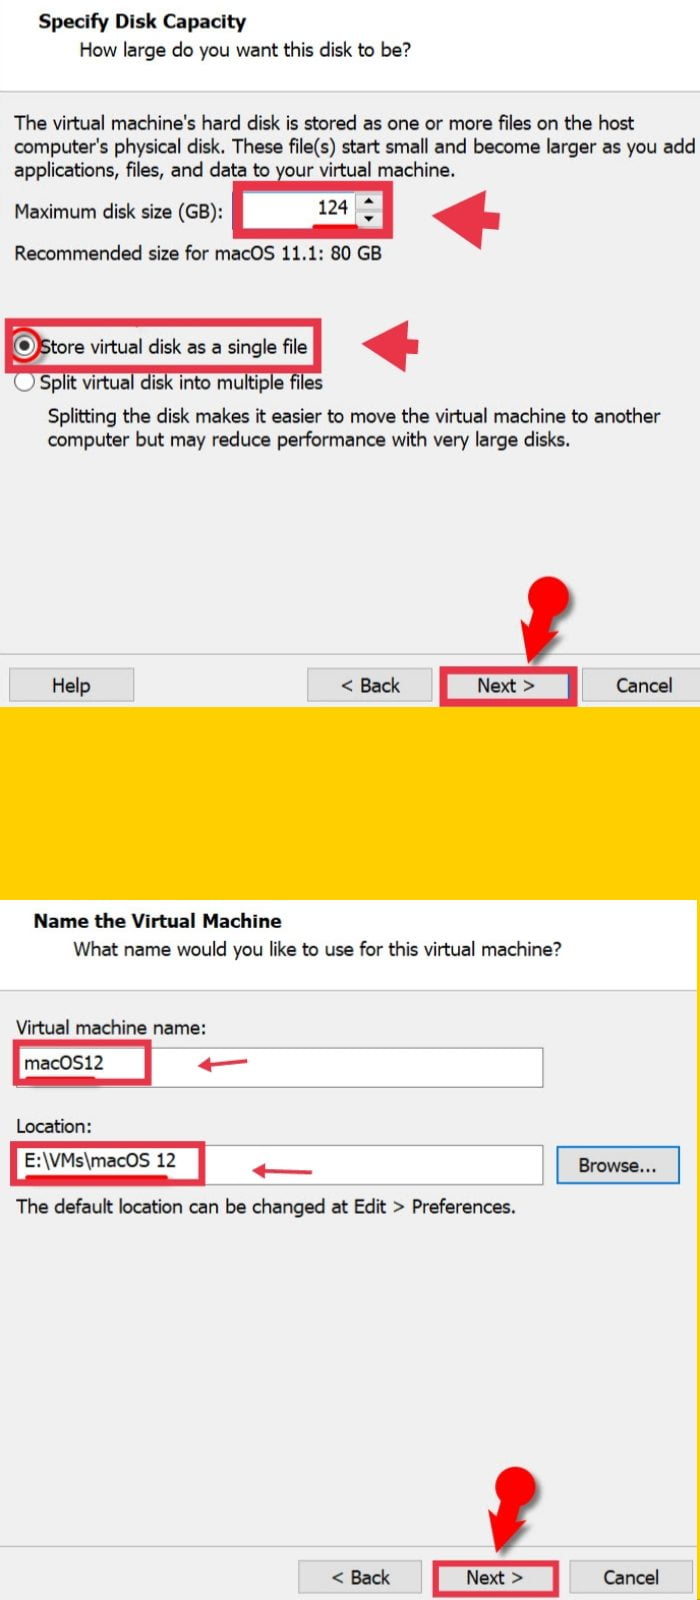
- Now choose a name for your virtual machine like macOS Monterey. tap on Search Then select a location to save the virtual machine files and tap Next, or you can leave it that way default.
- Next, choose the hard drive size from 124 GB or more than 50 GB. Then choose Save virtual hard disk as a single file and tap Next
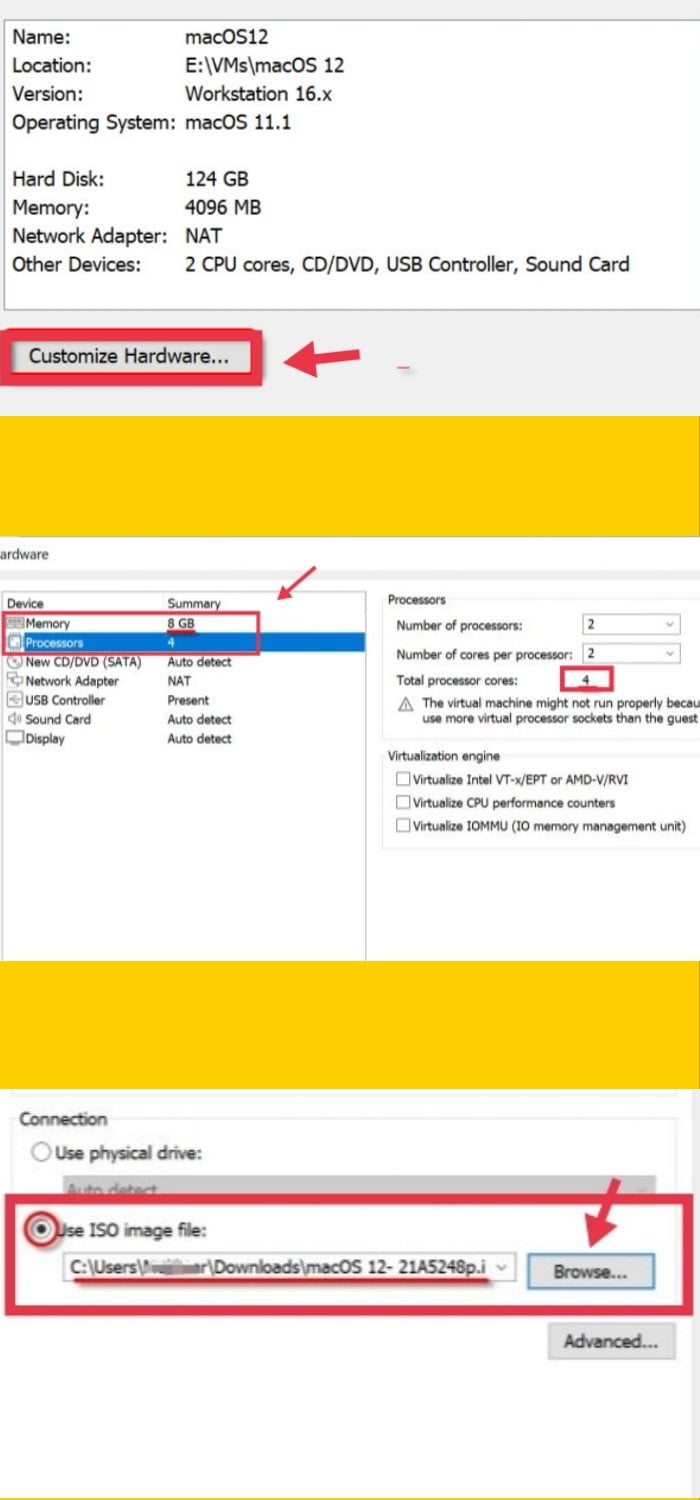
- On the Ready to create a virtual machine Page, tap Adjust hardware.
- Now you can use the memory of 4GB to 8 GB or higher for better performance.
- Next go to the Processors Then increase the menu for better performance CPU processors Core off 2 cores to 4th or higher cores.
- Note: If you want to run macOS Monterey on a Windows 10 PC, the minimum memory and processor requirement is Process 4GB Memory and 2 cores of processors.
- Now you can tap New CD / DVD (SATA) In the menu, tap Use ISO image file: and click Search.
- Find the macOS 12-21A5248p.iso Then click on file to open. If you don’t have this file, you’ll need to download it from Step 1: download Prere. download and install itQuisites section.
- After adding the macOS Monterey ISO, click Shut down to save all changes.
- Finally, tap on ‘Finished‘in the New Virtual Machine Wizard window.
4. Edit the macOS Monterey VMX file
- To edit the VMX file, go to the virtual machine folder you selected earlier in this guide. If you haven’t selected a new location, the default location is in Document> Virtual Machine.
- Now click with the right mouse button on macOS12.vmx then open it over notepad or a third-party text editor.
- Go to the end of texts and add the following code; then tap file > to save. Now you can close it.
smc.version = "0"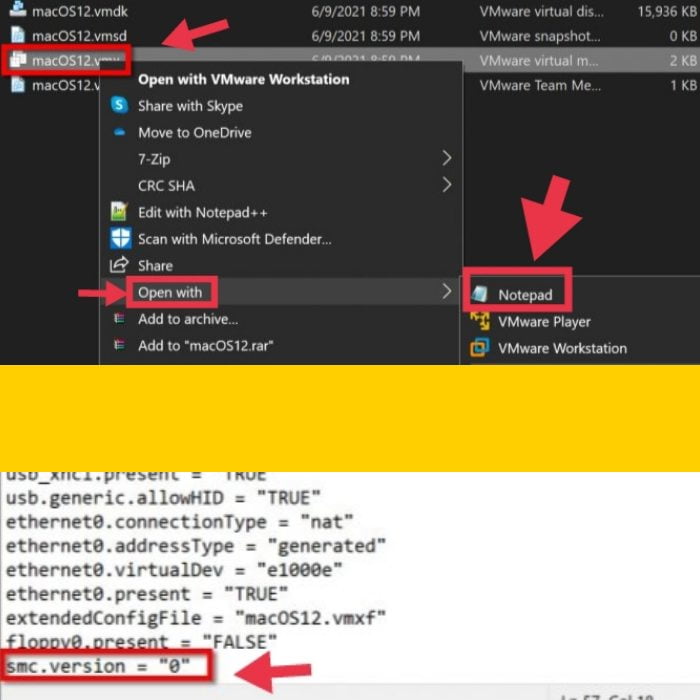
5. Install macOS Monterey on VMware on Windows 10 PC & Laptop
Now that you’ve got everything set up, now is the time to install macOS Monetary on your Windows 10 computer. You can do this by following the steps below:
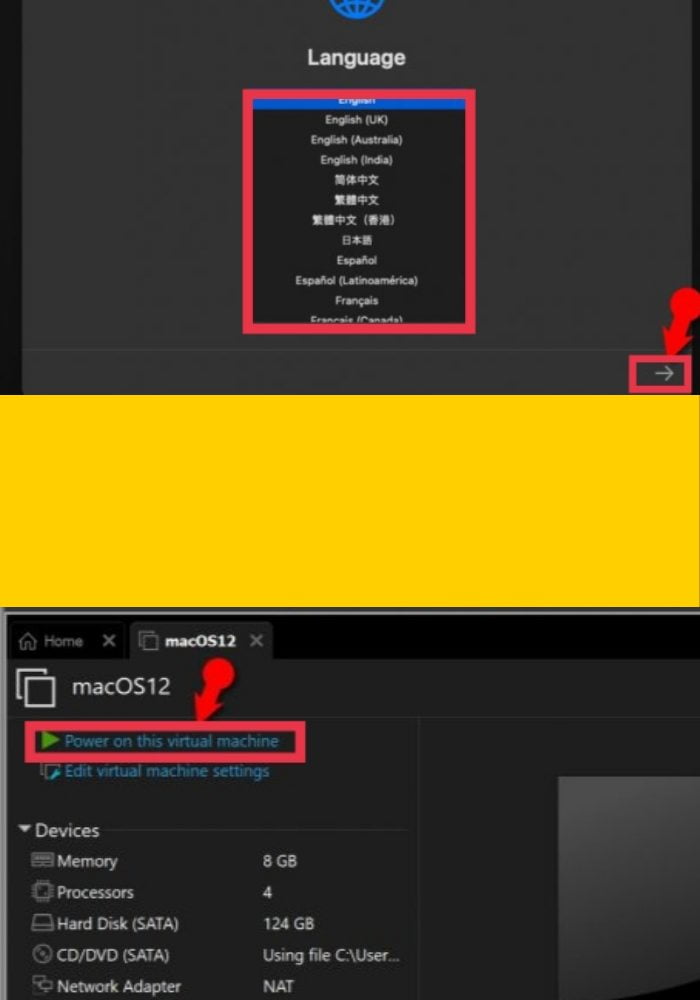
- Start VMware and tap ‘Power on this virtual machine ‘ on the macOS Monterey VM windows and wait for it to start up.
- Next, choose Your preferred language then tap on the language page Next arrow Symbol.
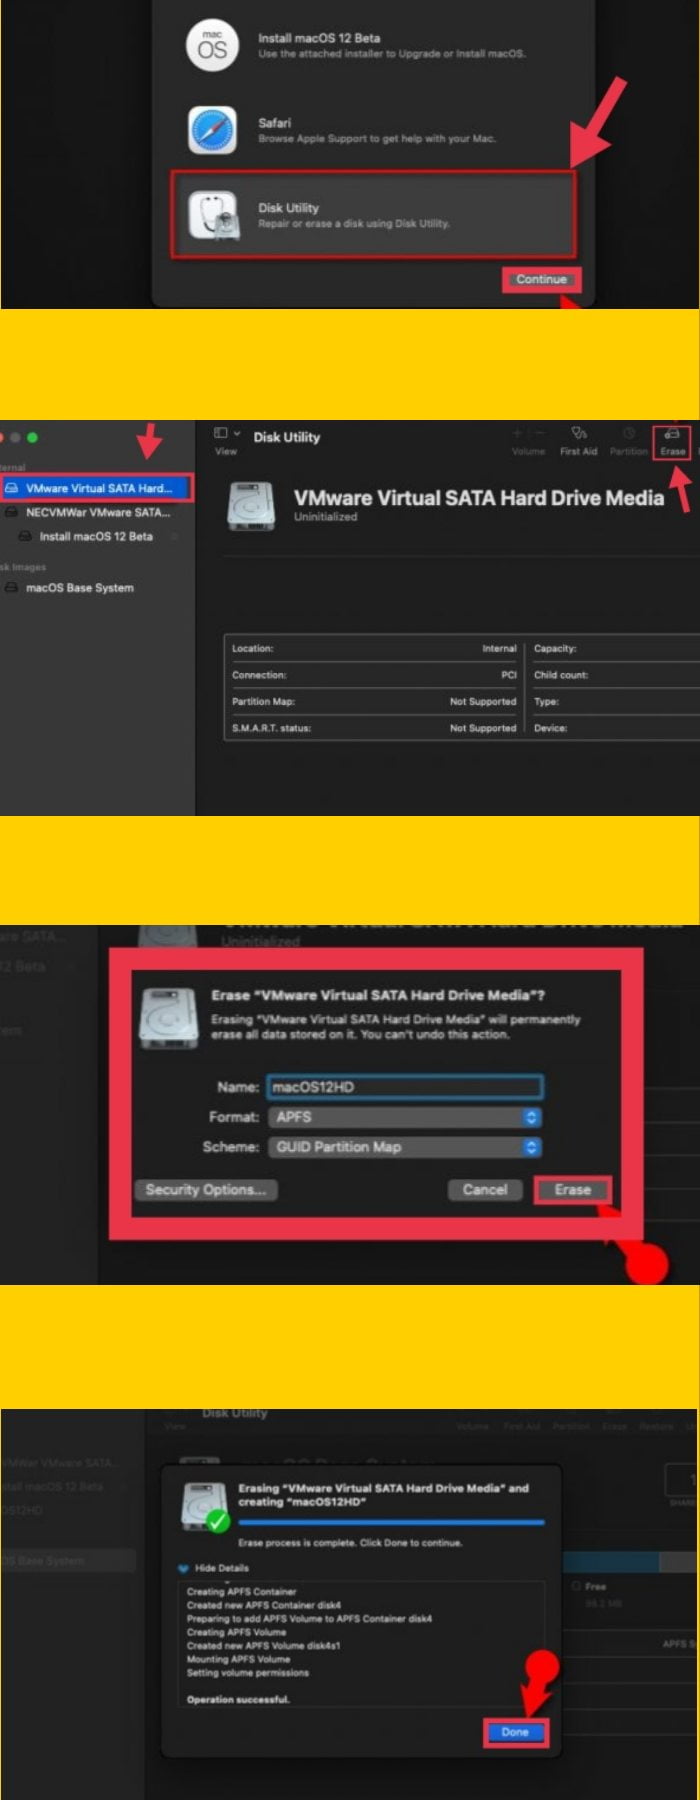
- Now tap on that Disk utility and choose Continue.
- Next, choose VMware Virtual SATA hard drive media then tap Clear.
- Now for the Surname, Enter floppy disk macOS12HD then choose APFS of format Drop-down list and tap Clear.
- Tap on Done to close the dialog box.
- Of Disk utility Tab, tap Quit Disk Utility.
- Tap on Install macOS 12 Beta and tap Continue twice.
- You need agree to the terms of the software license agreement.
- Tap the available hard drive, then press the To install Button.
- After 2 or 3 restarts, the installation of macOS Monterey is now complete. This can take around 15-30 minutes, depending on the system.

Complete the basic macOS account settings
After you have successfully installed macOS Monterey on VMware on a Windows 10 PC or laptop, there are a few basic account settings you need to make depending on your preferences.
- First choose your preferred one Language.
- Now you can choose which one country where you live. Select it so that the national language should be entered on the keyboard.
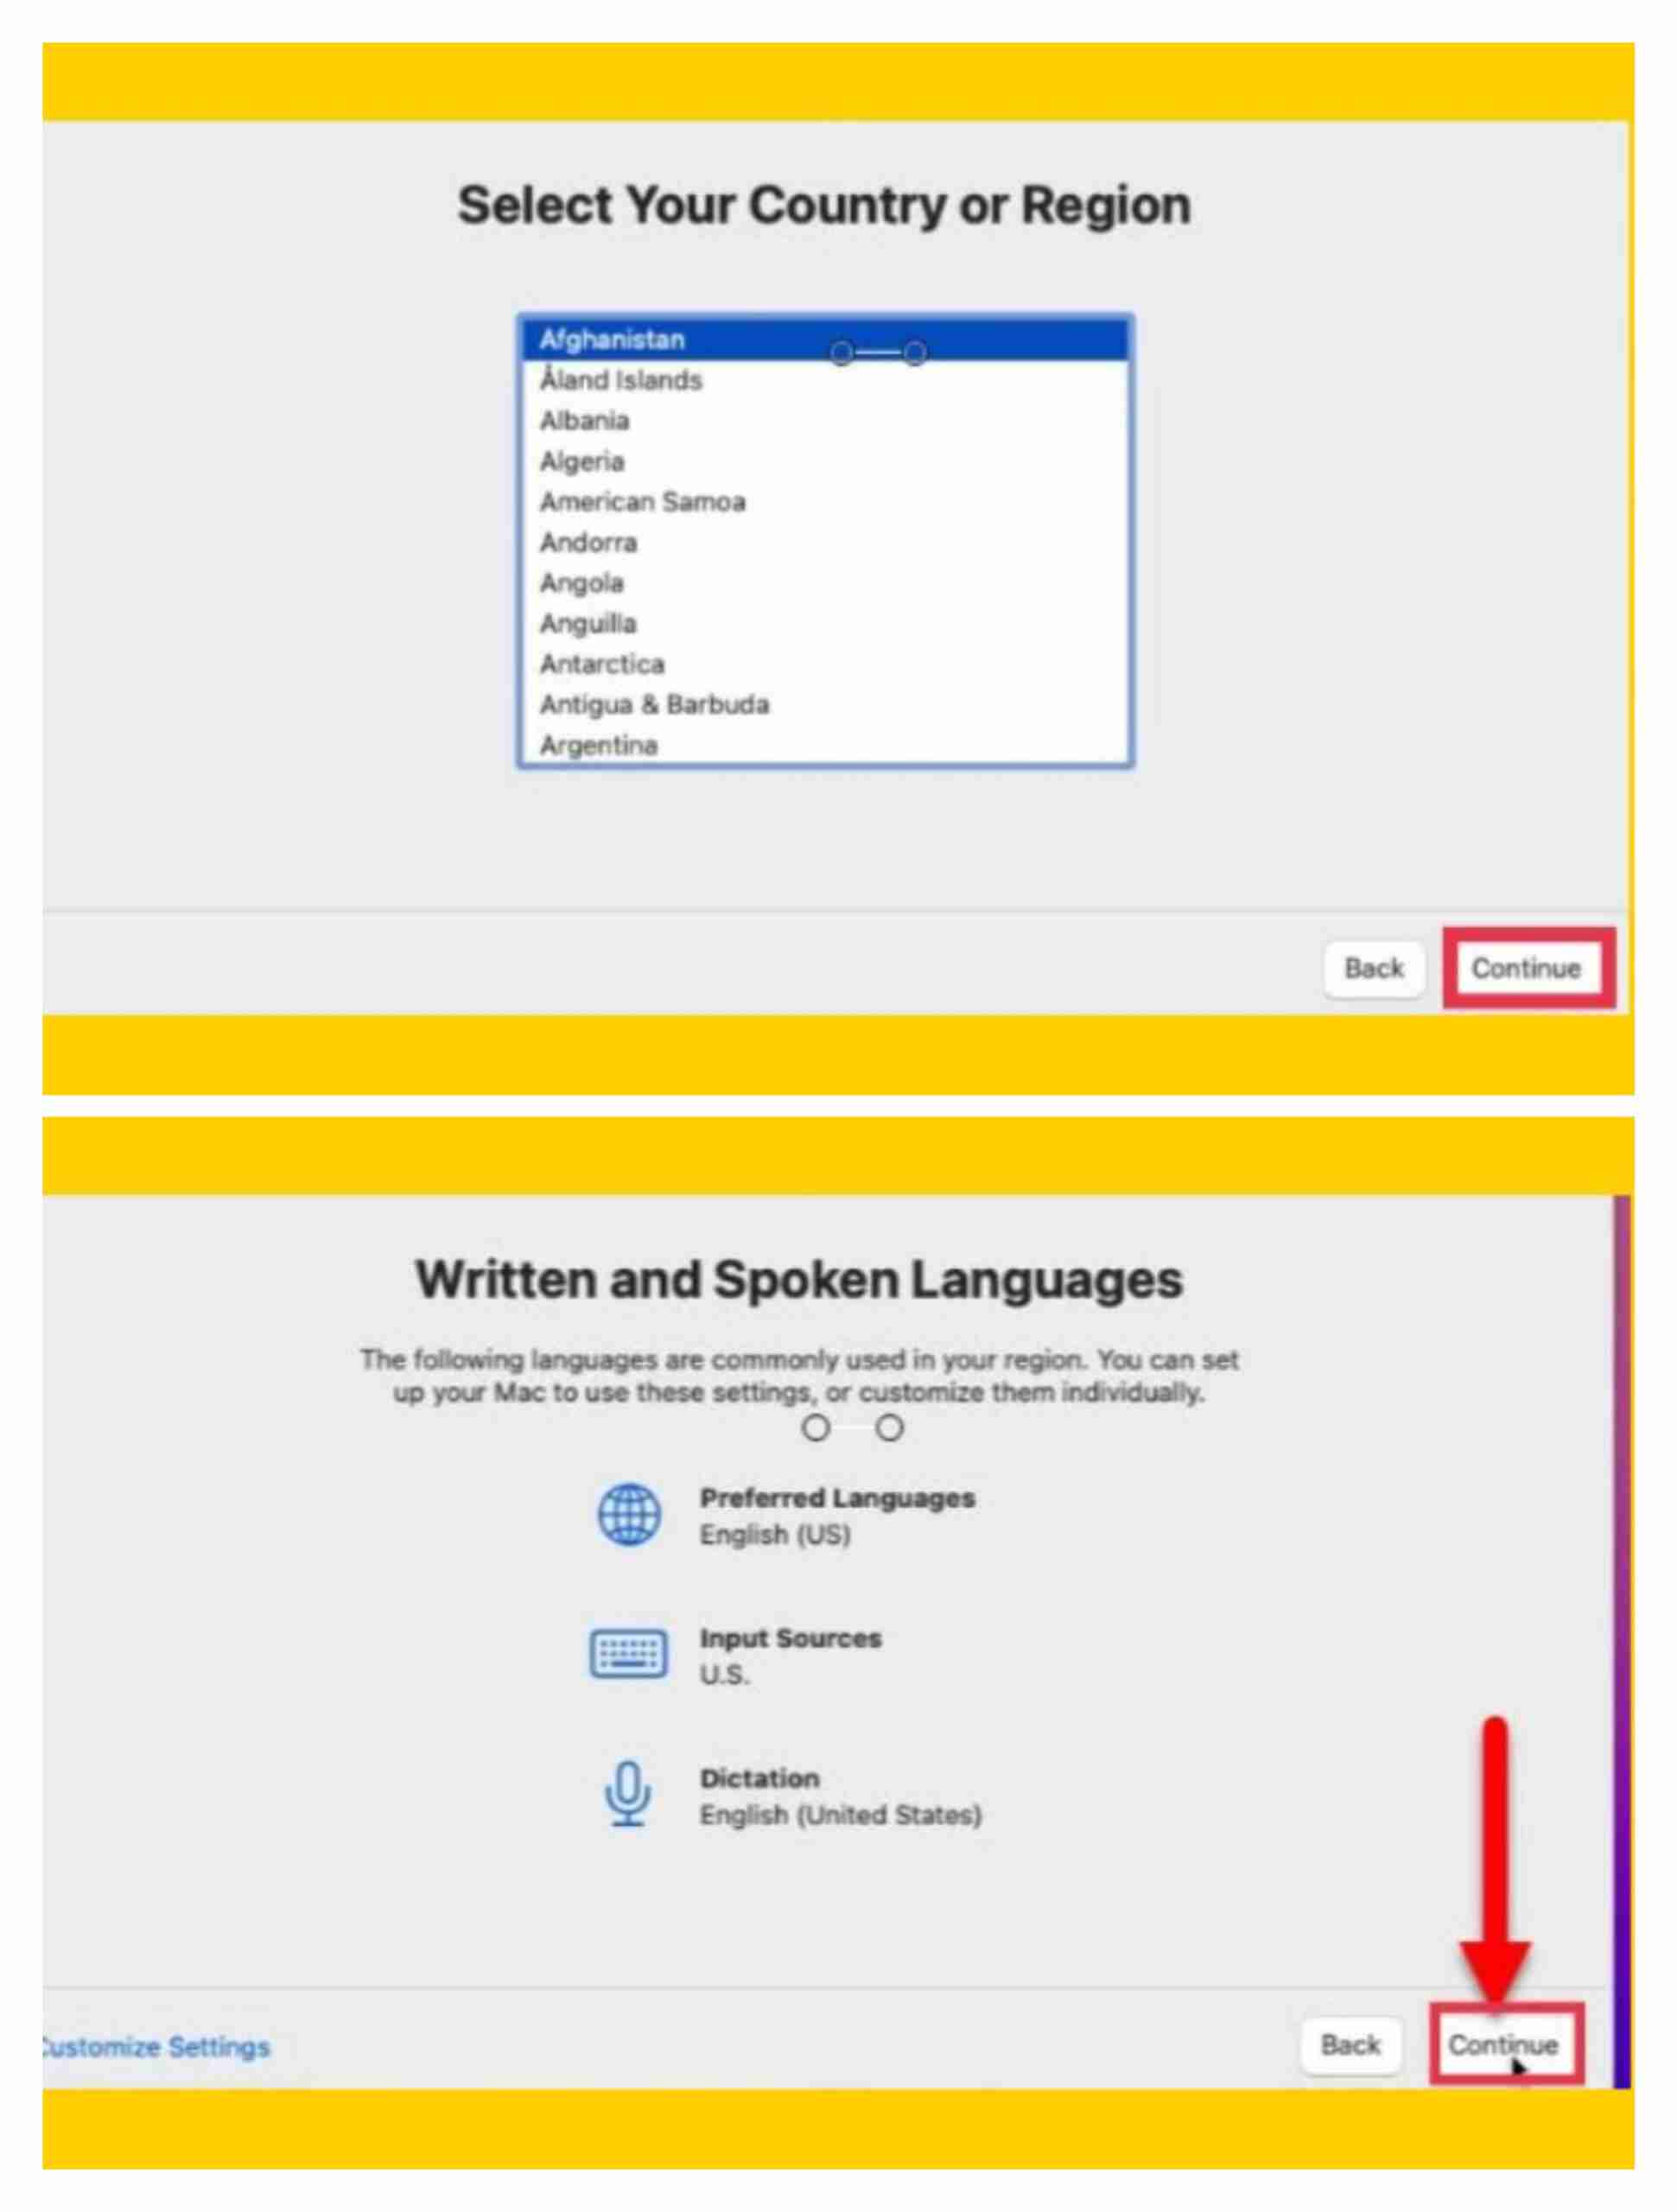
- With the Accessibility, you can customize the Mac to your liking, activate it if necessary, otherwise you can skip it.

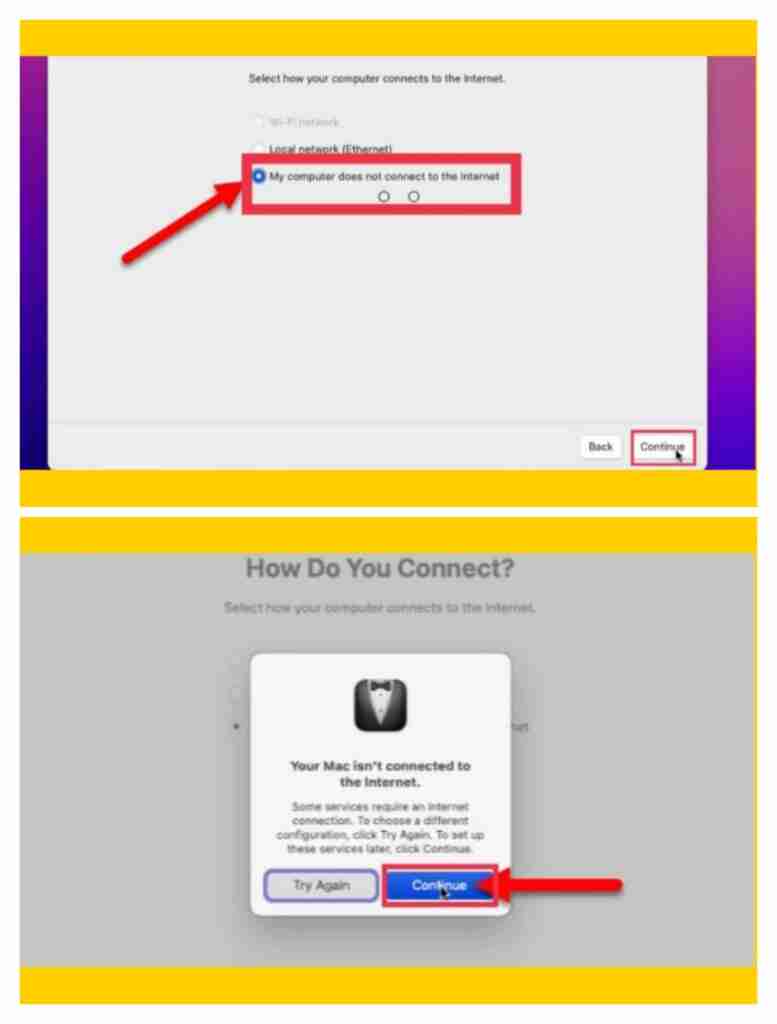
- Choose ‘My computer won’t connect to the internet and ignore the internet warning. Don’t worry, your internet will work
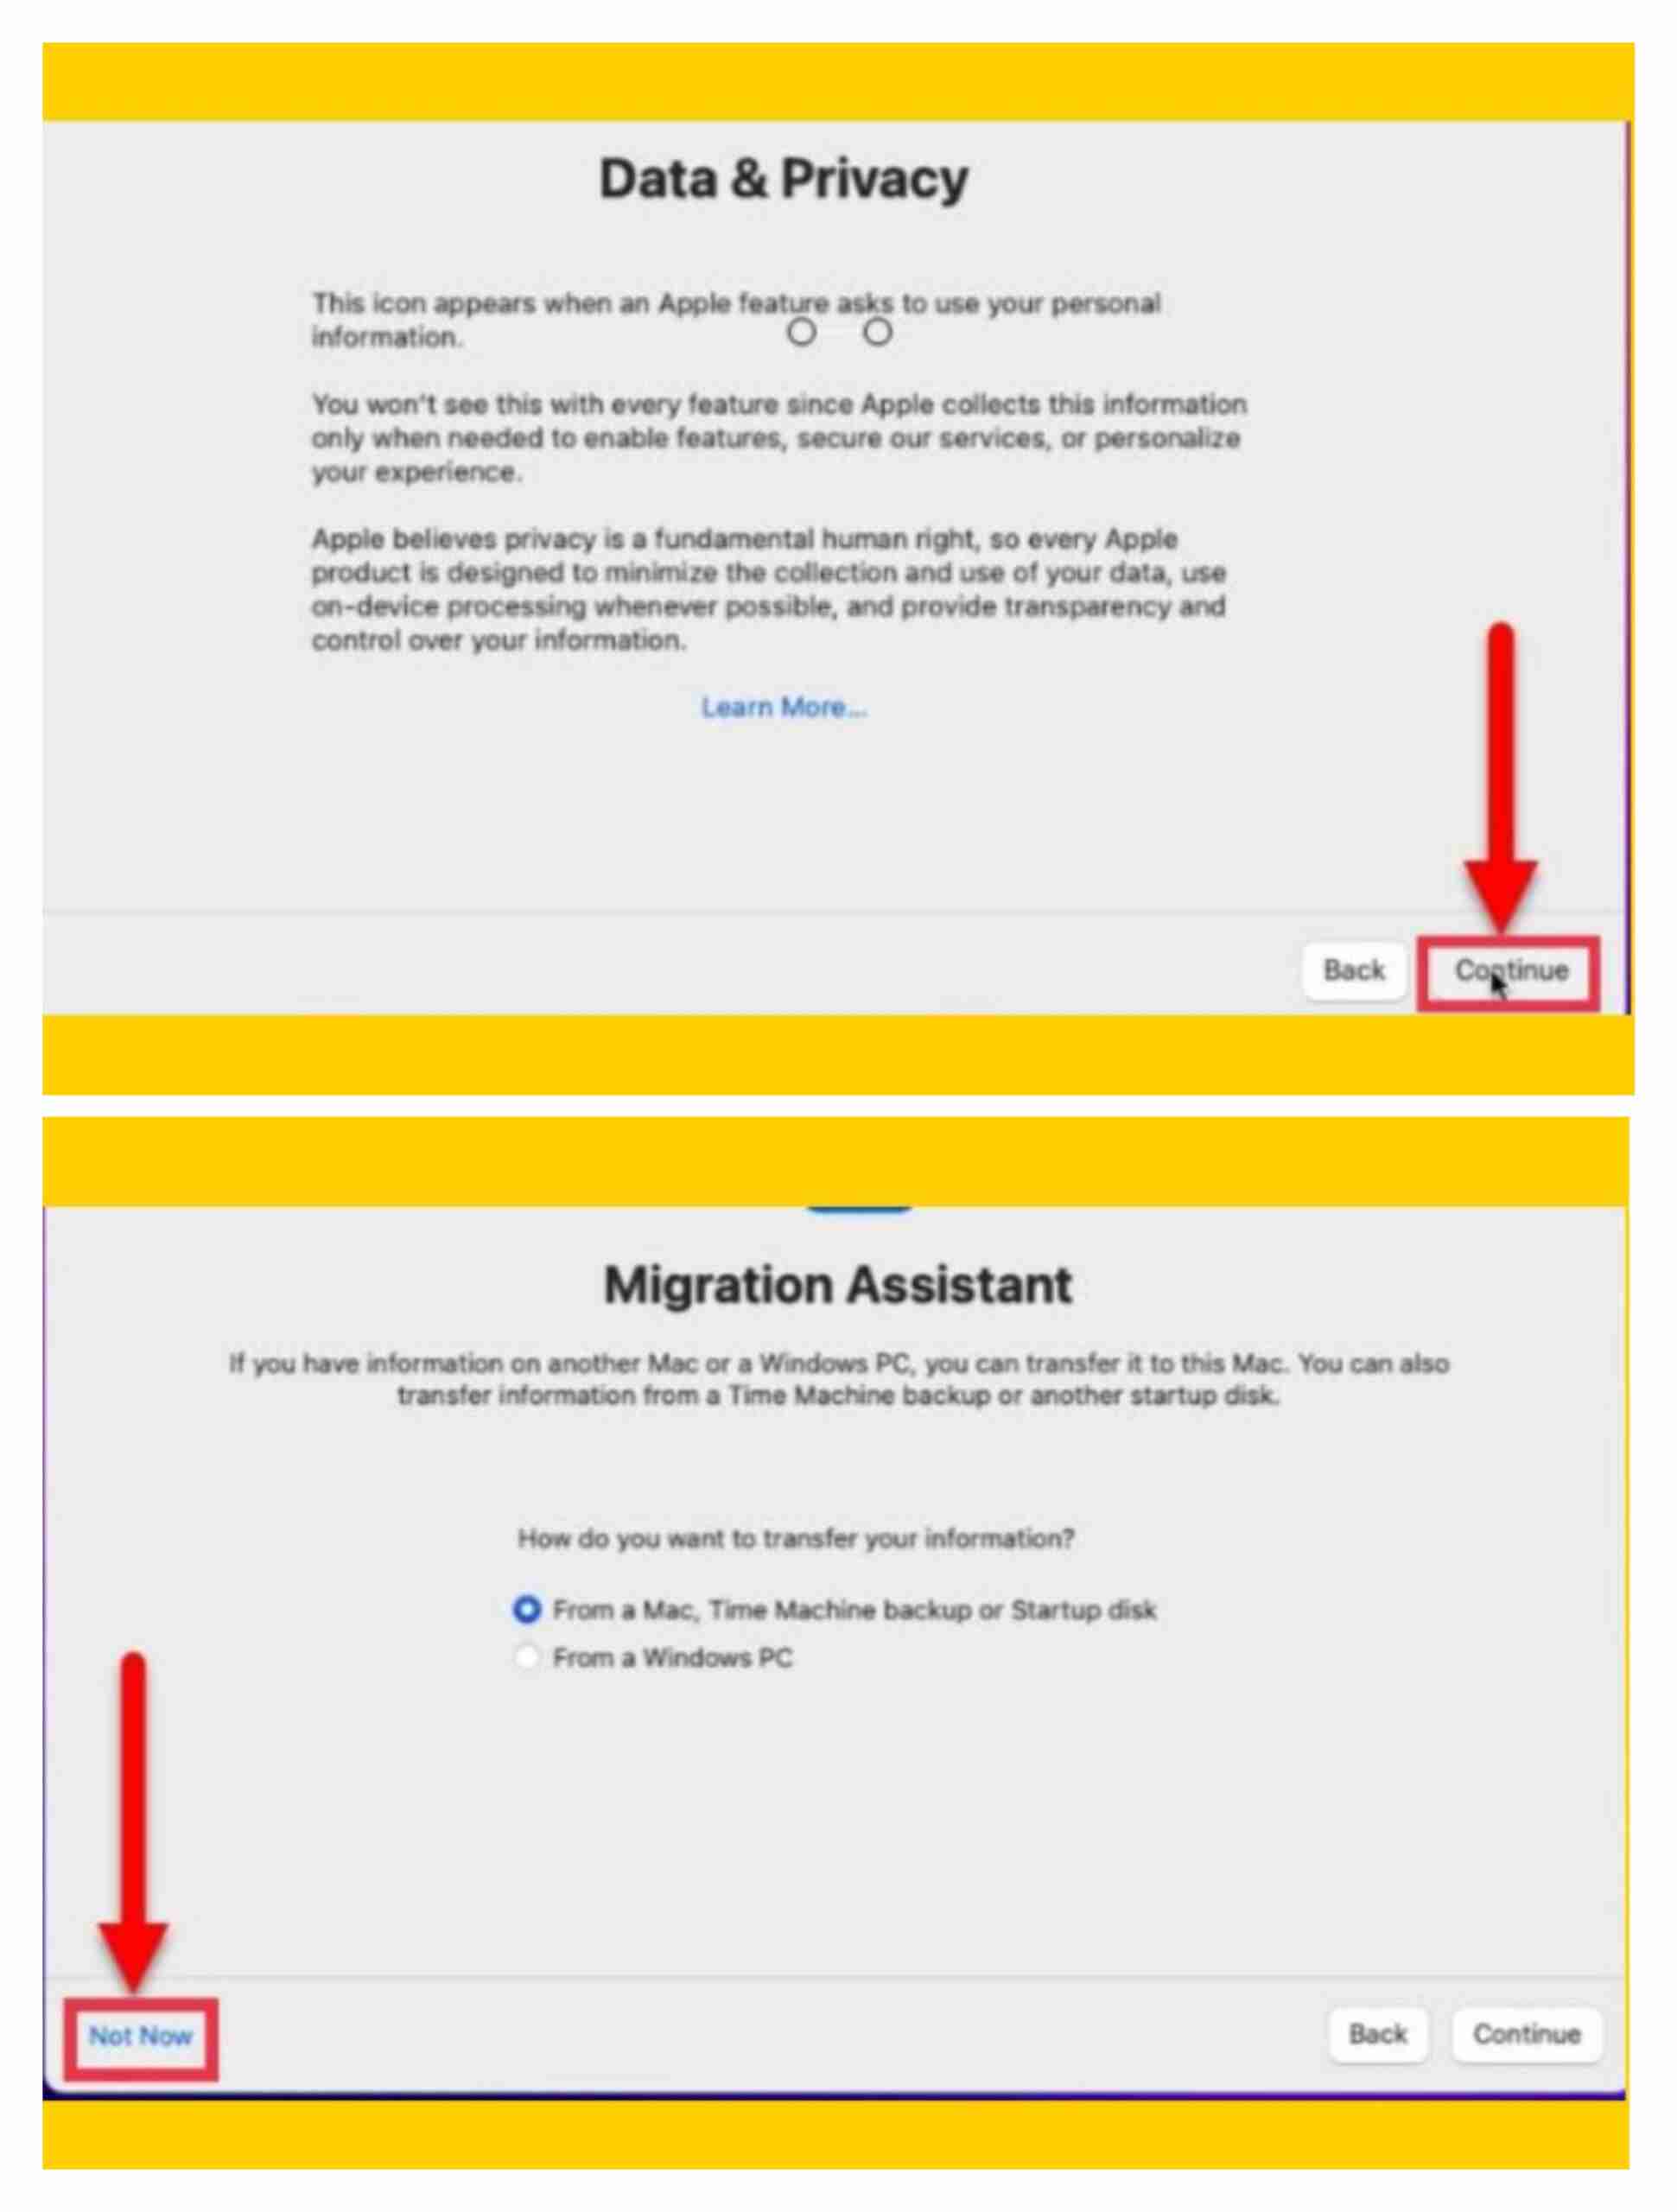
- Read Data & Privacy and click Continue.
- In this step we have nothing to do with migration as we are doing a fresh installation. You can tap Not now.
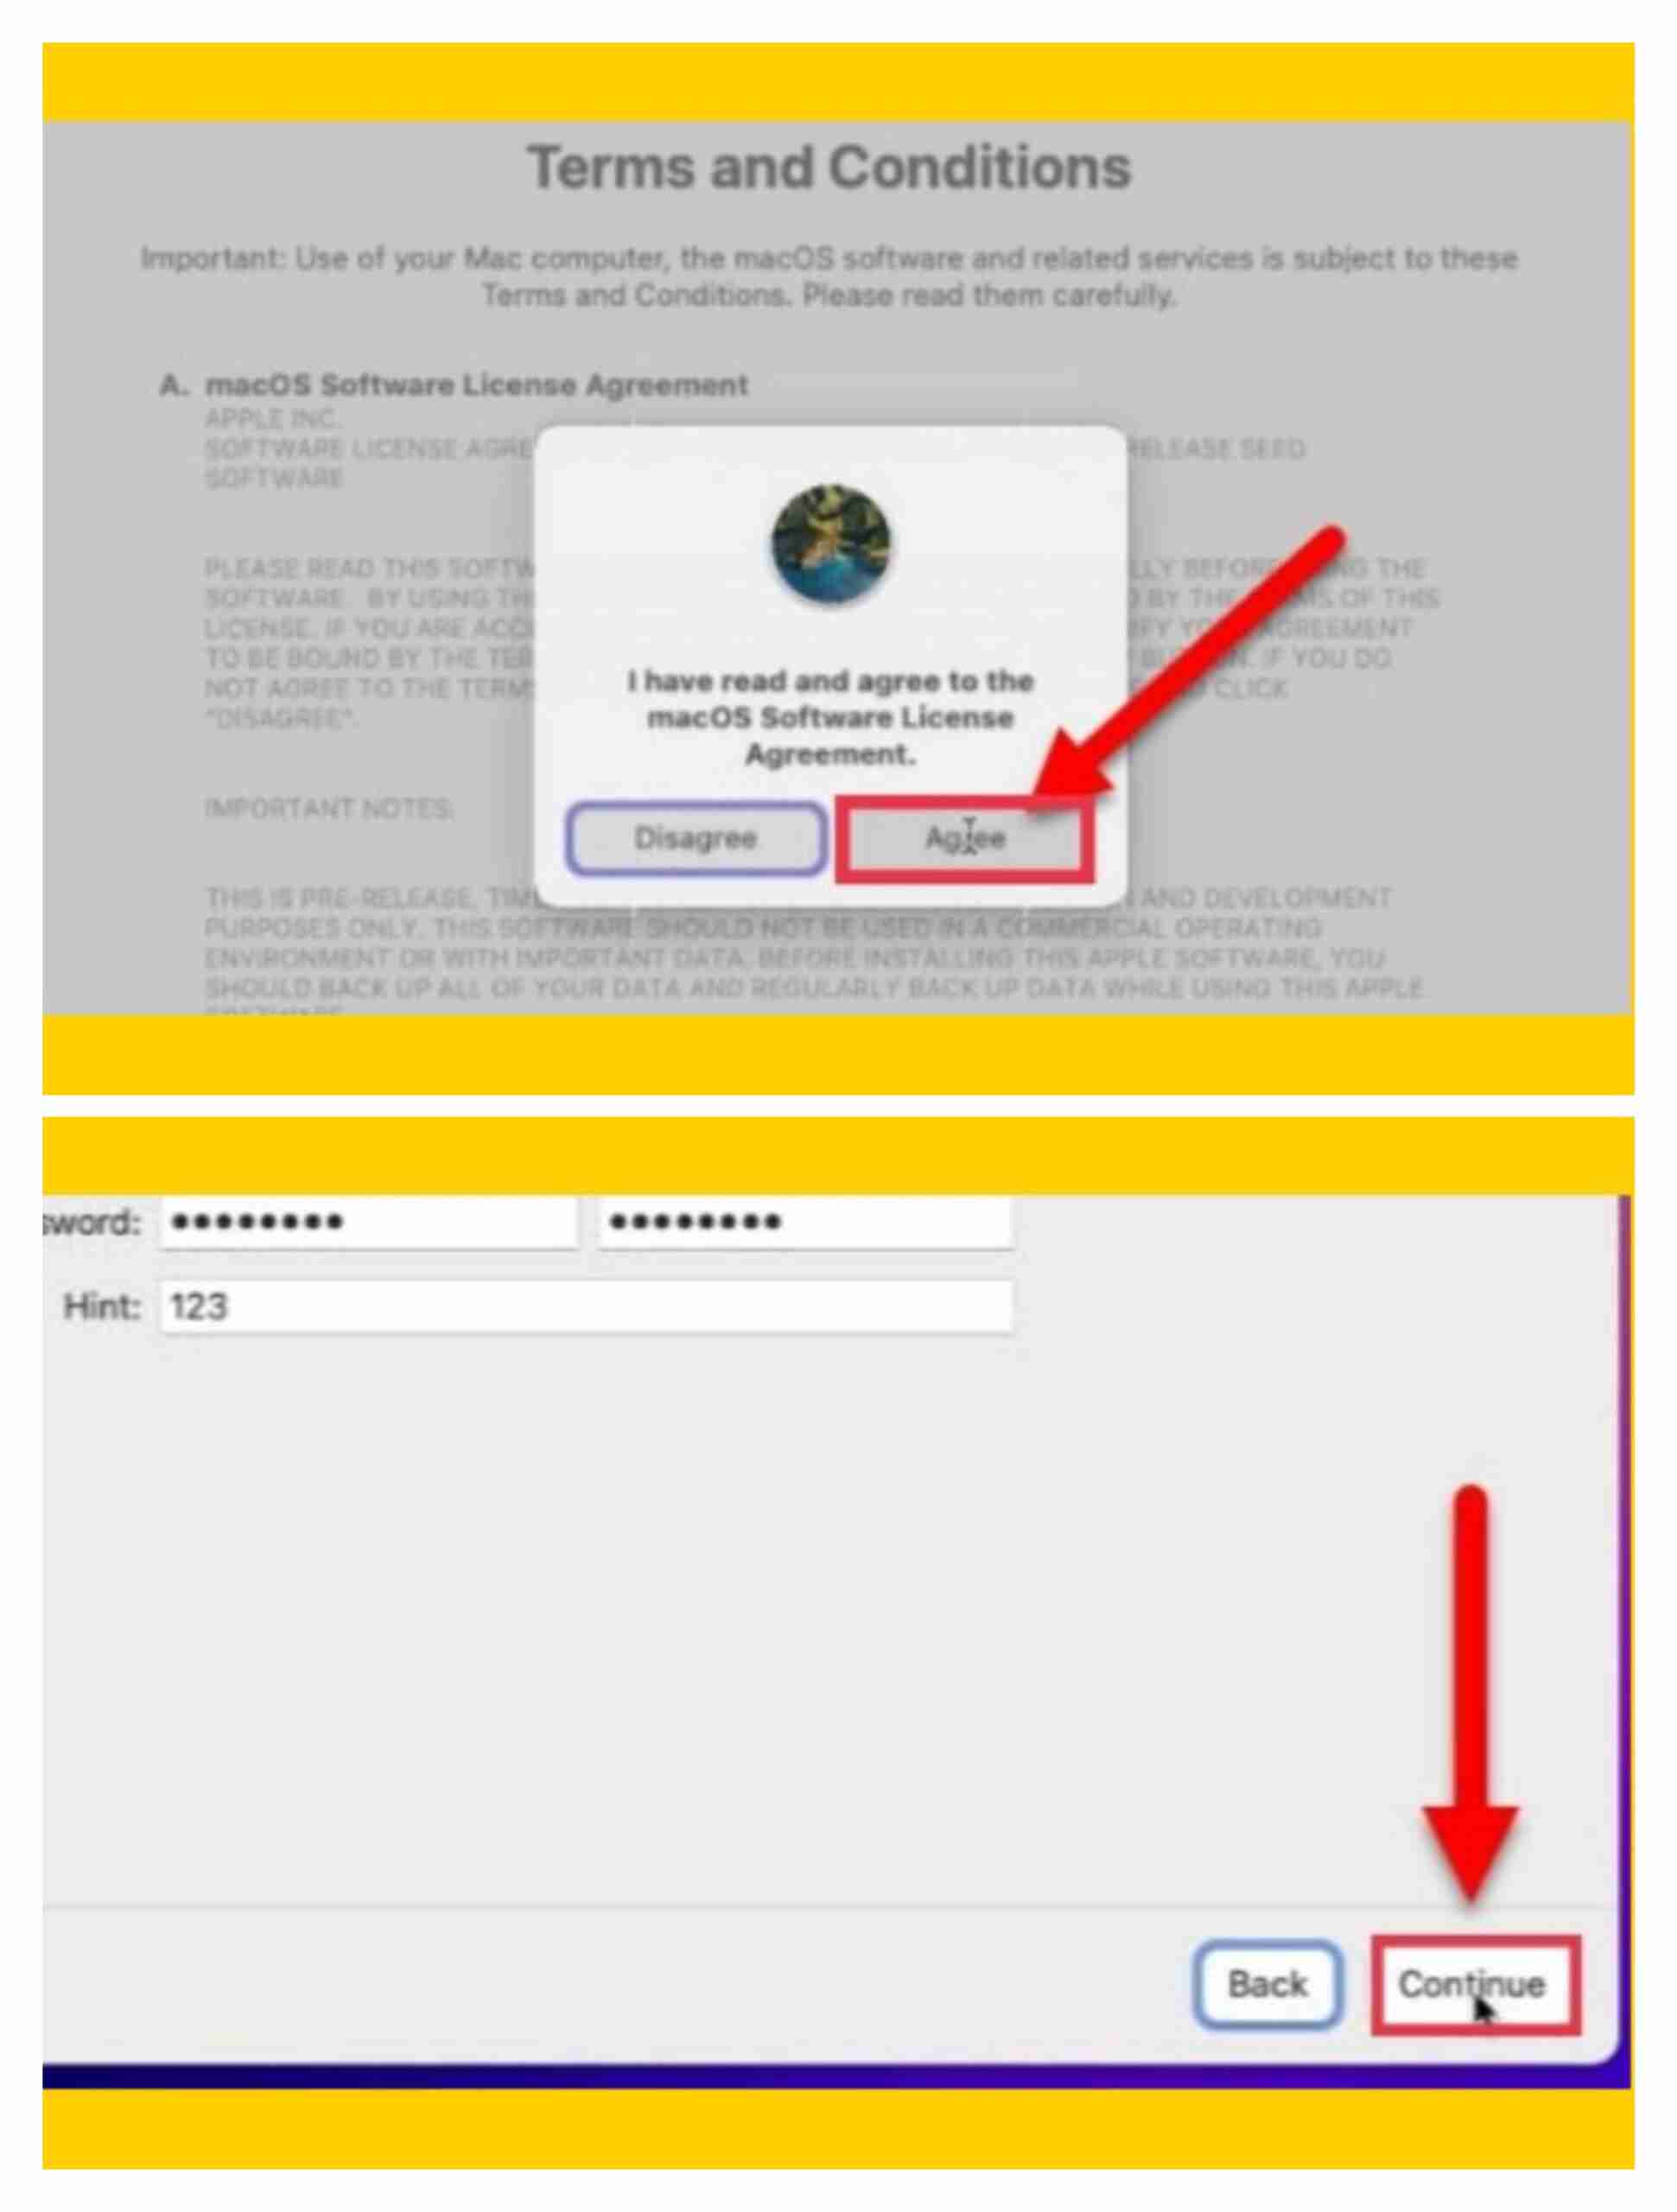
- Now tap on Agree with the terms and conditions to go to the next step.
- Next, for privacy reasons, you need to create a computer account with a strong password and tap continue.
- click Continue Make this your new Mac window.
- If you’re interested in monitoring your weekly reports, app downtime, or uptime, you can sign up for Screen time. If not, you can tap set up later and go to the next step.
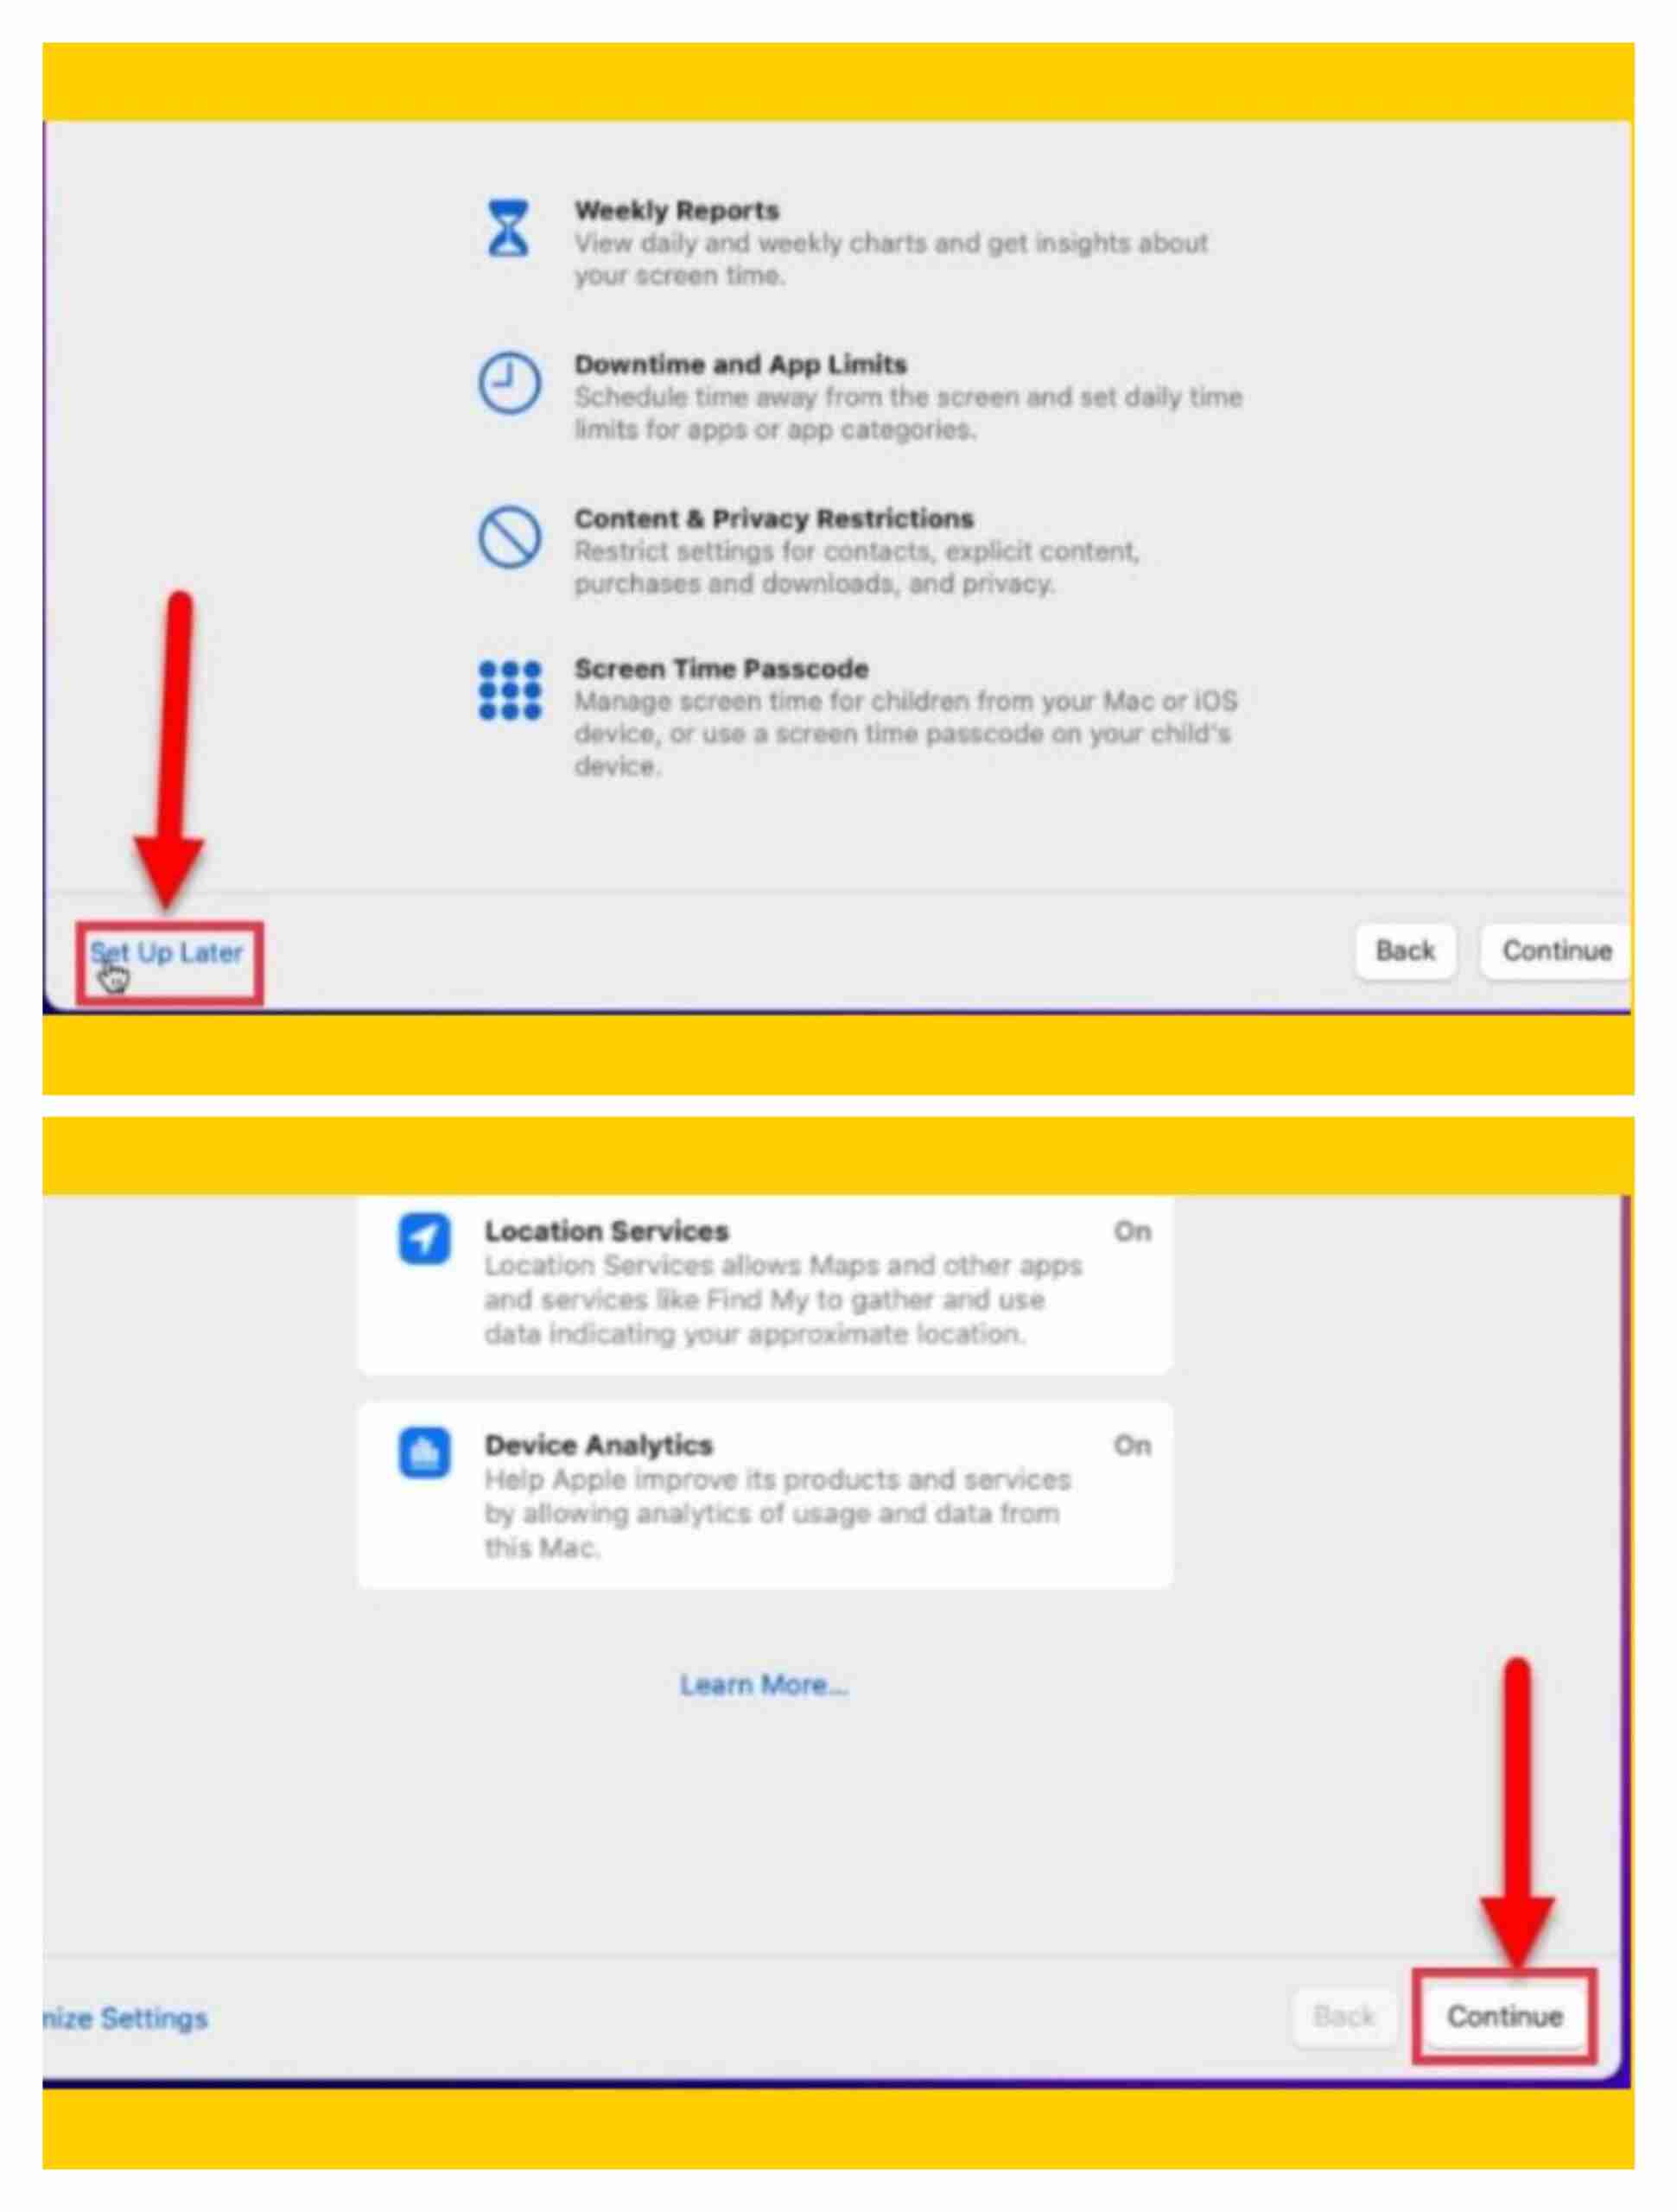
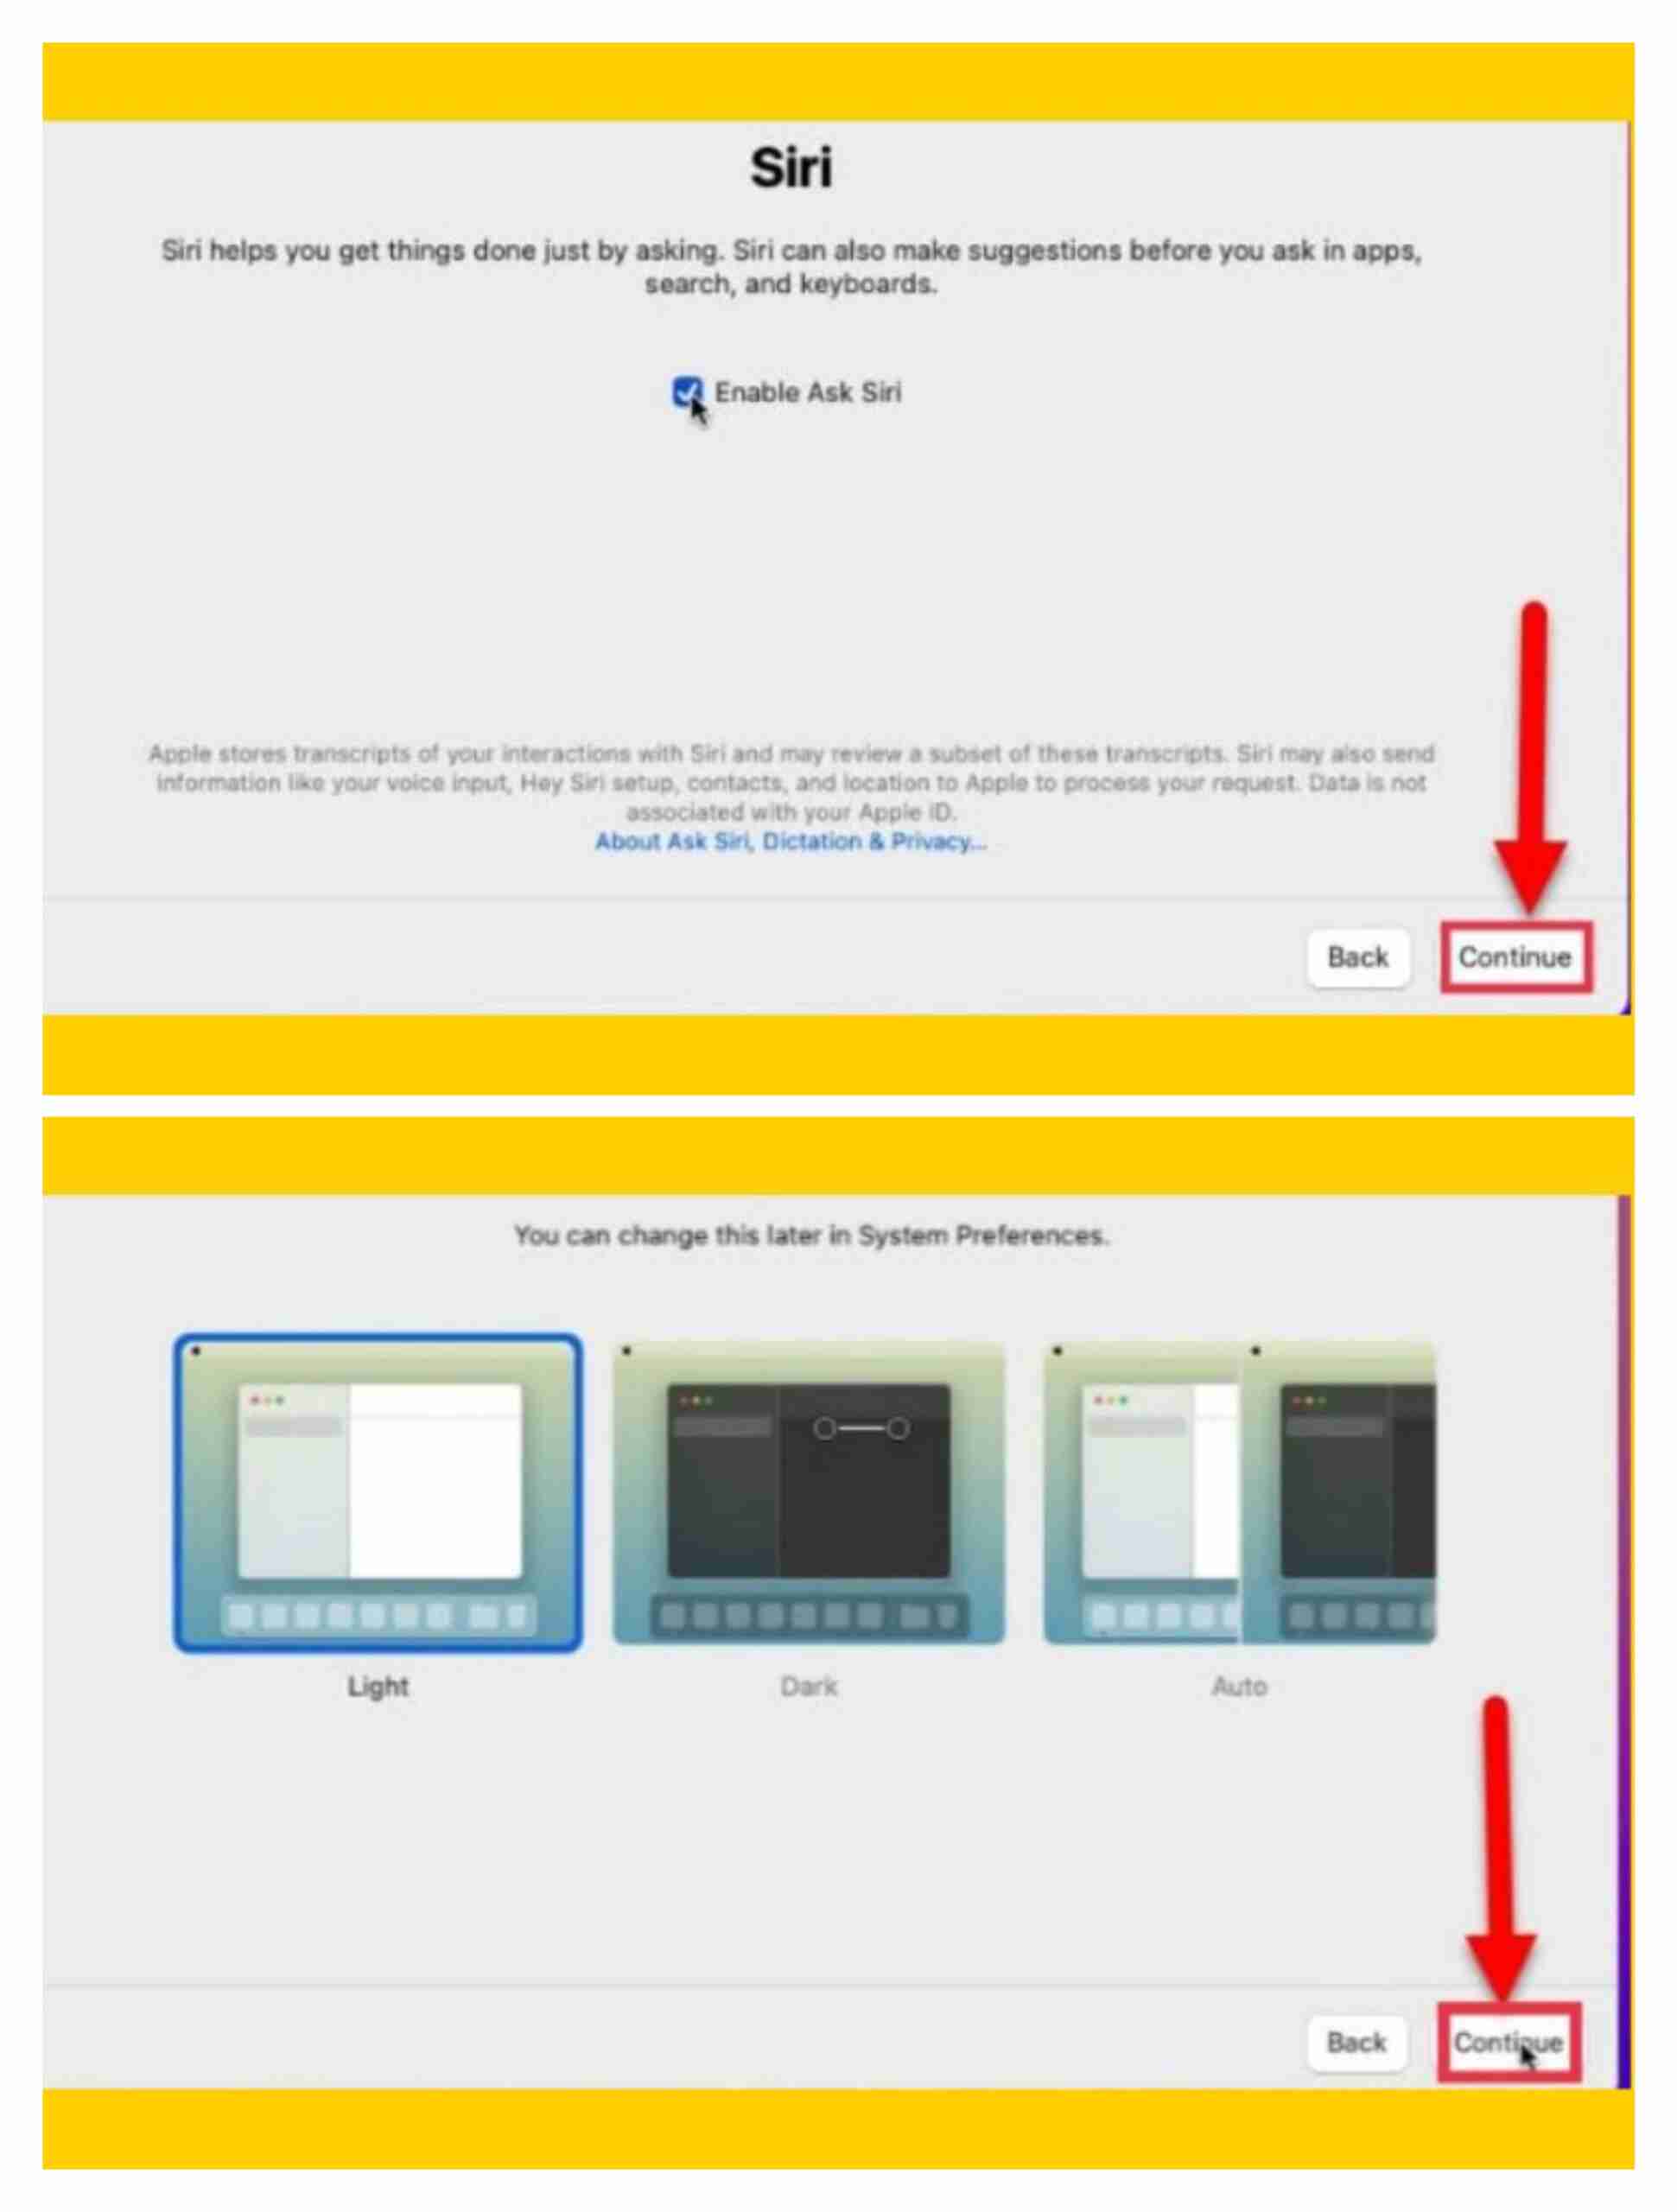
- Now tap on Continue if you want to use Sirius on your Mac, if not, uncheck the box next to Siri.
- Finally, choose your preferred design for your macOS Monterey or macOS 12.
Pro tips: If you want your macOS Monterey to work smoothly and quickly under VMware on your PC, we recommend installing VMware Tools.
last words
This is how you can install macOS Monterey on VMware on a Windows 10 PC and laptop very easily and with step-by-step instructions. If you have any questions or encounter any problems, please let me know in the comments section. Good luck!
Also read:
- How to download macOS Monterey on Windows 10 to create a bootable USB stick
- How to create a bootable USB installer for macOS Catalina on Windows 10
- How to install macOS Big Sur on VirtualBox on Windows 10