
There are many reasons why you need to flush or reset your DNS in Windows 11. The most common reason is that the website is not resolving properly and your DNS cache is keeping the wrong address can be a problem. In this guide, we’re going to show you three different and easy ways to clear or reset your DNS cache on a Windows 11 PC.
However, in Windows 11, clearing the DNS resolution cache will help fix DNS-related issues. The problem could be undetected bugs on the website or the inability to access these ever-changing web pages.
What is dns
DNS stands for Domain Name System. Converts the website name to an IP address that the computer can understand. It does this with every website you choose to visit. When a user visits a website by their host name, the web browser initiates a search on the Internet, which however cannot be completed until the name of the website is “translated” into an IP address.
To improve your browsing experience, Windows offers an option to save the specified DNS server address. The TCP / IP stack uses the IP address and points to that specific gateway user or service specific DNS to resolve the website’s domain name to its IP address and upload it to your web server.
What is DNS Cache?
DNS caching refers to the temporary storage of information about previous DNS lookups in the device’s operating system or web browser. Keeping a local copy of DNS lookup makes it easy to get it from your operating system or browser, making it easier to resolve a website’s URL to its corresponding IP. The basic functions of all cache types are similar.
DNS caching doesn’t just happen at the operating system and device level. In fact, DNS lookup involves the various steps outlined above. In the new DNS lookup process, the search takes place via the resolver, the root server and the TLD server. Gather information at each stage and save it for future reference. Therefore, even if the local DNS cache is empty, the solver can still access the cached copy of the required information, eliminating the need to go through the entire DNS lookup phase.
How to view the DNS cache
If you’re curious and want to know what’s currently stored in your DNS cache, here’s how you can view it:
- Go to start and then enter cmd and then tap Execute as administrator.
- Now in the command prompt window enter the following command:
- ipconfig / displaydns
- Now meet them Enter Key to execute the command.
- Now you can see your current DNS cache data.
3 ways to reset your DNS cache on Windows 11
There are typically three types of caches in Windows that you can simply empty:
- Memory cache
- DNS cache
- Thumbnails cache
Clearing the memory cache frees up some system memory, while clearing the thumbnail cache saves your hard drive space. Clearing the DNS cache will fix problems with your internet access.
So without further ado, here’s how to reset the DNS cache on Windows 11:
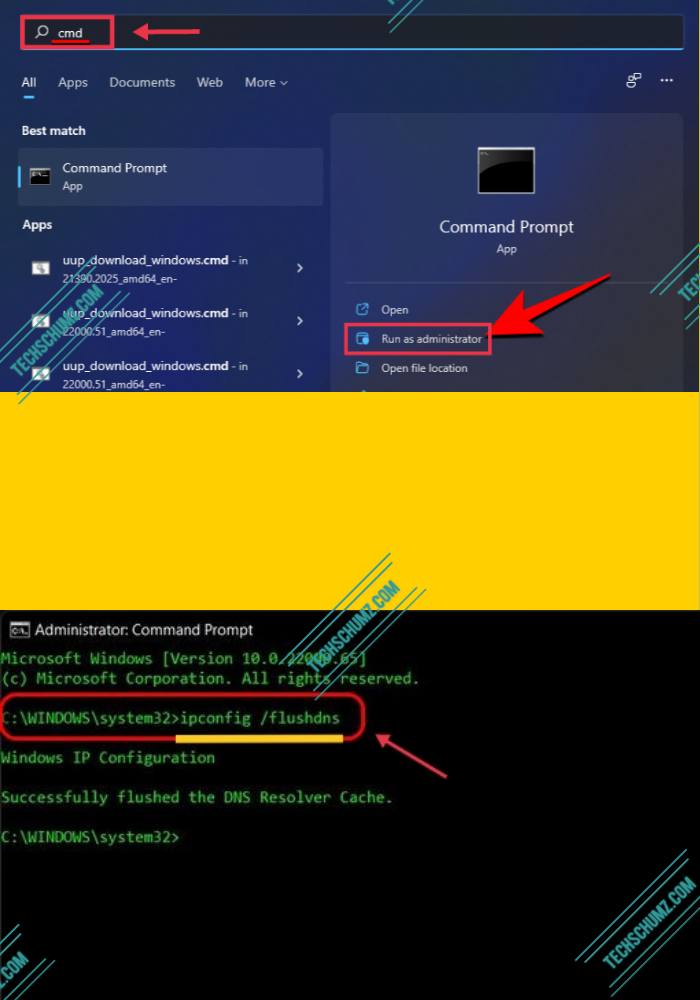
Method 1. Empty the DNS cache in Windows 11 via the command prompt (CMD)
- Open the command prompt by going to Begin, and search for cmd.
- Now tap on Execute as administrator as soon as you see it.
- Now enter the following command:
- ipconfig / flushdns
- Now press Enter to run the above command.
- After pressing Enter, you will now receive a confirmation message that the DNS resolver cache has been cleared.
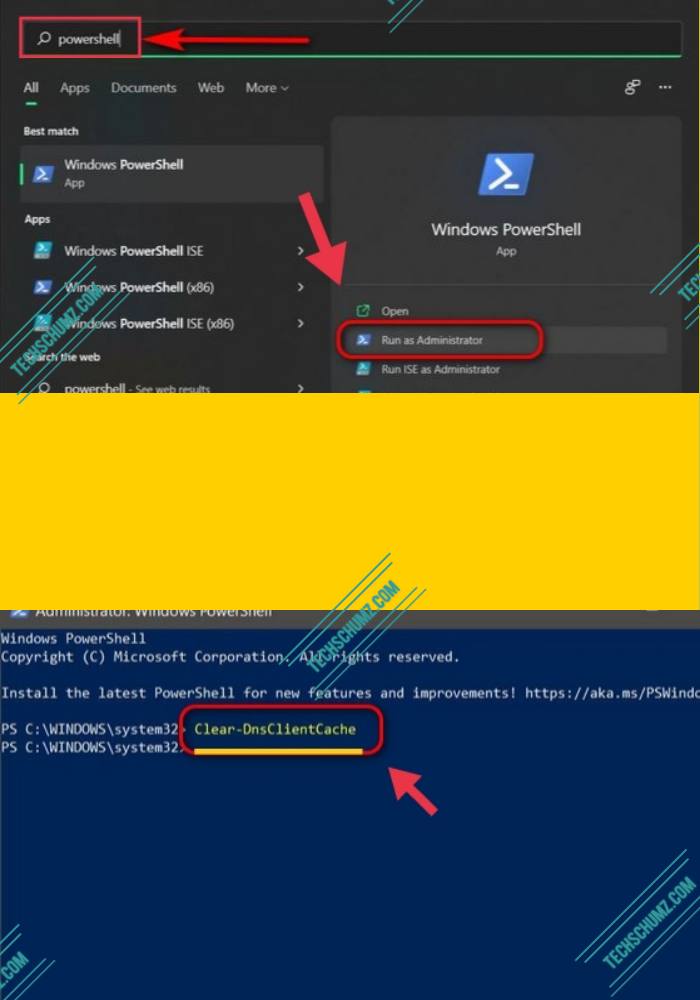
Method 2. Reset your DNS cache on Windows 11 through PowerShell
In addition to the command prompt, you can also use PowerShell to flush or reset the DNS cache on a Windows 11 PC or laptop. How to do it:
- First go to the start menu and search for Power Shell.
- Then tap Execute as administrator.
- Then type or just copy and paste the following command:
- Clear-DnsClientCache
- Now meet them Enter Key to execute the above command.
- That’s it! Your DNS cache will be flushed immediately.
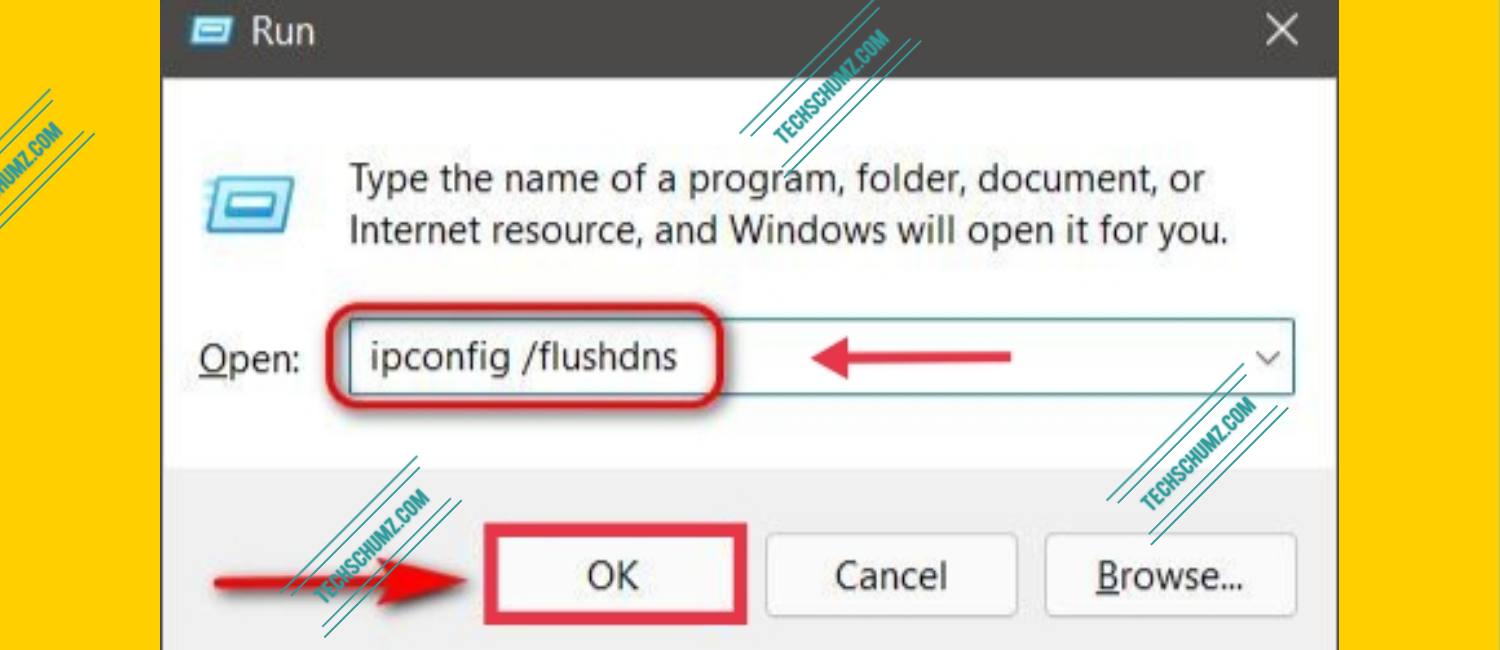
Method 3. Clear the DNS cache in Windows 11 with RUN
You can also flush the DNS cache directly from the RUN window without opening a command terminal. Many people find this method much more convenient than the first two methods we explained above. That’s how it’s done:
- First you need to open the run box by using
Win + RKeyboard shortcuts. - After the Run box appears, just enter the following command:
- ipconfig / flushdns
- Now press Enter on your keyboard to run the command.
- After that, you will see a command window and your DNS cache will be flushed immediately.
last words
Clearing the DNS cache may sound like a lot of technical terms, but as you know, it is an easy task. There are several ways to clear or flush the DNS cache on Windows 11, including using Command Prompt, PowerShell, and running commands. So keep updating the DNS information cached on your Windows 11 computer to fix any potential connectivity issues and improve your privacy.
Also read:
- Here’s how to completely disable OneDrive on Windows 11
- How to disable or remove the login password on Windows 11