
Nowadays, even high-end computers can become slow and sluggish and interfere with your daily work. While there are many methods that you can use to make your PC quick and efficient, the best thing to do is to defragment your hard drive once a week. In this guide, we are going to help you learn how to defragment Windows 11 hard drives automatically and manually, but first learn what is being defragmented in Windows 11.
What is defragmentation in Windows 11?
Basically, defragmentation is what it sounds like: to undo the fact that data on the hard drive is fragmented. Over time, as files are saved, re-saved, or deleted on the hard drive, small pieces of information eventually end up in random locations on the hard drive, rather than all together.
These files take longer to find on traditional spinning hard drives because the read head has to be moved to different locations on the hard drive instead of being able to read data in consecutive sectors.
Defragmentation means putting files back in one place. Because the operating system eliminates the spaces between files, the data is effectively compressed. This, in turn, should increase the speed of your PC or laptop, even if it’s just trivial. Here’s how to defragment hard drives in Windows 11 to improve your system performance.
Don’t worry, no files will be deleted without your express consent.
Manually defragment Windows 11 hard drives using the Settings app
Windows has a built-in tool for defragmenting your storage device. You can also set custom routines to run automatically during off-peak hours.
Step 1. To manually defrag a Windows 11 PC, open the Settings app from the Start menu, then tap the ‘system‘Tab in the left sidebar.
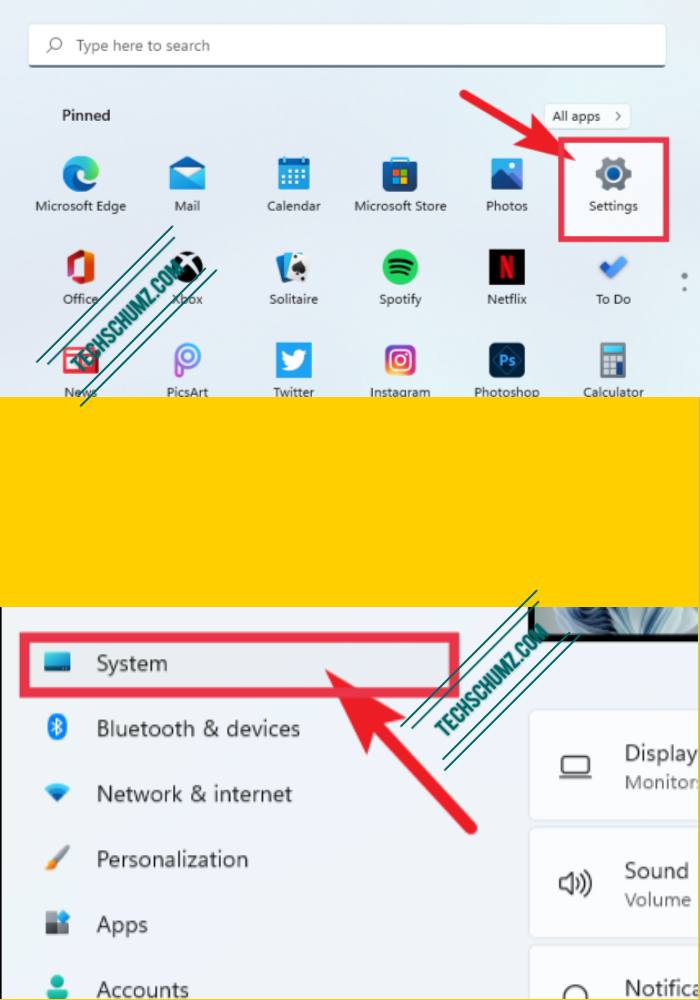
Step 2. Then tap the ‘Storage’ scroll down and click the ‘Advanced storage settings’ Opportunity.
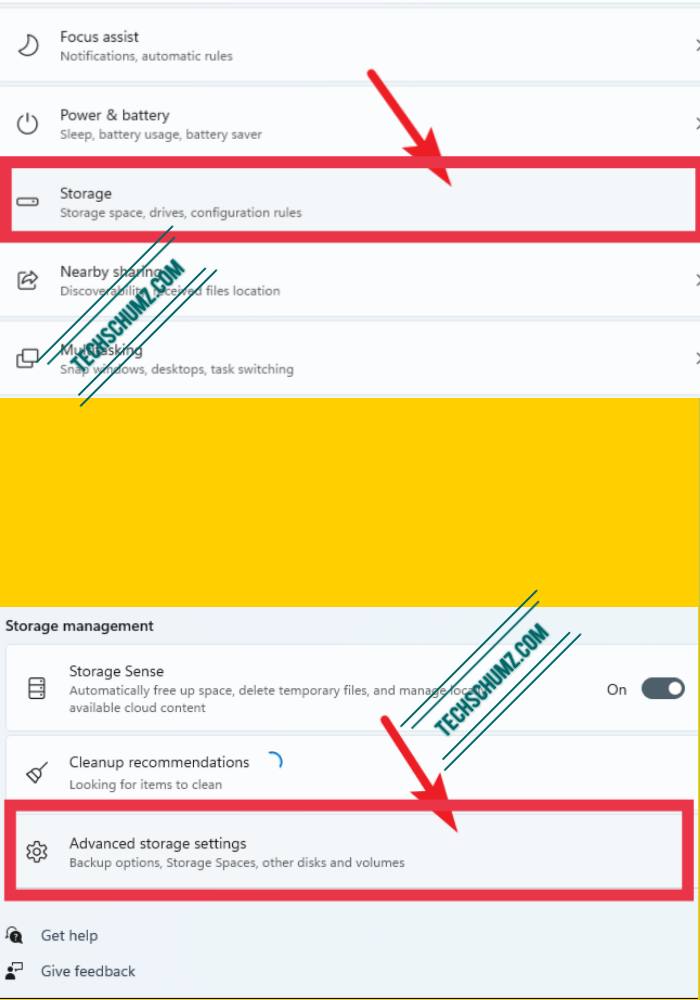
Step 3. Then tap the ‘Drive optimization‘Tile from the list. This will make you a separate ‘Optimize drive‘ Window.

Step 4. If the Optimize drives Window opens, select the drive you want to defragment and click on Optimize to start defragmenting.
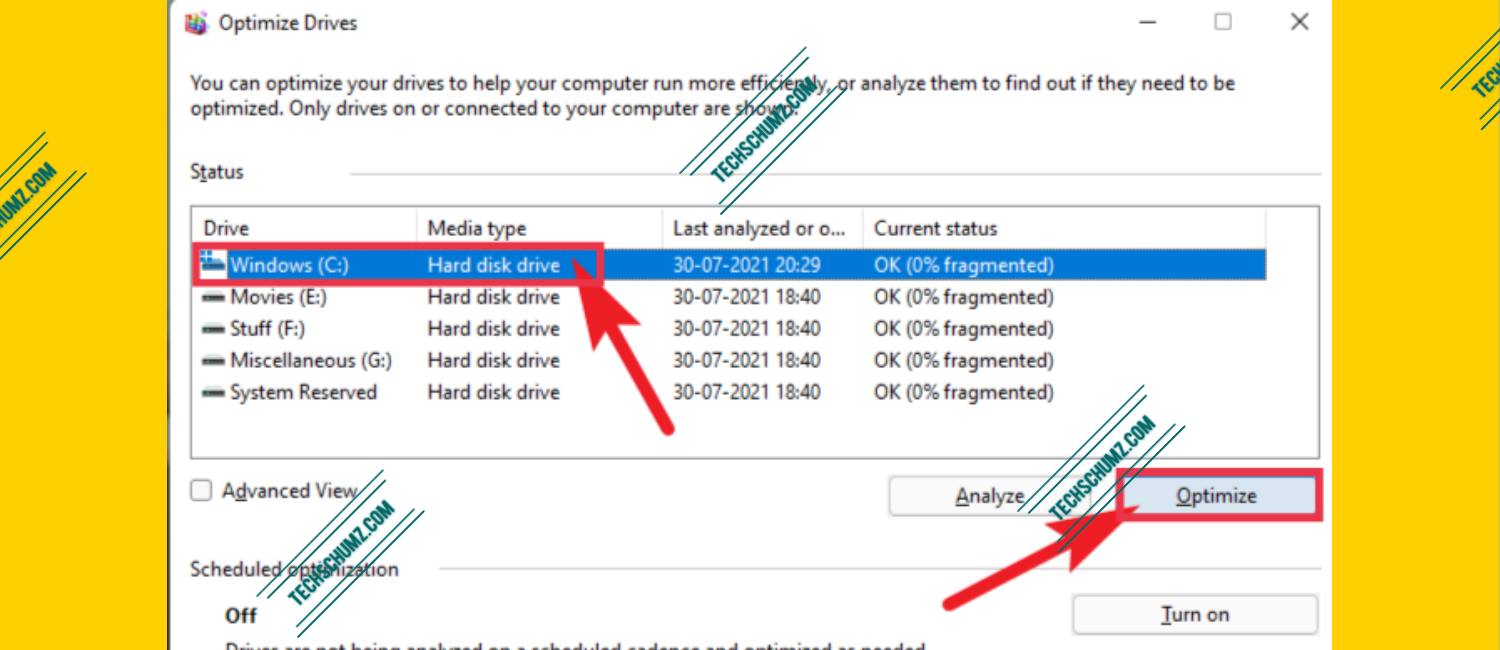
Note: Although defragmenting the Windows Installer drive can improve performance, it is recommended that you defragment each drive individually.
Defragment hard disks under Windows 11 automatically via Schedule Basis
If you want, you can set a frequency for defragmenting the hard disk. This way, you don’t have to manually optimize the drives. How to complete this task –
- To automatically defrag a Windows 11 PC or laptop, open the Optimize Drives window by following the steps above. Settings> System> Storage> Advanced Storage Settings> Drive Optimization.
- After it opens the next thing you should search and click Change settings under the heading “planning optimization”.
- A new window will now open. Here you can set the frequency to one of the following options – Weekly, Monthly or Daily.
- Besides, you can also choose a drive from which you want to apply this scheduled defragmentation.
- After choosing the frequency of defragmentation and the disks you want to apply it to, click OK and you’re done.

That’s it, the system will defragment your hard drive according to your instructions.
Does Windows 11 need a defragmentation?
If your Windows 11 PC has an SSD installed instead of a spinning hard drive, the answer is no. This will not help in any way and will likely shorten the life of the device. In any case, later versions of Windows will automatically run tuning routines on the SSD (the same goes for the SSD controller) so you can just let go of it and everything will be fine.
for Windows 11 PCs with mechanical hard drives, it’s worth a try. However, don’t expect a huge increase in speed. If your machine is running slowly, the best way to lubricate your carrier is still to install an SSD. The performances are usually day and night.
last words
That’s it. Now you know how to defragment Windows 11 hard drives both manually and automatically. Remember, however, that defragmenting hard drives is only considered good if it is done over a long period of time. If your device is spreading files further apart and you are bringing them closer together more often, it will have a negative impact on the hard drive. We therefore recommend doing this optimally.
If you have any questions about defragmentation and the steps above, please let us know in the comments section below.
Also read:
- How to flush or reset your DNS cache on Windows 11
- How to Free Download and Install Minecraft on Windows 11
- How to erase your data from a flash drive