Windows 10 happens to be the most popular operating system in recent times. The OS can be seen just about everywhere, from schools to offices. The smooth user experience constantly promotes Windows 10 over all other operating systems.
However, many of the users complain about the updates that Windows gives from time to time. While the updates contain security patches and system updates that bring us new features, they sometimes become a problem. Mostly, users face issues with their device sound after updates.
The reasons can be many, mostly being compatibility errors. The drivers updated during the last update might not support your sound System. Or it might be a simple incomplete update.
However, finding the root of the sound problems in Windows 10 can get complicated.
This, in turn, can render your system voiceless, making you incapable of hearing any sounds or play any videos.
Hence, to make your life a tad bit easier, we bring you the guidebook for fixing all your sound problems in Windows 10!
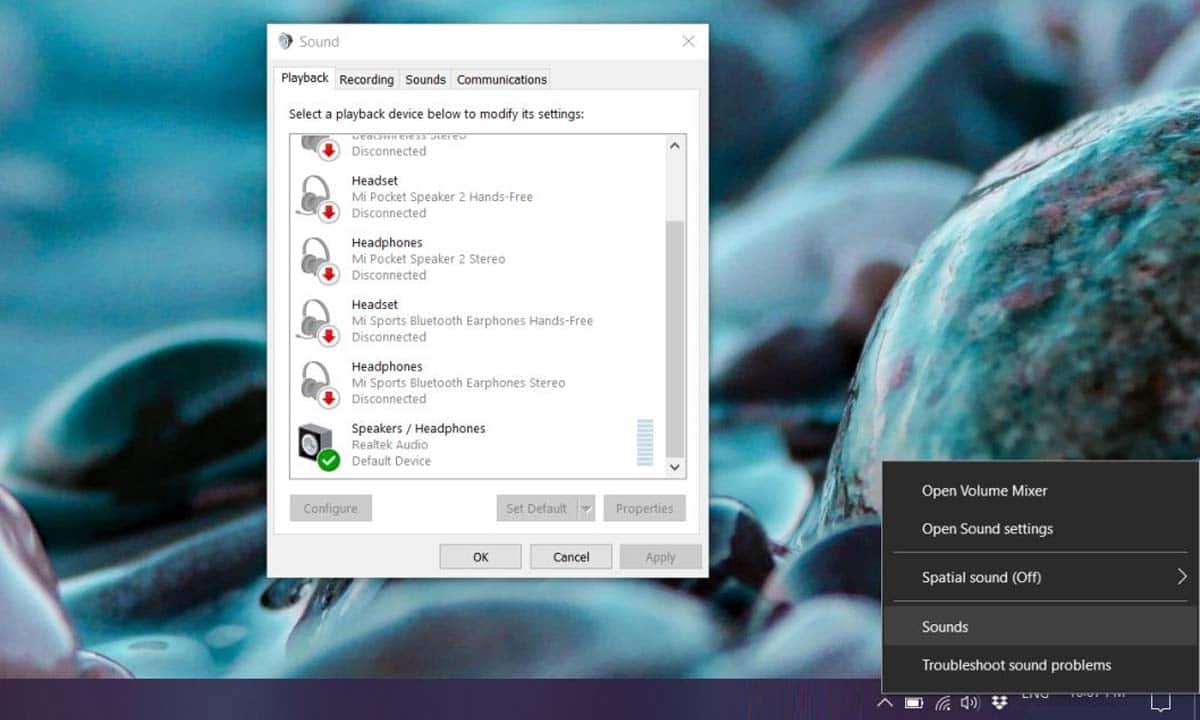
However, before you continue with the below steps to find out and fix the sound problems in Windows 10, do check your output devices as well. If there are many output devices connected to your system, the chances are that the wrong device might have been configured for the sound output. For checking this, simply go to the “speakers” icon on the taskbar.
From there, you will get a list of all the sound output devices connected to your system. You can select the one that you prefer for your sound output, such as speakers or headphones. If your sound problems get sorted, stop here. Else, check the other fixes that are given below!
Audio Troubleshooter
Due to the complaints from its users, Windows has now provided us with a sound troubleshooter itself! The troubleshooter takes care of most of the sound problems you might face in your Windows 10.
Opting for running the sound troubleshooter before you trouble yourself with the other methods is a great idea. This is because the troubleshooter will detect most of the sound problems on its own and fix them. So it is an amazing tool to save you a lot of time and brains!
For running the sound troubleshooter,
- Go to the search bar on your taskbar and search “audio troubleshooter”.
- From the search results, click on “Fix and find problems with playing sound”.
- Click on Next.
- You will get a list of devices that you might want to troubleshoot. Select the device that needs troubleshooting.
- Click on Next.
Alternatively, you can go to the Start menu>Settings. From there, go to system, then Sound. And then click on troubleshoot.
Now let the audio troubleshooter do its job while you can sit back and relax!
If your audio issues still don’t get solved after running the audio troubleshooter, considering the next step.
Check for updates
Often, the sound problems you face might be due to incomplete updates. While your system was getting updated the previous time, it could have unexpectedly shut down, rendering the updates’ incomplete installation. In such a case, check for the updates.
- Go to the Start menu and click on Settings.
- Go to Update & Security.
- Head over to Windows Update.
- Click on “Check for updates”.
- Look for the message that this dialog box shows. If the message says, “You’re up to date”, abandon this tip and move over to the next one. There is no incomplete installation of updates on your system. However, if the message says “Updates are available”, click on Install Now.
- From the list that then appears, select the updates that you want to install and click on Install.
- Once the installation finishes, restart your system. Your sound problems must have been solved.
Check your audio devices after the system restarts. If the problem still persists, go over to the next tip.
Look out for the connections
Mostly, common audio issues get sorted out by the previous two tips. However, if the problem continues, consider checking your connections. This would include the jacks, cables, and cords of your audio devices.
After that, you can try checking the volume levels of the audio devices.
Additionally, make sure that the audio devices and plugged in correctly. Sometimes, if a large number of audio devices are connected to the system, there is a possibility that the devices might get plugged into the wrong jack. Check for any such mismatches.
If your sound problems haven’t gone away yet, move over to the next tip.
Sound Settings
Sometimes, it is all about wrongly calibrated sound settings that might cause you audio troubles.
Right-click on the “Speakers” icon present on the taskbar and click on Open Volume Mixer. From here, you can balance out the audio properties of your sound devices. Make sure that none of them is muted.
Your devices might even have been disabled by mistake, leading to your sound problems. To check for such mistakes,
- Open the Start menu and click on Settings.
- Go to System.
- Head over to Sound.
- From the list, select the audio device you are facing issues with. Now select Device Properties. In this step, you can check the properties of both your input and output devices.
- Check for the Disable checkbox and make sure it is not selected for either input and output sound devices.
This will help you know if your devices were disabled.
If you are still facing sound problems on Windows 10, check the next tip.
Audio Drivers
The drivers of your audio devices might give you some serious troubles if not taken care of. Hence, checking for the audio drivers if you face audio issues is very important.
You can try updating your audio drivers to the latest version. Outdated audio drivers are a common problem when facing audio issues.
You can also try uninstalling the audio drivers. The drivers would get installed again automatically. This would get rid of any faulty installations that might have happened the last time.
You might also try using the generic audio driver provided by Windows. Sometimes, the simplest solutions work wonders, after all!
If you want to update your audio drivers automatically,
- Go to the search bar on your taskbar and search for “Device manager”. Select it from the search results.
- Click on the drop-down arrow beside “Sound, video and game controllers”.
- From the list, locate the device you want automatic driver updates. Right-click on the device and click on Update driver.
- From this dialog box, click on “Search automatically for updated driver software”.
If Windows cannot find an update for your device driver, you can download the same from the manufacturer’s website.
If your sound problems still haunt you, try uninstalling the device driver. For uninstalling the device driver for your audio device,
- Search for “Device Manager” in the search bar on your taskbar. Select it from the search results.
- Click on the drop-down arrow beside “Sound, video and game controllers”.
- Locate the device whose driver that needs to be uninstalled from the menu.
- Right-click on the device and click on Uninstall device.
- Select the checkbox that says “Delete the driver software for this device”. Then click on Uninstall.
- Restart your System.
You can also opt for the generic audio driver offered by Windows. For that,
- From the search bar on your taskbar, search for “device manager”.
- From the search results, select the Device Manager.
- Click on the drop-down arrow located next to “Sound, video and game controllers”.
- Located the audio device that you are facing problems with and right-click on it.
- From the menu, select Update driver.
- Select “Browse my computer for drivers”.
- Select “Let me pick from a list of device drivers on my computer”.
- Select the device whose driver needs help.
- Click on Next.
- Follow the instructions to install the driver by Windows.
Are you still facing sound problems in Windows 10? Go to the next tip.
Default device
Selecting your preferred audio device as the default device might save you from a lot of troubles in the future. In fact, some audio devices need to be set as the default audio device to function properly. For setting the default device,
- Search for Control Panel on your taskbar. From the search results, go to the Control Panel.
- Select Hardware and Sound.
- Go to Sound.
- Go to the Playback tab.
- You can see the list of all available audio devices here. Locate the one that you want to set as the default audio device.
- Right-click on the device.
- Click on “Set as default device” and then click on OK.
Audio still not working? Off to the next tip!
Audio enhancements
If you have audio enhancements, they might cause the malfunctioning of some audio devices and drivers. You can try disabling the audio enhancers and checking if your audio devices work then. For disabling the audio enhancements,
- Search for the “control panel” on your taskbar and select it from the search results.
- Head over to Hardware and Sound.
- Select Sound.
- Go to the Playback tab.
- Right-click on the default device.
- Select Properties.
- Go to the Enhancements tab.
- Click on “Disable all enhancements” or the “Disable all sound effects”, whichever you see depending upon your system.
- Click on OK and try using your audio device.
- Repeat steps 4-9 for the other audio devices connected to your system until you get rid of your sound problems.
Most users reportedly manage to fix their sound problems in Windows 10 by the end of this tip.
If you are not one of them, try the next tips for extra troubleshooting.
Restart Audio Services
Sometimes, something as simple as restarting your audio services can help you with the sound problems you are facing in your Windows 10. To restart the audio services,
- Search for “Services” in the search bar on your taskbar. From the search results, click on it.
- Select each of the services mentioned below:
- Windows Audio
- Windows Audio Endpoint Builder
- Remote Procedure Call (RPC)
- Click on Restart.
Audio Formats
For changing the audio format for your system,
- Please search for the Control Panel and click on it from the search results.
- Go to Hardware and Sound.
- Go to Sound.
- Go to the Playback tab.
- Right-click on the default device and click on Properties.
- Go to the Advanced tab.
- Under Default Format, make the necessary changes to the audio format.
- Click on OK.
Now try using your audio device.
Restart your System
For the newly installed updates to start working on your system, you need to restart your system. Hence, if you just updated your audio device drivers and are facing audio issues, restart your PC. You can also try restarting your system after changing the device driver or uninstalling it.
Alternatively, you can simply opt for updating your drivers and restarting your system automatically. For this, go to the Start menu and click on Power. Select “Update and restart” or “Update and shut down” from the options. Either one of them would install all the updates available and prep your system for running the updates.
Final words
All your sound problems in Windows 10 must be solved using one or the other of the above-mentioned steps. Sound problems are not rare in the case of Windows 10, especially after an update. The audio troubleshooter provided by Windows is a huge help in fixing the nominal problems that most users face while working on their systems.
We recommend using the above tips in the order that they have been mentioned. This is because they have been mentioned in the order of the users’ ease. Why trouble yourself with a more difficult tip when a simpler one can do the trick!
Bid farewell to your sound problems in Windows 10!