If your laptop won’t charge when plugged in, read more on how to fix a laptop that’s plugged in but won’t charge.
Salvation! Everyone i am so glad to invite you to this article i think your laptop is not charging properly or it is plugged in but not charging if you are facing this issue and looking for the solution for this type of people this article is the best reference.
In this article, we are ready to discuss the methods to fix the laptop is plugged in but not charging issue and also explain the reasons behind the problem.
Reasons why laptop is plugged in but no charging issue
The main reason why the laptop is plugged in but not charging issue is
- Defective or damaged battery
- Lack of updated battery drivers
- Sometimes the network connection is not correct
- Applications consume a lot of resources.
- Due to a damaged adapter or cord
- Changes to power settings
Methods to Fix Laptop Is Plugged In But Not Charging Issue
Here in this article we are discussing the methods to fix Laptop is Plugged In But Not Charging Issue
- Remove the battery
- Update battery drivers
- Recheck the connection
- Check power and sleep settings
- Decrease resource usage
Method #1: Remove the battery
Sometimes the laptop is plugged in but the charging problem is not due to faulty batteries or the batteries are damaged, most of the times we face this problem due to faulty and damaged batteries, we are discussing here steps to remove the battery.
If the user’s laptop has a removable battery, then you need to follow the simple steps below in order to fix the problem.
- First, you need to remove all the bolts or screws, then remove the battery.
- Then press and hold the power button for almost 10-15 seconds.
- Now you need to plug in the charger
- Next PC power-on
- You can also reinstall the battery with a new one.
Check the laptop whether it is working fine or not, if not then move on to another method
Method #2: Update Battery Drivers
If you are using any device, be sure to update the system as well as the drivers to avoid system errors and installation errors, updating the drivers will help improve system performance with the latest features,
If you check the battery but do not notice any physical damage, you need to update the battery drivers to fix the problem.
Below we provide the steps to update Windows 10 laptop battery drivers.
- First, you need to press Windows keys + R both on the keyboard to launch the runtime utility.
- Then enter devmgmt. msc and knock Okay and he opens the Device Manager on a separate window.

- Now you need to enlarge the Batteries Category.
- Then right-click on Microsoft power adapter then select Update driver which is available in the context menu.
- You need to follow some on-screen instructions
- After that, you need to repeat the update process for the Microsoft ACPI Compliant Control Method Battery that appears.
- After the update is complete, restart the laptop and check if the laptop is charging properly or not.
Method #3: Double-check the connection
User must remember one thing before starting any process, first you must check the connection, if the laptop is properly plugged into a charger or not, just double check the connection, if the connection is good, then only you are facing the problem then try another method to solve the problem.
Method #4: Check Power and Sleep Settings
One of the effective methods to solve laptop is plugged in but not charging, just check the power and sleep settings, in case any changes are held for any reason, follow the simple steps below below to resolve the issue.
- press the Windows +I keyboard keys to open Settings.
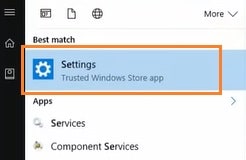
- So choose System.

- Now go to the Power and sleep Category.
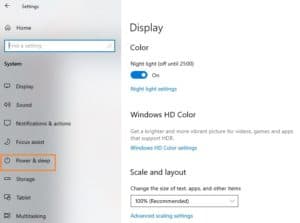
- Then select the Additional power settings under related settings.

- After that click on Change plan settings.
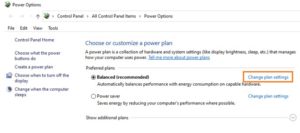
- You can notice the correct settings.
- If you want to make any changes to the settings, just tap Save changes.

If the user is using the Mac, don’t worry, you can easily check the power and sleep settings on a Mac device.
- Initially, on Mac, click on the Apple menu icon.

- Then select System Preferences.
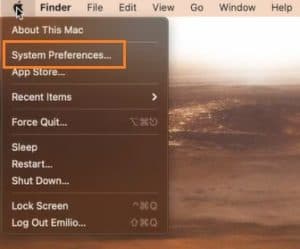
- In this tap on Energy saving.
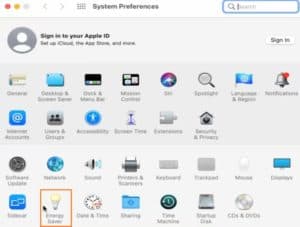
- Now you need to apply the necessary settings.
Method 5: Decrease resource usage
In some cases, the charger is not sufficient or not powerful enough to support the power consumption of the device, in this type of situation, the user can obtain the most powerful charger or simply decrease the use of resources, to This requires the user to follow some simple steps, just turn off/disable unwanted startup applications and randomly terminate tasks that consume a large number of resources.
Follow the simple steps below to manage and reduce resource usage
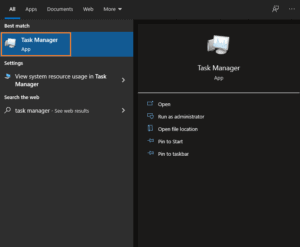
- Launch it Task Manageryou need to use the following methods to open it
The user needs to right-click on the taskbar and select task manager available from the context menu
Or just press the Ctrl+Alt+Esc keyboard keys.
- Every time the Task Manager is opened on the compact view then select the More details option displayed at the bottom left of the window.
- User should go to Default Processes tab, then user can find the processes that have more resource influence, if you want to close them, just right click on the app and choose the Final task option displayed in the context menu.

- Then go to the start located at the top of the Task Manager window, where you can notice all the applications that start with the launch of a computer.
- After that, the user should tap on the app which does not have the Microsoft company declared in the Publisher column.
- The user can also check the Start-up impact column to select applications that have a high impact on the measurement.
- Then tap on the Disable located at the bottom right of the window, you need to change the status of the application to Disabled.
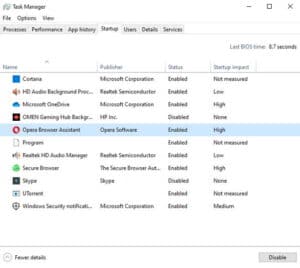
You need to repeat the same steps for a non-Microsoft application that does not require startup, then you need to restart the computer and check if the problem is solved or not.
Frequently Asked Questions?
- issue 1) How can I recheck my charger?
Responnse: You can check the battery in three ways: check for physical damage, check the connector and finally check for overheating.
Sometimes the problem is solved by changing or replacing the charger or the cable can solve the problem
Check for physical damage:
Sometimes both the charger cable and the power adapter are susceptible to damage, such as tears, burnout, breaks and short circuits. Suppose the user can see any kind of sorting, then just replace the affected part to see if the load issue is not resolved.
Check the connector:
Remember that the connector must have a hard or tight connection with the laptop’s charging jack, any spread of dirt particles will cause connection problems,
Check overheating:
Laptops that do not have a cooling system overheat due to heavy use, because of this the battery sensors are misfired, show wrong values, if you found heat during use device, overheating is the reason for the problem.
- issue 2) Is it possible to charge the laptop with a USB C?
Responnse: Suppose the laptop comes with a built-in USB-C port, the user needs to charge the laptop via the USB cable, this only applies when the laptop has the built-in USB-C port, the cable must have the plug adapter, usually the box-shaped plug is shown at the end of the phone charger, now you need to plug it into another socket. Most laptops use the USB-C cable as the main charger for laptops.
Conclusion:
This article clearly explains the repair methods to fix the laptop that is plugged in but not charging problem and also explains the reasons behind the problem.
For people who are looking for methods to fix the problem and also want to know the reasons behind the problem for such type of people, this article is the best reference to know.
Thank you for reading this article, I hope this article is useful for you for more updates and information, visit and follow our site omgeeky