If you are facing Sony Vegas keeps crashing on your Windows 10/8/7, know how to fix Sony Vegas keeps crashing on Windows 10/8/7?
Salvation! Everyone i am so glad to invite you to this article i think your sony vegas is crashing on windows and you are trying to solve the problem and eagerly looking for the different ways to fix the problem so for this guy people, you have come to the right place and this article is very helpful to fix Sony Vegas crashing problem on Windows, you don’t worry about Windows version, these methods are perfectly applicable to Windows 10,8 and 7, so why are you waiting, lets; get into the topic.
In this article, we want to share the reasons for Sony Vegas Keeps crashing issue on Windows 10.8 and 7 and clearly explain the ways to fix the problem, you can easily fix the problem without any difficulties.
We all know that the Sony Vegas is an excellent video editing software which is widely used by so many YouTubers and content creators, it offers unlimited special effects, creative compositing, as well as many advanced image compositing due some bugs, errors the Sony Vegas keeps crashing on Windows.
In this article, we provide complete information to fix the crashing issue.
Reasons behind the Sony Vegas keeps crashing on Windows 10,8,7
The main reasons behind Sony Vegas Keep Crashing on Windows 10,8, 7 are
- Presence of corrupted system files
- Lack of update
- Changes in processor settings
- Enable multi-core rendering
- Adjustments to Sony Vegas settings
- Also due to pirated copy, incompatible video codes, bugs, system requirements and outdated version of Sony Vegas.
Ways To Fix Sony Vegas Keeps Crashing Windows 11
If you want to fix Sony Vegas keeps crashing on Windows 11, there are several ways to fix the problem. Below are the different methods.
- Delete temporary files in Windows
- Set high priority for Sony Vegas
- Change processor settings
- Reset Sony Vegas
- Disable multi-core rendering
- Repair system files
- Change settings on Sony Vegas
Method #1: Delete Temporary Files in Windows
Due to presence of temporary files on Windows, we also face Sony Vegas Keep Crashing on Windows 11, they eat up lots of system resources and slow down system performance and speed along with many reasons problems, so you need to delete temporary files in Windows to fix the problem and free up space on the device.
For this, the user needs to follow some simple steps
- First, the user must press Windows+R keys at once on the keyboard to launch the Run dialog box.
- In this kind %temp% and press Okay button.
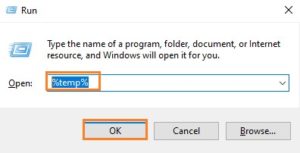
- It displays a pop-up window consisting of temporary files and folders.
- Now you need to press the CTRL+A keys on the keyboard, in order to select all the files in the window.
- Then right click and select the To delete option.
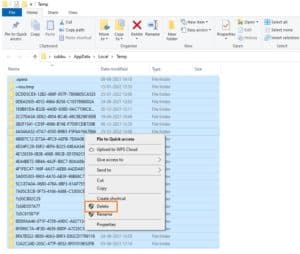
- Finally, restart / restart the PC.
After that, check if the Sony Vegas keeps crashing issue is resolved or not, if not, try another method.
Method #2. Set high priority for Sony Vegas
One of the effective ways to fix Sony Vegas Crashing Windows issue is to simply set Sony Vegas high priority. Microsoft will completely allow users to set the priority of apps installed on the device.
To do this, you need to follow the simple steps below
- Initially, press Windows+R keys at once on the keyboard to open the Run dialog box.
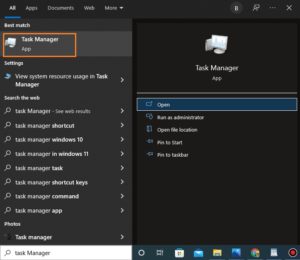
- Then enter task Manager then press the Okay button.
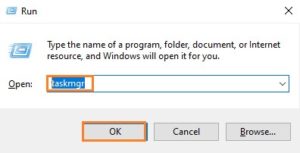
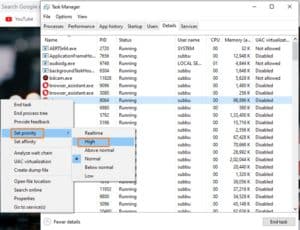
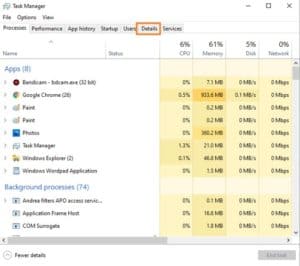
- It will launch the task manager, in which navigate to Details tongue.
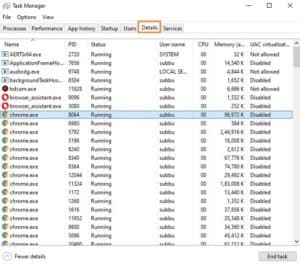
- You need to find Sony Vegas in the list of programs.
- Right click on it and move to the Set priority option and it shows the small menu in this tap on High.
Once you have completed all the steps, just run Sony Vegas and check if the crashing issue is resolved or not.
Method #3. Change processor settings
You can change or modify the CPU settings and then increase/decrease the CPU cores assigned to Sony Vegas to fix the crashing issue on Windows.
To change the processor settings, the user should carefully follow the simple steps below.
- The user must search Task Manager in the search bar and click on the result.
- Then select the Details and find Sony Vegas in the list of applications.
- Now you need to right-click on it and then press Set affinity.
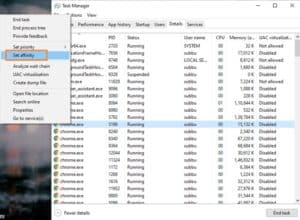
- Then just increase/decrease the number of CPU cores in the Sony Vegas program.
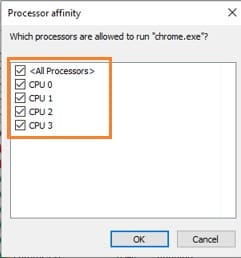
- If you notice an uncheck in this box, try checking all CPU cores.
Finally, check if the crashing issue is resolved or not.
Method #4. Reset Sony Vegas
The crashing issue is also due to corrupted cache memory or some settings which are not supported by the system so to avoid these issues you can reset the sony vegas app as the user needs to follow the steps simple below.
- On the The start menuyou need to search Sony Vegas.
- Then press and hold the Ctrl+Shift keys and press the Vegas icon.
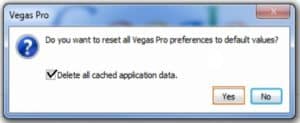
- Then it asks users if they want to reset the app to its default.
- Now you need to check the box i.e. Delete all app data from caches and press the Okay button.
- Wait a few minutes to complete the process.
Method #5. Disable multi-core rendering
If you are still facing Sony Vegas Keeps Crashing on Windows 11, disable multi-core rendering, it solves the problem, but if CPU is not packed, it leads to lack of fire and game crash, so be careful when using this method.
Steps to disable multi-core rendering
- To throw Vegas.
- Then select Choice and click on Video settings.

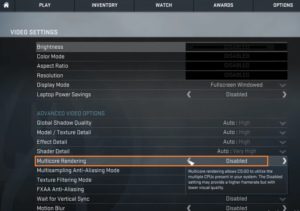
- You must discover the Multicore.
- Then adjust the Enable multicore rendering for playback to FALSE and then disable/disable multicore rendering to FALSE.
Method #6. Repair system files
Due to corrupted files on Windows the Sony Vegas crashes, at first you need to run sfc /scannow command, if it fails to fix the problem then try to use the powerful tool to repair the system , here we use the Reimage to repair system files.
Reimage is one of the powerful and professional system repairs that identifies Windows issues and issues that affect data.
Follow the simple steps below to repair system files using Reimage.
- First, you need to download and install the Reimage on Windows.
- Then launch it and run it.
- It will start system scan to check for corrupted files.
- Wait a few minutes to complete the process.
- After the scan is complete, the user can get a preview of the summary.
If Reimage recognizes missing or corrupted system files or any other issue leading to crashing issue then you should press start the repair to solve the problem.
To note: For Reimage, repair is only available in the paid version and comes with a 60-day money back guarantee when using Reimage. If you have any problems, contact support immediately.
Method #7. Change settings on Sony Vegas
If you try the above methods, you are the only one facing the Sony Vegas crashing issue on Windows 10.8 and 7, then make some changes to its settings in order to fix the problem.
To change the settings on Sony Vegas, the user needs to follow a few simple steps
- First, run the Vegas
- Then select Choice.
- To move to Preferences
- Then navigate to the Video tongue
- After that, the user should increase the Overview Max Dynamic RAM (MB) then deactivate/turn off the GPU acceleration of video processing.
- Finally, you need to save the settings, restart the app and then check the crashing issue is resolved or not.
Frequently Asked Questions?
- issue 1) How do I disable/disable GPU accelerations?
Responnse: Disabling GPU Accelerations will also help to fix Sony Vegas crashing issue, it allows to make some changes to the GPU and all the graphics that offer computer software and CPU as well as free up the GPU and solve the problem.
- On Windows, go to Control Panel on the computer.
- Then select Display then switch to Change display settings.
- Choose now Advanced settings then switch to Troubleshoot tongue
- In the Hardware Acceleration section, you need to set the slider to None.
- After that click on Apply then press the Okay button.
- Finally, restart the computer.
To note: If the user is unable to find the Troubleshoot tab in the advanced settings, i.e. the graphics card on the computer, it means that the device does not support hardware acceleration.
- issue 2) How to import the images via the explorer?
Responnse: If you want to import the footage via explorer, follow the simple steps below
- Select Explore, then find the files through the left navigation panel on the PC. Suppose the user cannot see the Explore button, just press Alt and 1 on the keyboard to activate the Explore window.
- Now you need to right-click on the empty space where the files are displayed and then choose Thumbnails.
- This will fix the crash and also import the images
Conclusion:
This article clearly explains the reasons behind Sony Vegas keeps crashing on Windows 11 and also discusses the various ways to fix the crashing issue, the ways are simple and easily fix the issue.
People who are looking for ways to fix the Sony Vegas keeps crashing Windows 11 and also want to know the reasons behind the problem, for such type of people, this article is the best reference.
Thank you for reading this article, I hope this article is useful for you for more updates and information, visit and follow our site omgeeky