Windows is full of temporary files that help the operating system complete its work. Sometimes these file caches can get corrupted or become very large, which affects the performance of the computer.
If you are running out of memory or if you notice unusual behavior under Windows 11, you can first clear the cache. In this guide, I’ll show you how to clear the cache on a Windows 11 PC or laptop. Before proceeding with the steps, let’s first get some information about the cache and its advantages and disadvantages.
Also read: How to defragment Windows 11 hard drives
What is a cache in Windows 11?
A cache is a reserved location that is used to collect temporary data to help websites, browsers, and applications load faster. Whether it is a computer, laptop or mobile phone, web browser or application, you will find all types of caches.
Caching helps to get data quickly, which in turn helps the device run faster. It acts as a repository that allows you to easily access data locally without having to download it again every time you visit a website or open an application.
Advantages of caches
- Improved performance: When saving local copies of website files, your browser only needs to download the information on the first visit and can upload local files on subsequent visits.
- Save more data: To improve performance, the application caches recent and frequently used data. As mentioned above, this not only makes everything run faster, but in some cases it can also cause the application to work “offline”.
- Storage of data for later use: Downloading files once is very efficient. Having a copy of the file cached eliminates the need for the application to waste time, battery power, and other resources on the second download. Instead, the application just needs to download new or changed files.
Disadvantages of caches
- It can take up a lot of storage space: Basically, a cache is a small repository of files used by an app. However, some caches can get very large and limit the free space on your device.
- This can cause the app to behave badlyy: If there is a problem with the cache file, it can cause the application to display incorrect data, crash, or even crash.
- It can prevent apps from loading the latest version of a webpage or another Data: In theory, the application should only use the cache to view files that have not changed since they were last accessed. However, this doesn’t always work and sometimes the only way to see the latest version of the website or other information is to clear the cache, forcing the application to download everything again.
Should you clear the cache on your Windows 11 computer?
Given the drawbacks of the cache, it makes sense to clear the cache as part of regular maintenance of your Windows 11 PC. In addition to corrupted files, these issues can also affect your computer’s performance if the cache becomes too large or your computer runs out of memory.
The benefits of clearing the cache include freeing up old space on your computer and deleting files that can cause bad behavior.
Unfortunately, clearing the cache also deletes files which are supposed to improve the efficiency of your computer. For example, if you clear your browser’s cache, you will usually have to log in to all of your favorite websites again and lose special adjustment or personalization settings there, including the shopping cart or the contents of the shopping cart.
However, if you are having problems with your Windows computer, it is worth clearing the cache.
Different ways to clear the cache on Windows 11
Clearing the cache in Windows is a good start to troubleshooting your system, improving system performance, and freeing up hard drive space. How to clear the cache on Windows 11.
1. Clear the cache for unnecessary files in Windows 11 using Disk Cleanup
Disk Cleanup is a built-in utility for scanning cache files and other temporary system files that can be deleted.
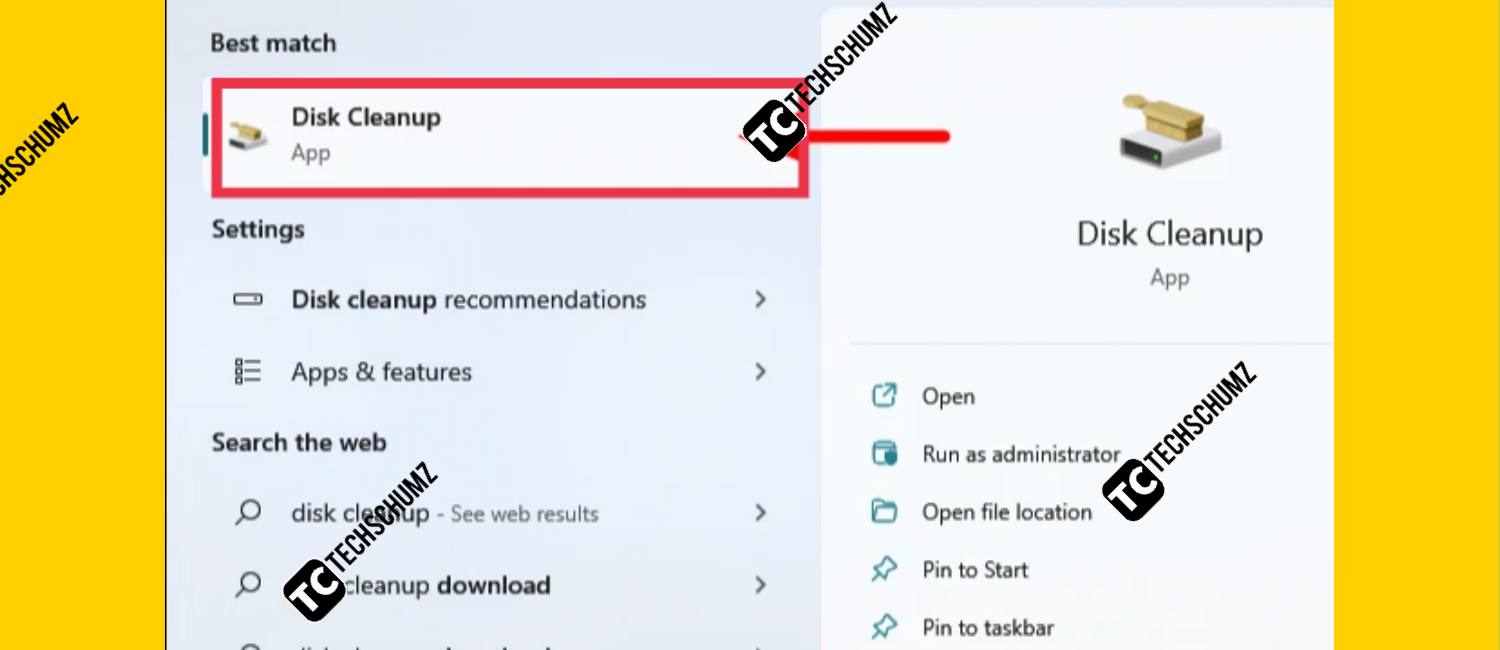
Step 1. To clear the system cache using Disk Cleanup, find the app from the Search menu and click on it to open it.
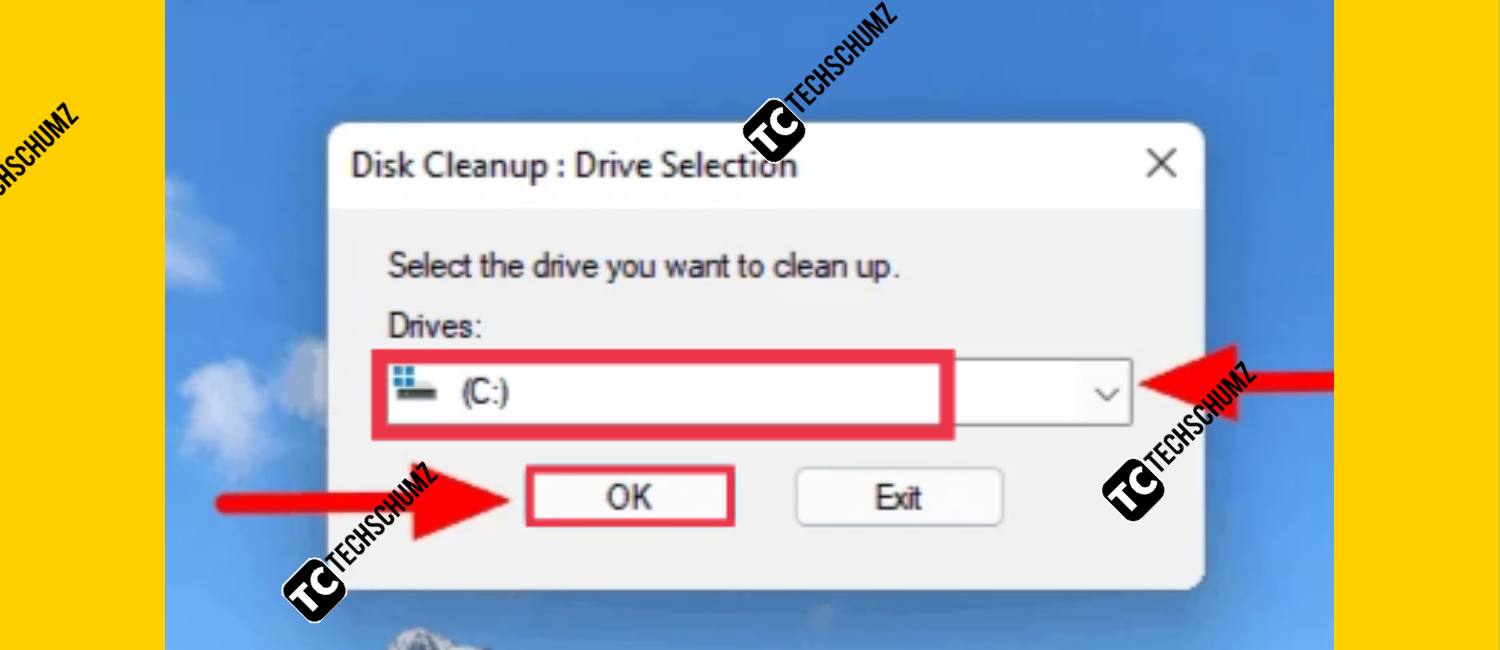
Step 2. Click the drop-down menu, select the drive, then click ‘OK‘ at the bottom.
Step 3. Select the files you want to delete and click ‘OK‘. If a confirmation box appears, select the appropriate answer.
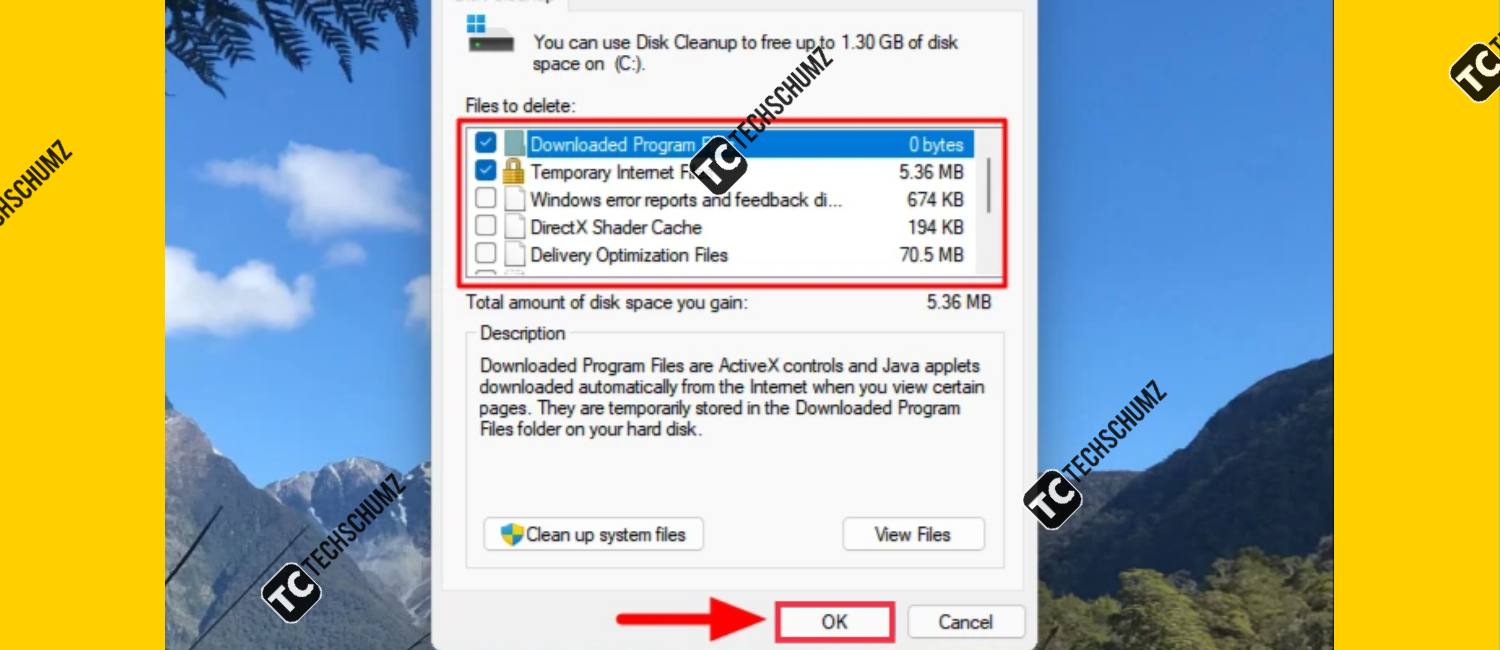
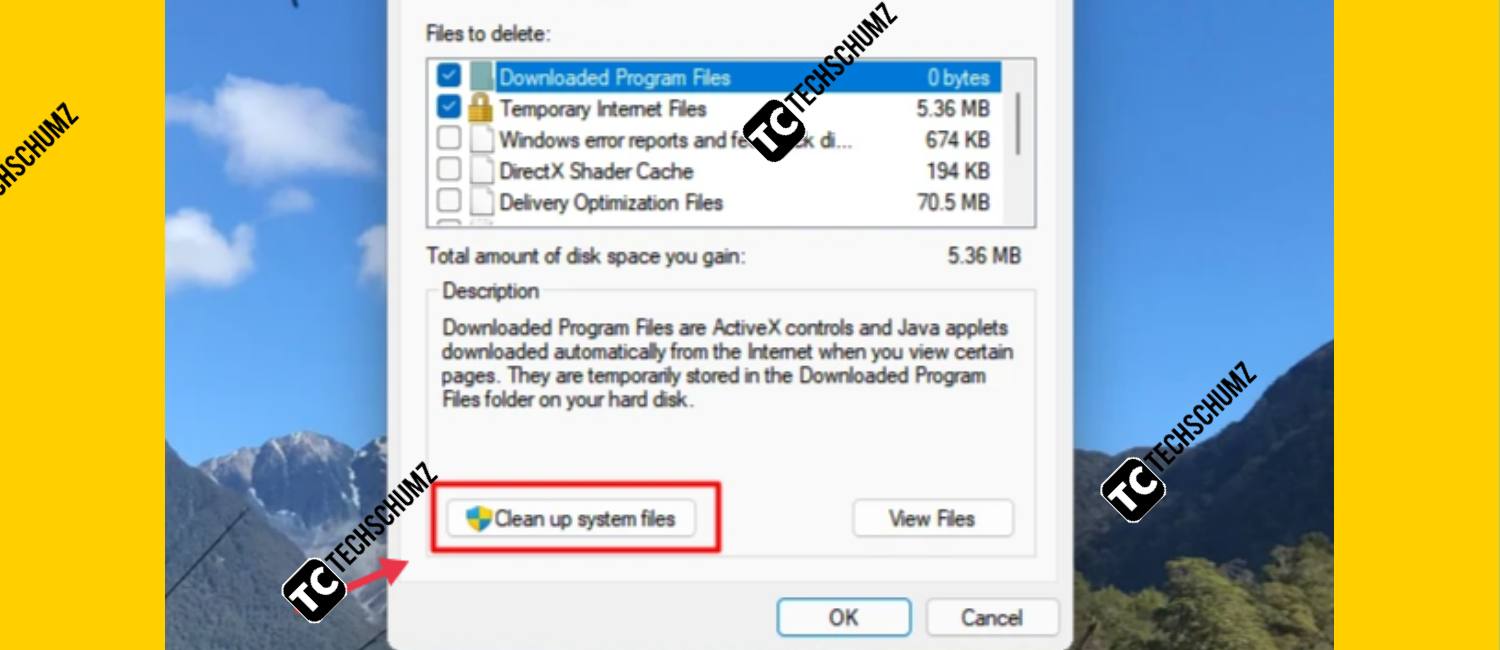
Step 4. To delete the system files, click on the ‘Clean up system files‘select the drive on which the system files are stored.
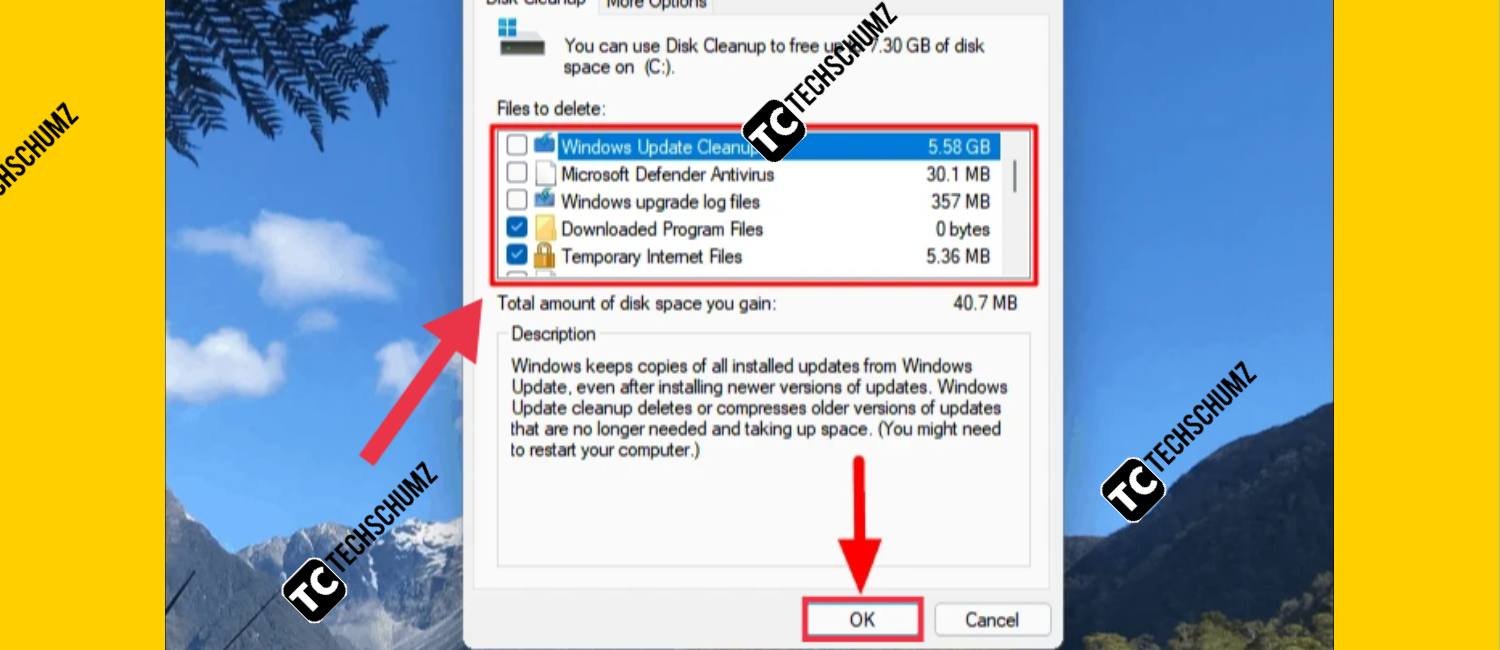
Step 5. Select the files you want to delete and click ‘OK‘. If a confirmation box appears, select the appropriate answer.
2. Delete the temporary files via Settings
These files are created by the application as it performs various tasks. Ideally, they should be automatically deleted after the task is completed. However, in most cases it doesn’t and you will have to delete them manually.
There are certain other temporary files that are scattered around the system but can easily be deleted from Settings.
Step 1. To clear the system cache via the settings, use the shortcut Windows + I to open the Settings app.
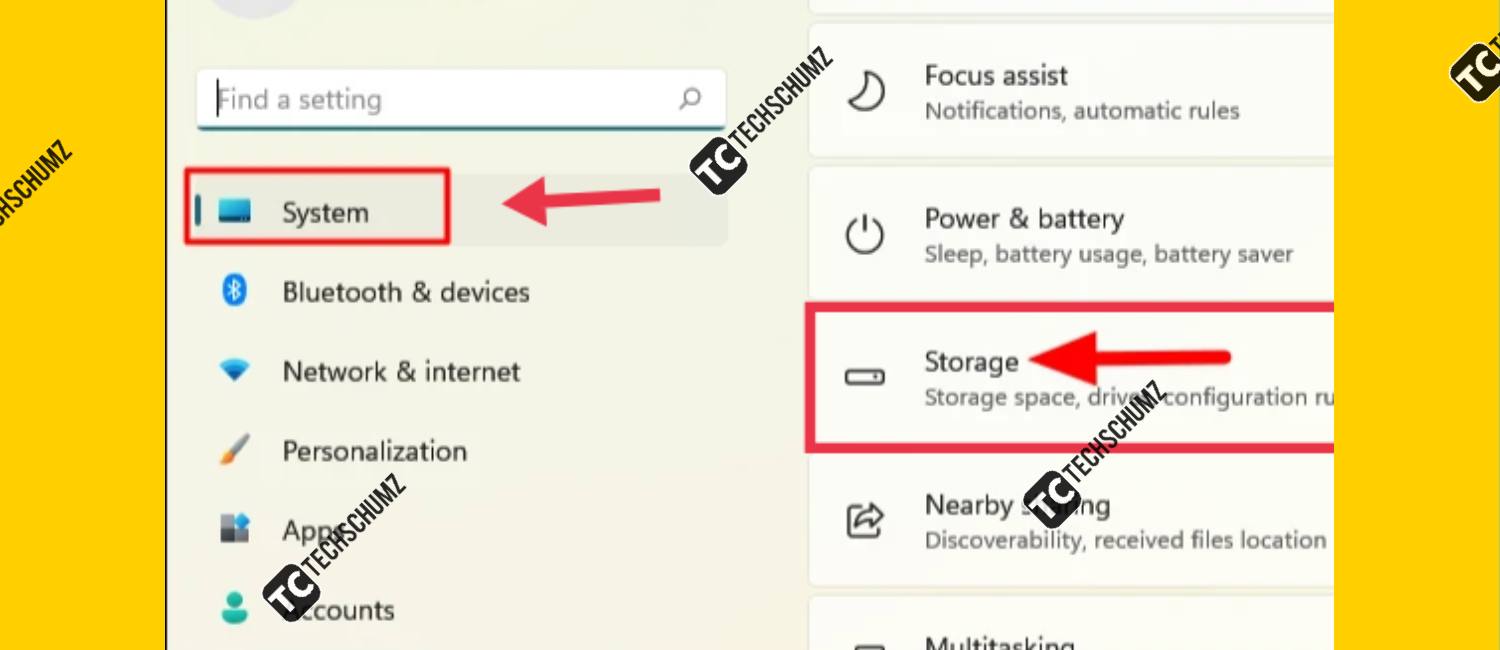
Step 2. On the Settings tab, scroll down to the right and select Storage.
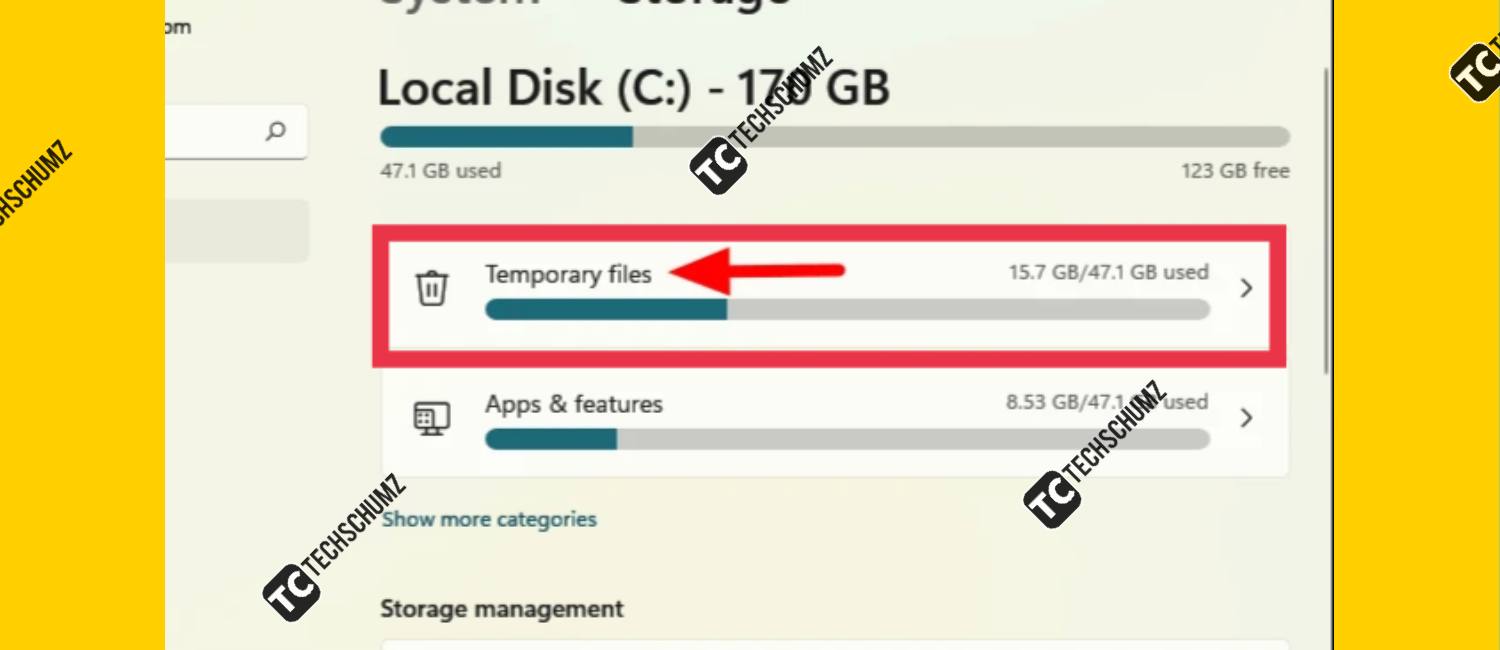
Step 4. The various cache files are now listed. Scroll down and select the files you want to delete and click the “Remove Files” option.
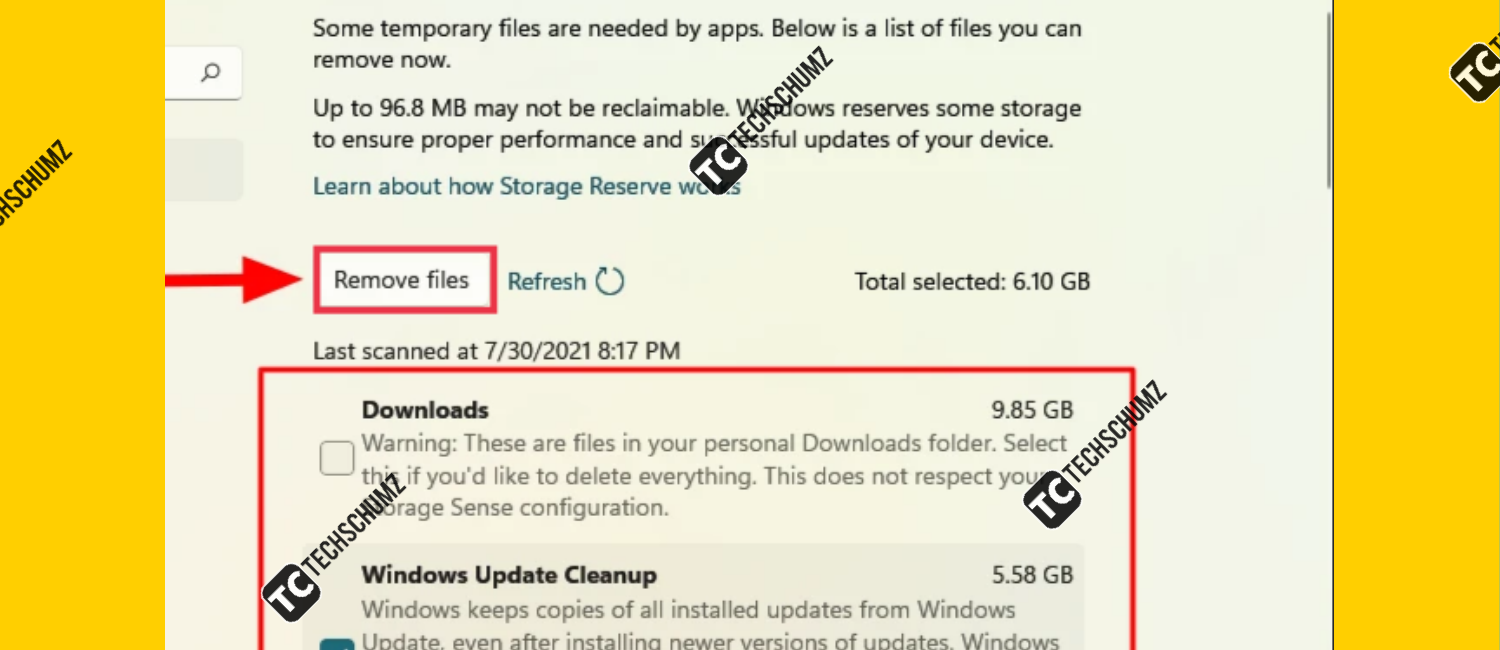
Step 5. Finally, click “Next” in the confirmation box that appears to complete the process.
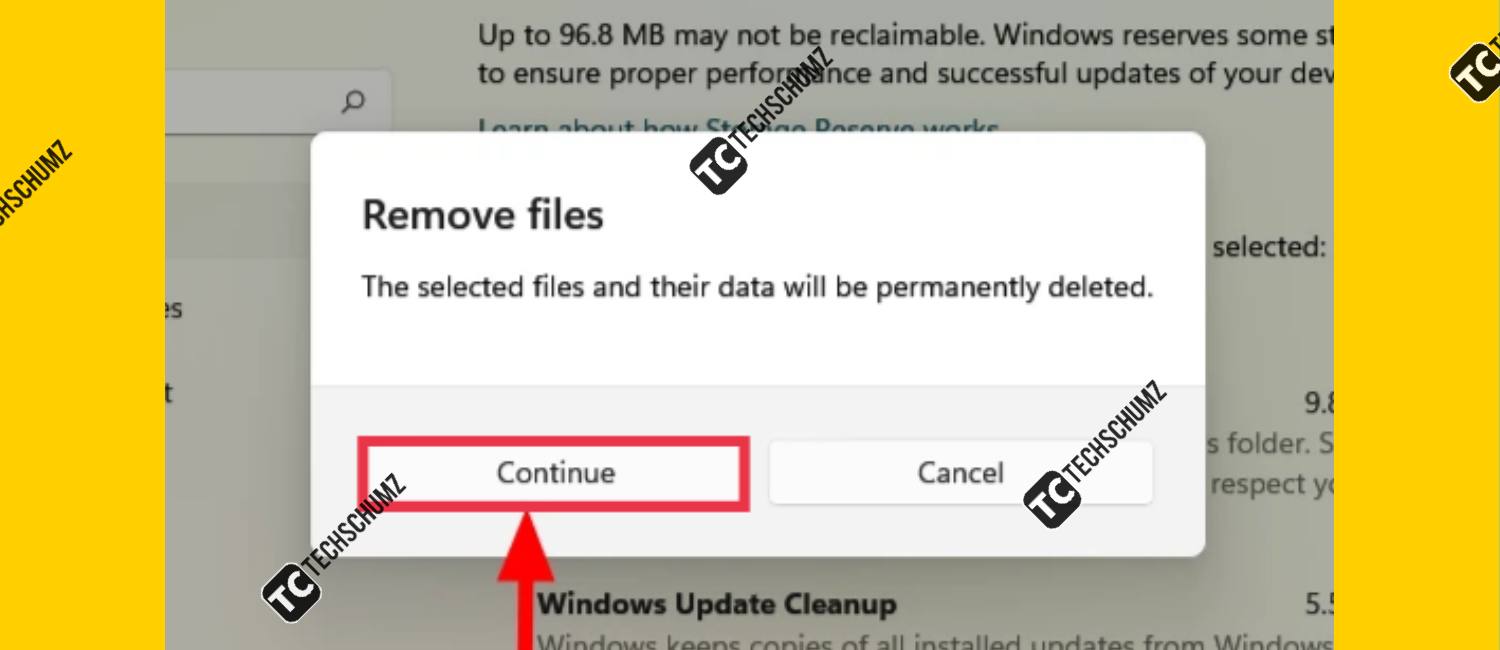
The selected files will now be deleted.
3. Clear your DNS cache on Windows 11
The DNS (Domain Name System) server stores the domain names of the websites visited in the past so that they can be loaded quickly on subsequent visits. Over time, this server can fill up and corrupt the entries, resulting in website loading errors. This is how you can clear the DNS cache.
- Open Command Prompt by looking for it in the Start menu.
- At the command prompt, type the following command and press Enter to clear the DNS cache.
ipconfig /flushdns
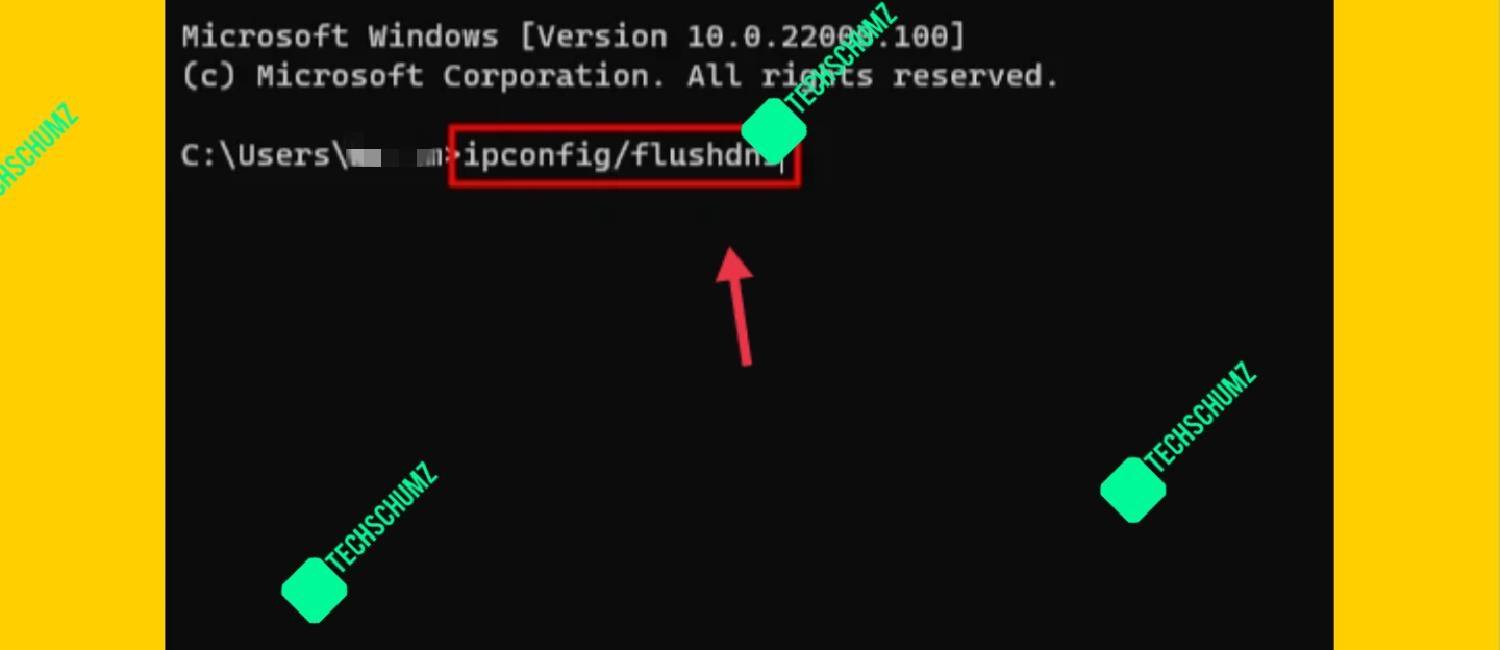
The DNS cache will now be cleared. To learn more about DNS cache on Windows 11, click here.
4. Clear the Windows 11 Store cache
When you access the Microsoft Store and download apps, cache files are created. You can easily delete these files with a simple command. Let’s see how you do that.
- To clear the Microsoft Store cache, press WINDOW + R to start the run command.
- Enter ‘wsreset.exe‘in the text field and press the ENTER Button.
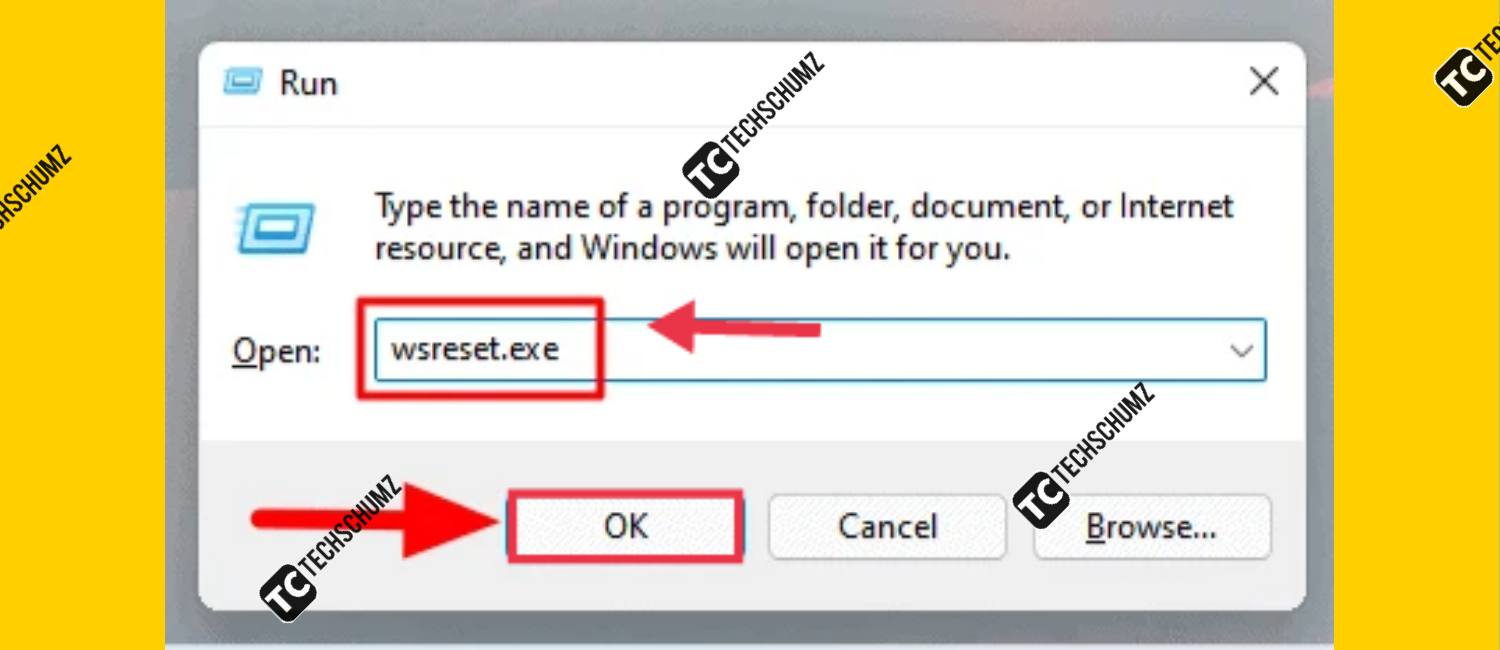
This will open a black window with no text that will disappear once the cache is cleared and the Microsoft Store app is launched.
5. Clear your location cache on Windows 11
You can also delete the location history stored in the system.
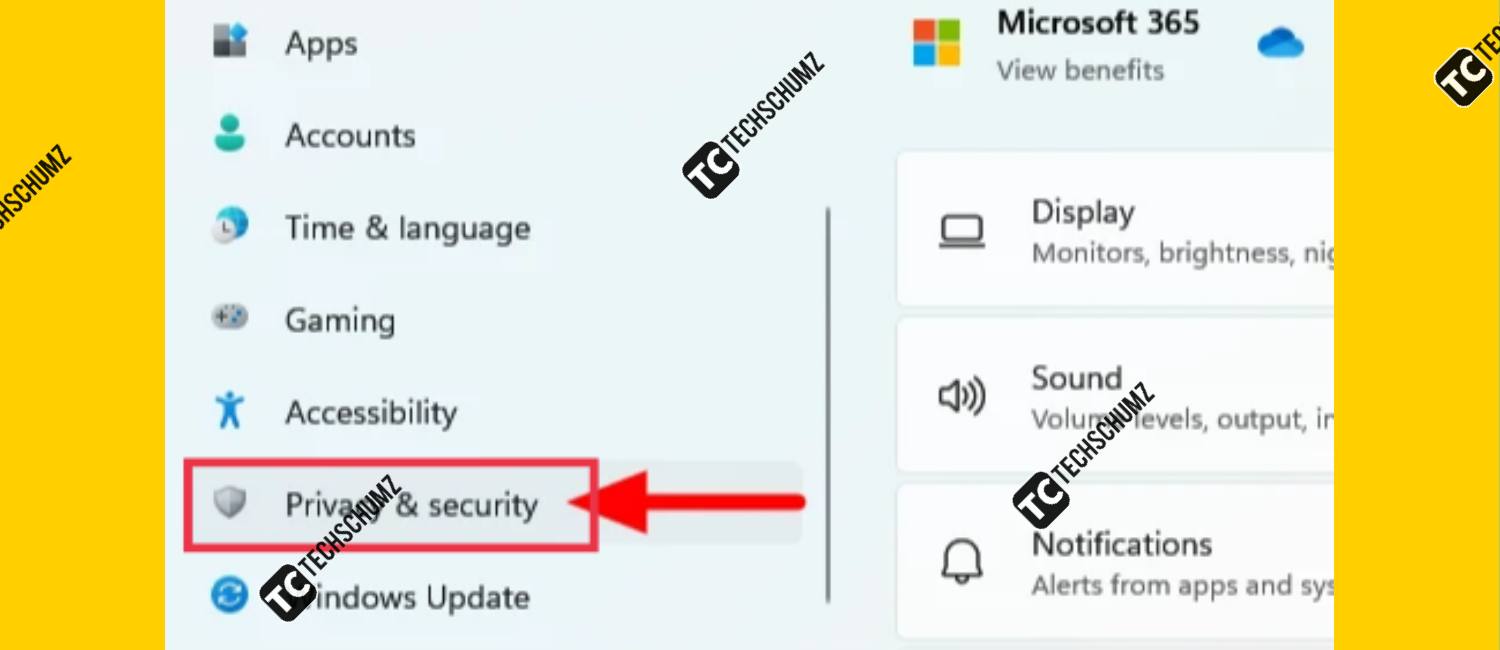
Step 1. To clear the location cache, start the app “settings” with the keyboard shortcut Windows + I and select “Privacy and security‘from the navigation area on the left.
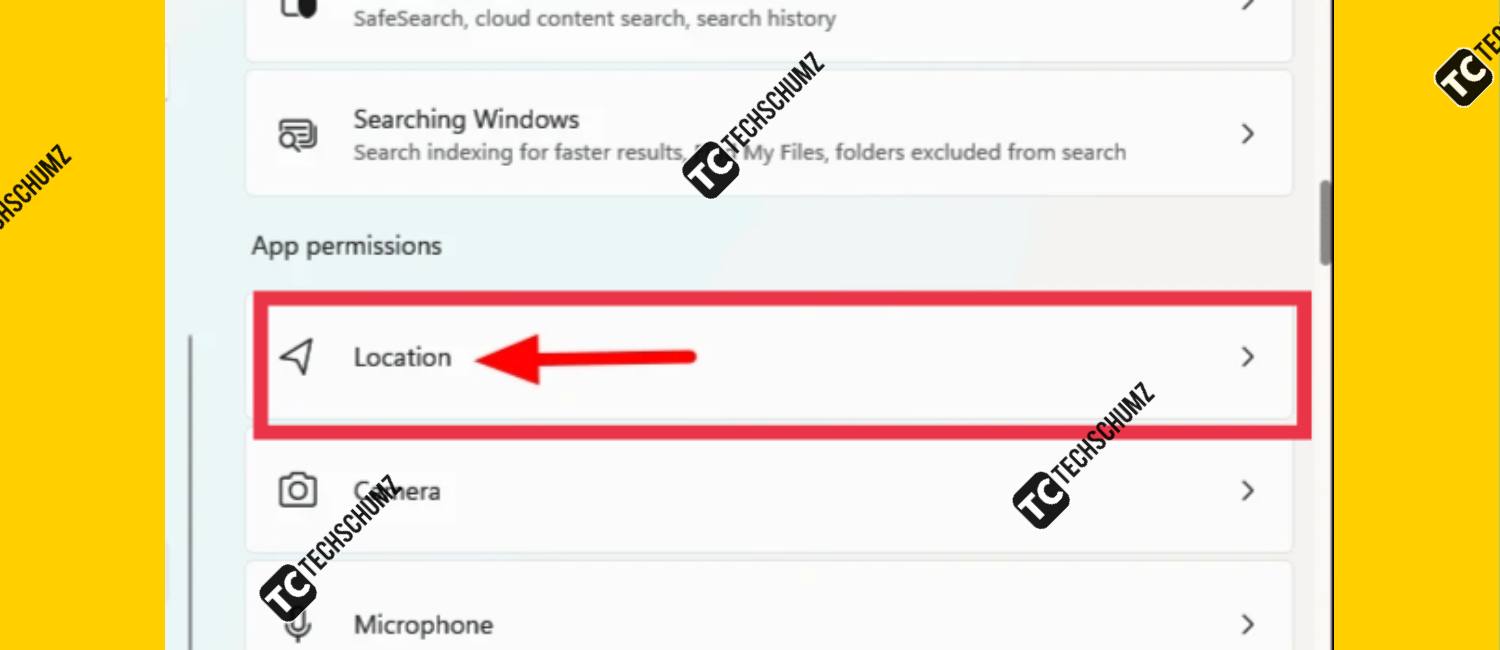
Step 2. Now select the ‘location‘Option under’ Apps Permissions’ on the right.
Step 3. Next, look “Location history” and click on “Clear‘ Besides.
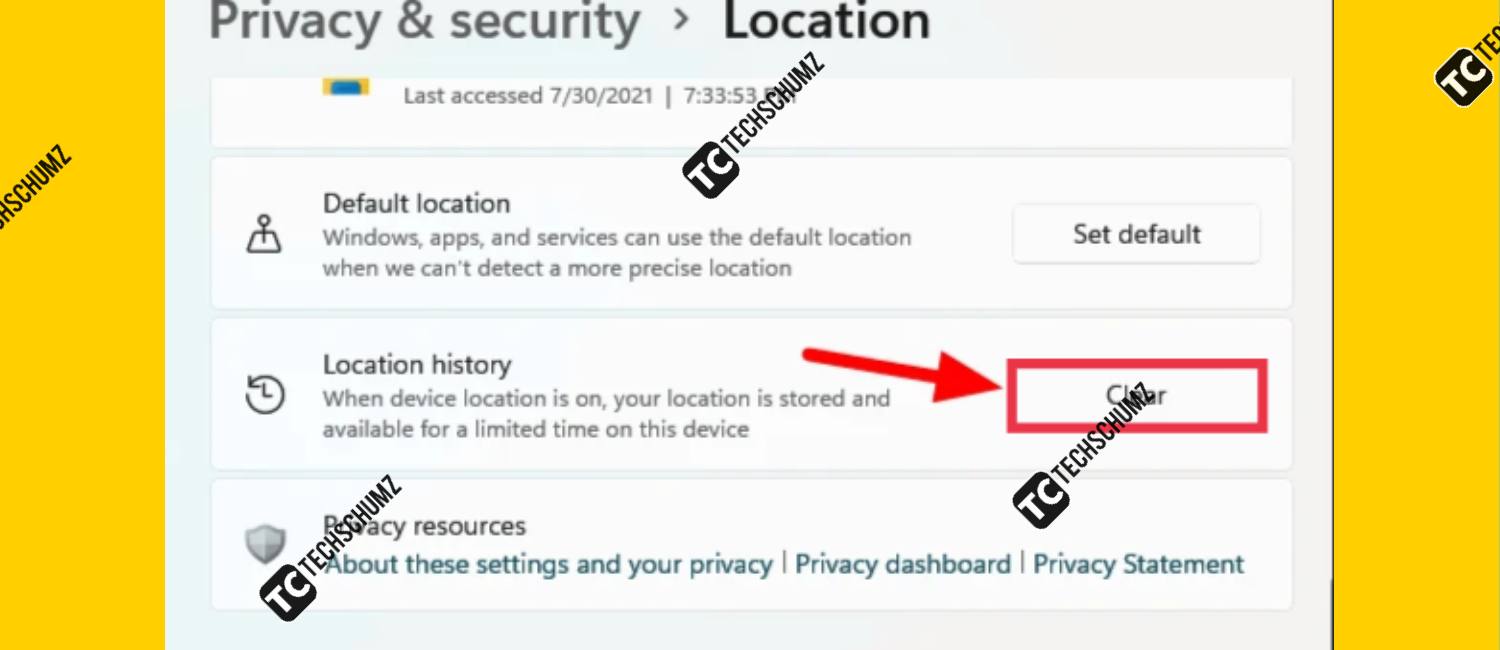
The location activity stored in the system will be deleted.
last words
The above methods are most effective when you want to clear the cache on Windows 11 and free up significant space. These methods are also handy when you encounter a corrupted cache file error, and clearing the cache is a good start for troubleshooting your system and improving system performance.
