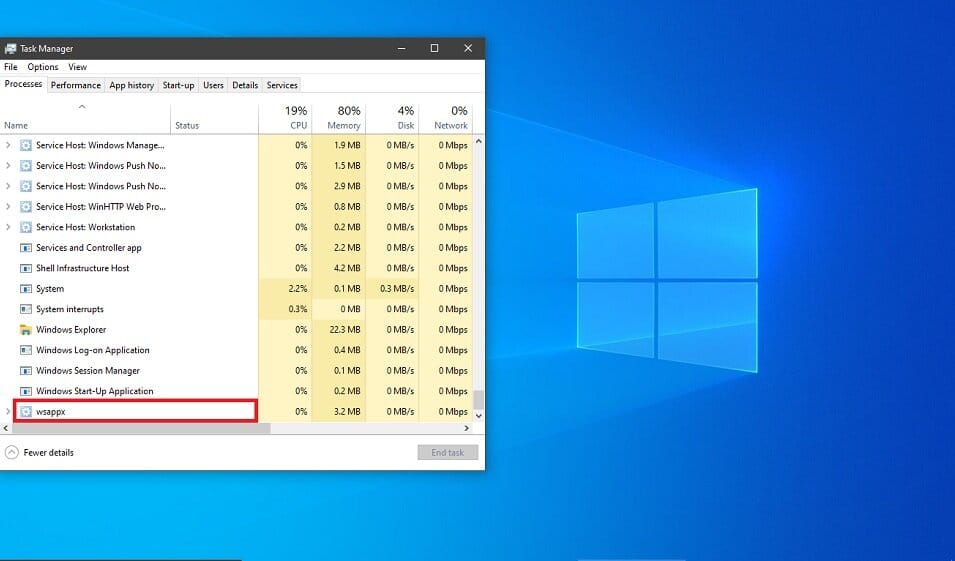
Sometimes while your PC runs slowly on Windows 11, you open assignment supervisor, simply to look a wsappx.Exe or wsappx (2) procedure causing high CPU load. Or even wsappx black display screen takes place to you. But you even haven’t any concept why this wsappx is running on Windows 10.
And at the same time as you amplify this procedure on Windows 11, you can be aware two sub-branches here-AppX Deployment Service (AppXSVC) and Client License Service (ClipSVC) (for Windows 8, it’s far Windows Store Service (WSService) in place of ClipSVC).
The first aspect flashing your thoughts is how you may disable wsappx procedure on Windows 11 in an effort to put off the wsappx.Exe high disk usage or CPU.
This submit will assist you no longer only study what wsappx does and the manner to restoration wsappx problems.
What Is WSAPPX?
WSAPPX is a technique that runs in the background for your Windows 10/eight computer as part of the Windows Store and the Universal app platform of Microsoft. It is used for installations, updates, and uninstallation of Store apps, so after you are executed putting in all updates, you don’t want it. But at instances you may face situations wherein you find that this technique is the use of high disk, CPU or memory.
Now that we’ve determined the solution to “what is wsappx”, let us additionally recognize what reasons wsappx high CPU utilization. But before that, allow us to study the sub-offerings of the wsappx manner.
What is AppX Deployment Service (AppXSVC)?
As the call shows, the AppX Deployment Service is used to deploy Store Apps. AppX refers back to the extension of Windows Platform app packages. Essentially, the AppX Deployment Service (AppXSVC) allows in putting in, uninstalling, and updating Store apps. The provider is generally began with the aid of the Microsoft Store because the computerized updates are became on through default. So, technically, Windows will update save applications within the heritage mechanically and this isn’t feasible without the AppX Deployment Service.
Besides using the Processor assets, the AppX Deployment Service (AppXSVC) additionally makes use of the disk sources with the intention to set up, put off, or replace the Windows apps from the shop. Similar to installation from the Windows Store, the conventional laptop application set up method additionally uses sources. But within the case of installation from the Windows Store, the resources are utilized by AppXSVC whilst in the case of traditional set up, this system’s installer uses the resources.
| Display Name | AppX Deployment Service (AppXSVC) |
| Name of the service | AppXSvc |
| Path | %WinDir%\system32\svchost.exe -k wsappx -p |
| File | %WinDir%\system32\appxdeploymentserver.dll |
| Object | LocalSystem |
However, in a few instances, you may discover this service strolling for your laptop even in case you aren’t the use of the Windows Store utility. This is due to the fact Windows is updating your Store Apps inside the history. This is why you from time to time get to see this procedure going for walks in the heritage while eating your CPU and Disk sources.
What is Client License Service (ClipSVC)?
The Client License Service (ClipSVC) affords infrastructure assist for the Microsoft Store. As the name implies, it tests the licenses for the applications which might be purchased by using the user. Disabling this carrier will bring about the malfunctioning of the packages offered from the Store.
The Client License Service (ClipSVC) is a Windows 10 only service. Besides validating the licenses, it does a number of other things that ensure the proper strolling of the Store apps. However, Microsoft has not special a lot about the other functionalities of this carrier.
| Display Name | Client License Service (ClipSVC) |
| Name of the service | ClipSVC |
| Path | %WinDir%\system32\svchost.exe -k wsappx -p |
| File | %WinDir%\System32\ClipSVC.dll |
| Object | LocalSystem |
What is Windows Store Service (WSService)?
The Windows Store Service (WSService) is Windows 8 exceptional and is meant to offer infrastructure help for Windows Store. This is technically the same as the Client License Service (ClipSVC) present in Windows 10. It is simply that they are named otherwise.
Stopping or disabling the Windows Store Service (WSService) will no longer make certain the right functioning of Windows Store Apps.
| Display Name | Windows Store Service (WSService) |
| Name of the service | WSService |
| Path | %WinDir%\System32\svchost.exe -k wsappx |
| File | %WinDir%\System32\WSService.dll |
| Object | LocalSystem |
Now that we have found out about wsappx and the offerings concerning it, let us now recognize the reason of wsappx excessive CPU utilization and a way to restoration it.
Why Is It Using So Much CPU?
The wsappx service commonly best makes use of a substantive amount of CPU while your PC is putting in, uninstalling, or updating Store apps. This can be because you have chosen to put in or uninstall an app, or due to the fact the Store is routinely updating the apps for your machine.
If you definitely don’t care approximately those covered apps, you can inform the Windows Store no longer to mechanically update your apps. To accomplish that, release the Store, click your user icon on the top right corner of the window, after which choose the “Settings” alternative. Set the “Update apps robotically” slider to the “Off” position.
When you need to update your apps, you can return to the Store, click on your person profile icon, and pick the “Downloads and updates” alternative. This display displays any updates for your installed apps and lets in you to install them.
This answer prevents the wsappx provider from the use of CPU to update apps inside the background, despite the fact that you received’t routinely get the today’s app updates. When you manually replace apps, you’ll nonetheless use system sources like CPU and RAM, however as a minimum you get to pick after they’re used.
Microsoft often updates the apps protected with Windows—consisting of Mail, Movies & TV, OneNote, Photos, and Calculator—so we don’t recommend disabling this option if you use any of them.
How to Fix High Disk Usage In Windows 11
It isn’t an excellent signal to have high disk or CPU usage or high disk usage, this means that there’s little aid left to perform other actions. Everything slows down and laptop can’t responsive unexpectedly. If the issue is due to the procedure Wsappx, you can observe answers beneath to restoration the issue.
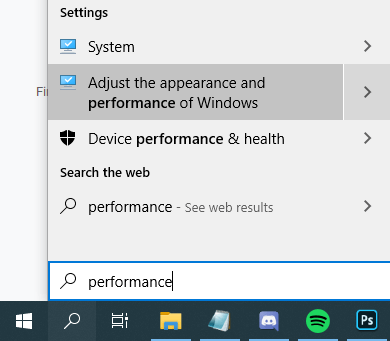
Method 1:- Increase Virtual Memory
The virtual reminiscence size may additionally want to be accelerated. You can do it as follows:
- Type the phrase “performance” in the search bar and pick out the option “Adjust Appearance vs. Performance in Windows.”.
- Select the ‘Advanced’ tab a few of the tabs on the top.
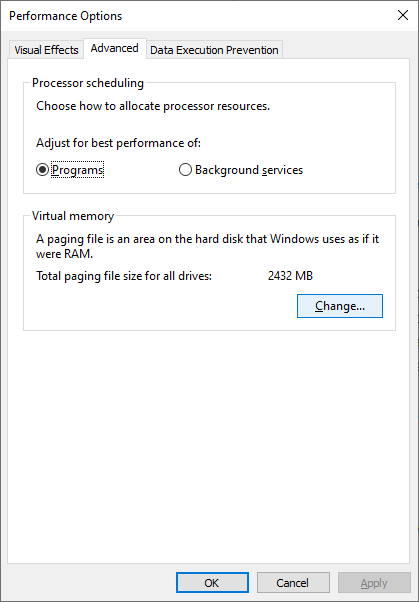
- Go to ‘Virtual Memory’ and click on on ‘Change’.
- Uncheck the ‘Automatically control paging file length for all drives’ checkbox.
- Select the force in which the OS is hooked up and click on on ‘Custom size’.
- Set the ‘Initial size’ equivalent to the scale of your RAM but in MB and the ‘Maximum length’ to double of the Initial length.
- Click ‘Set’ and then ‘OK’ after which restart your tool.
See if this helps.
Method 2 :- Update device drivers manually
It appears that the excessive CPU problem due to Wsappx does now not have path relation with drivers, and but old or corrupted tool drivers certainly reason problems. If your computer maintains seeking to replace drives routinely inside the history and the Wsappx process may flip to unresponsive and occupy CPU sources. In this case, you could try updating device drivers for your own. Here are steps to replace drivers in Windows 10.
Step 1 Right-click at the Start button and select Device Manager option. Then Device Manager window shows up.
Step 2 Locate and amplify Display adapters. Then right-click on the indexed option to pick out Update motive force, as under.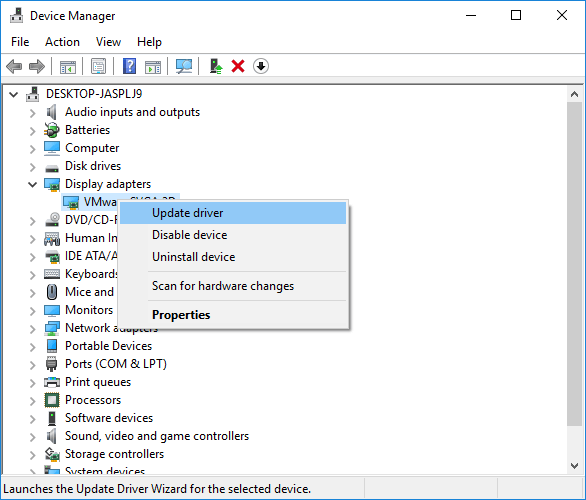
Step 3 On the Update Driver Wizard, pick Search routinely for updated driving force software program and Windows 10 starts offevolved to go looking your computer and the Internet for the today’s driver software to your device.
If Windows fails to discover favored motive force updates, you can try trying to find drivers at the legit website of tool’s manufacturer and you could additionally find clear instructions concerning the way to get them established to your PC.
Method 3:- Disable Windows Store using Group Policy Editor / Registry Editor
Disabling the Windows Store can assist a lot in decreasing disk or CPU difficulty and you could disable it via both Group Policy Editor or Registry Editor.
Disable Windows Store using Group Policy Editor
Step 1 Press Windows brand key and R key at the same time to open Run dialog. Then kind in gpedit.Msc and hit Enter key to open Local Group Policy Editor.
Step 2 In the Group Policy Editor, extend the direction: Computer Configuration > Administrative Templates > Windows Components > Store.
Step 3 Right-click on Turn off the Store utility and pick out Edit from the context menu.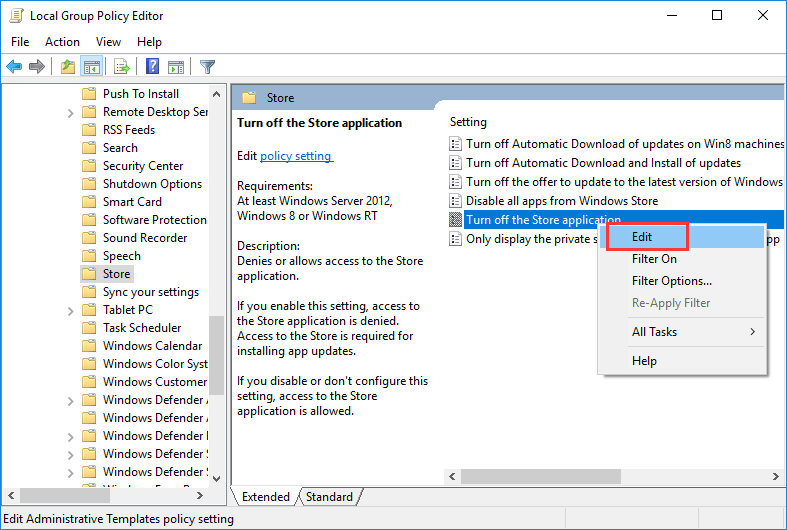
Step 4 Select Enable and click Apply and OK to save changes. Then restart your pc and take a look at if the high CPU or excessive disk usage trouble is constant.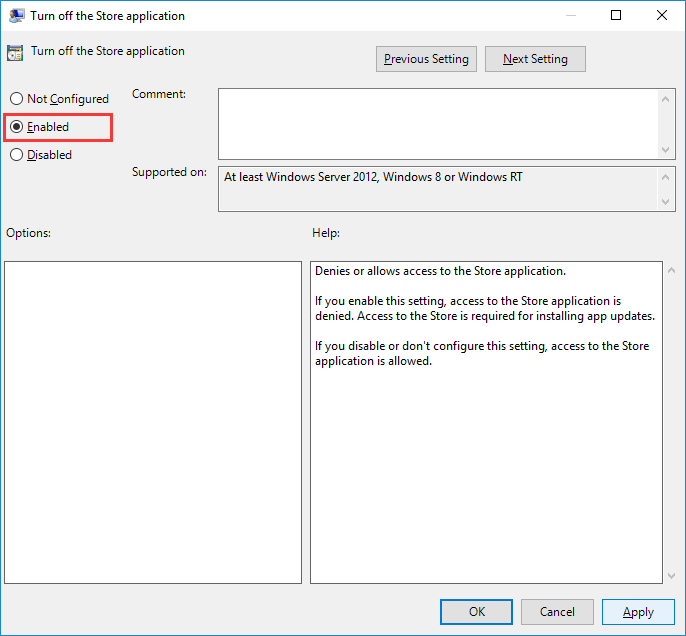
Disable Windows Store the usage of Registry Editor
Step 1 In Windows 10, kind regedit within the looking bar and press Enter key to open Registry Editor.
Step 2 Navigate the location: HKEY_LOCAL_MACHINESOFTWAREPoliciesMicrosoftWindowsStore.
Step 3 Click WindowsStore from the left pane and right-click the empty vicinity of the proper pane to pick New > DWORD (32-bit) Value. Then this newly created key as RemoveWindowsStore.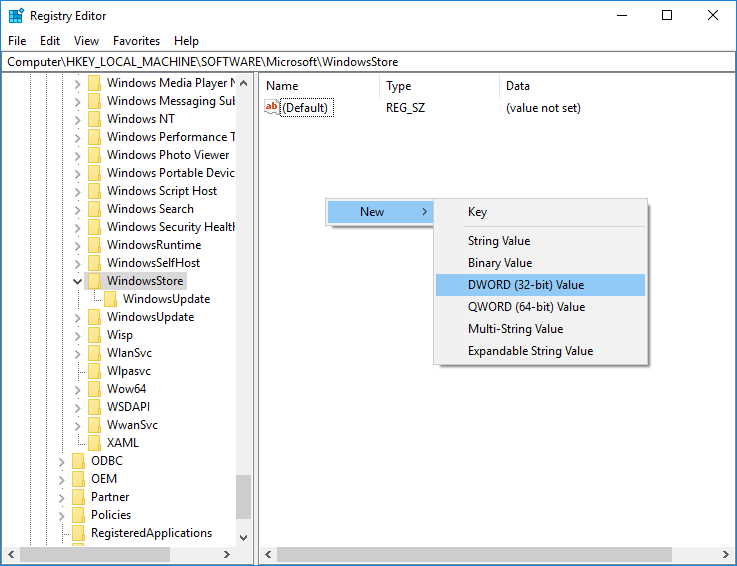
Step four Double-click on the key RemoveWindowsStore and kind 1 underneath the Value statistics. Click OK button after which restart your pc.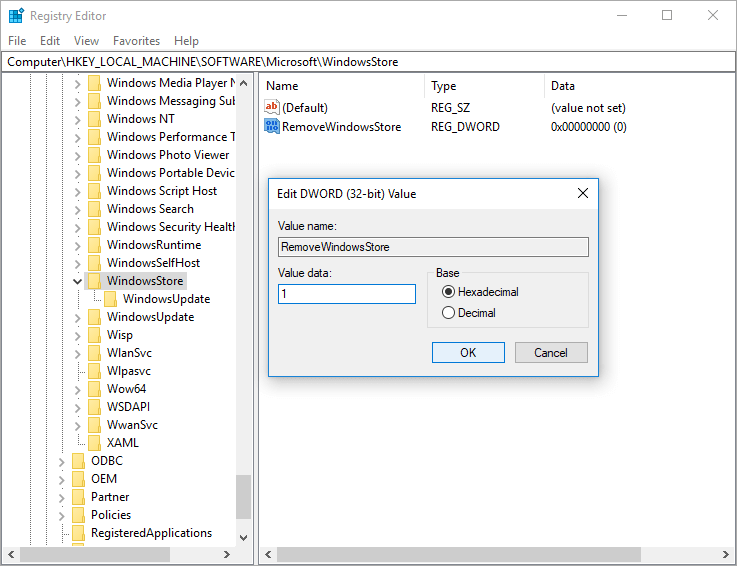
Method 4:- Perform a disk check
A disk take a look at ought to be taken into consideration for those who get this issue recently, for the disk may also include errors or horrific sectors.
Step 1 Right-click on Start menu and pick Windows PowerShell (Admin). Click Yes if you receive prompt from User Account Control.
Step 2 Type command chkdsk.Exe /f /r in Windows PowerShell and press Enter.
Step 3 Type y and press Enter key to verify that the quantity may be checked subsequent time the machine restarts.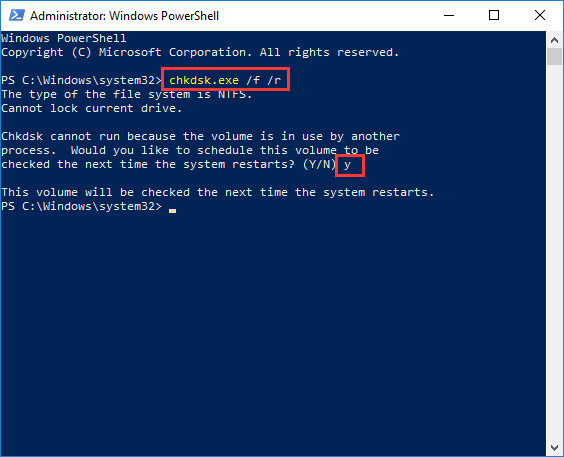
It is really worth noting that disk checking usually takes time to finish, you could no longer have the ability o use your PC for a while in case you restart and run it. You can skip it for the instant and reschedule it when you are convenient. Apart from the usage of machine command to test disk problem, you can use DiskGenius Free Edition to check hard disk. If your pc or hard drive starts offevolved to response slowly, you must experiment disk for terrible sectors. Here is how to check and restore horrific sectors using DiskGenius.
Step 1 Install and release DiskGenius Free Edition shape your laptop, pick the disk you need to check horrific sectors from the left pane and click on Tools > Verify Or Repair Bad Sectors.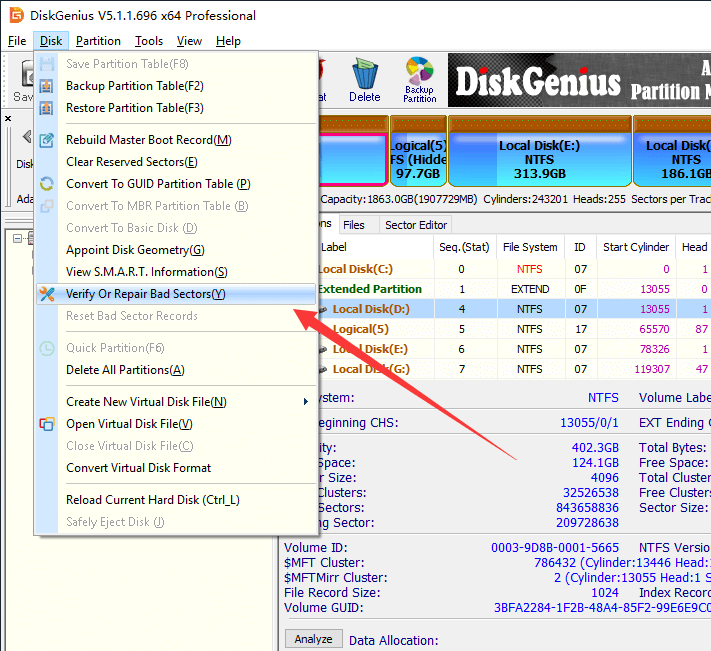
Step 2 Click Start Verify button from the Bad song verification window and DiskGenius starts to scan the disk and test if there may be any horrific zone.
You can click Repair button if DiskGenius reveals out terrible sectors after scanning. Note: terrible area checking is examine-simplest method and does now not damage records, but awful zone repair will harm statistics stored on or close to awful sectors. Thus, you need to returned up documents earlier than seeking to repairing terrible sectors.
Method 5:- Allocate more system virtual memory
If you’re stricken by using excessive disk utilization issue all of the time in your pc, you could try growing the digital memory for the method. To do that, you may comply with steps below:
Step 1- Type overall performance inside the searching box and click on Adjust the arrival and overall performance of Windows from searching result. This opens Performance Options window.
Step 2- Switch to Advanced tab and click Change button beneath virtual memory section. Then on the Virtual Memory window, uncheck the option Automatically control paging document size for all drives, pick out the machine quantity (commonly C: partition) and click on Custom length option, as follows.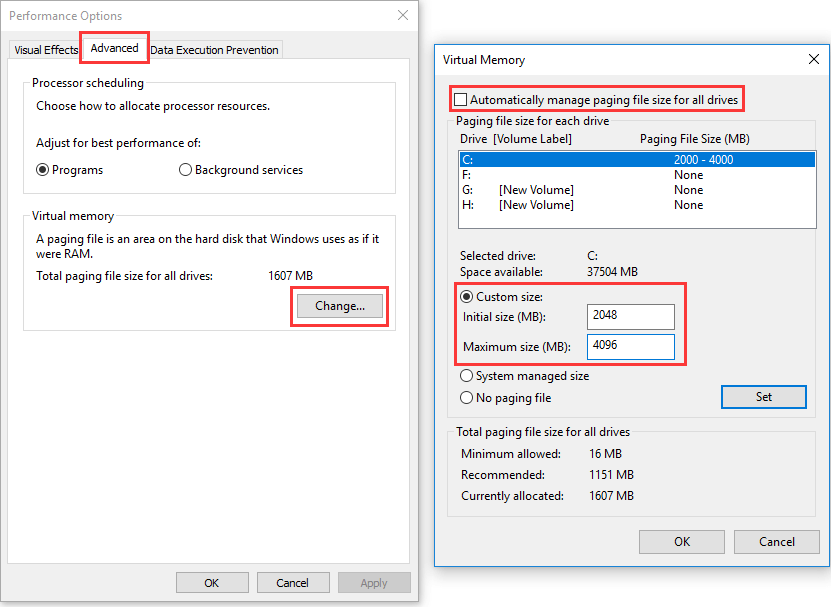
Step 3- In the box for Initial size (MB), input the price equal to the scale of your RAM and enter the double of your RAM in Maximum length (MB) container. Then click on Set and OK to save adjustments and restart your pc.
Method 5:- Change the value of AppXSvc in Registry
Jerry Shelton adds below in the comments:
Open Registry Editor and navigate to:
HKEY_LOCAL_MACHINE\SYSTEM\ControlSet001\Services\AppXSvc
In the right panel, change the value of Start to 4.
Restart the computer.
The following are some of the questions that we hold hearing loads from humans on exceptional net forums.
What is wsappx service in Windows 10?
The wsappx is a technique related to Windows Store running on both Windows 8 and 10. It includes separate history services wherein the AppX Deployment Service (AppXSVC) is commonplace for both Windows 8 and 10. The Client License Service (ClipSVC) then again is a Windows 10 one-of-a-kind while Windows Store Service (WSService) may be visible on Windows 8 by myself.
What is the motive for Wsappx high CPU use in Windows 11?
The Wsappx excessive CPU use is due to the historical past offerings particularly AppX Deployment Service (AppXSVC), Client License Service (ClipSVC), Windows Store Service (WSService). These are the vital services for the smoother walking of the Windows Store.
How to restoration wsappx high disk use in Windows?
The wsappx excessive disk use in windows is due to a heritage service known as the AppX Deployment Service (AppXSVC). It is started at some stage in the set up, uninstallation, and even as updating the apps from Windows Store. This usually causes wsappx excessive disk use in Windows.
We desire that this newsletter changed into in a position that will help you troubleshoot the wsappx procedure inflicting high Disk/CPU usage on your computer. If you ever run into any troubles with the manner in the future, make sure to come back to our web page and attempt to apply a special restore.